Advertisement
Quick Links
Advertisement

Related Manuals for Heusinkveld Sim Handbrake

Summary of Contents for Heusinkveld Sim Handbrake
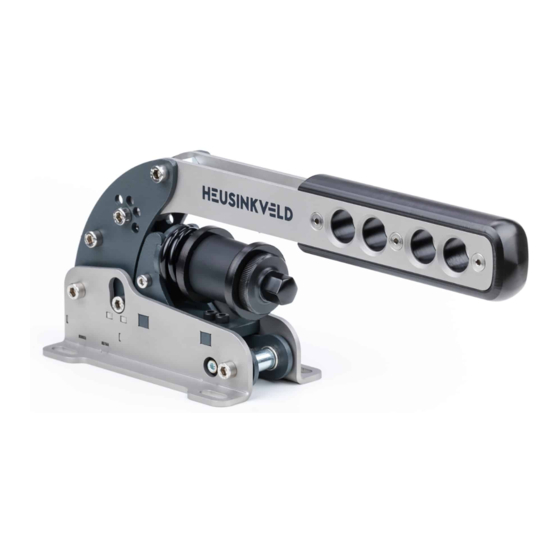
- Page 1 Sim Handbrake product manual version 1.0...
- Page 2 Congratulations on acquiring a Heusinkveld Sim Handbrake! We hope you will enjoy this top-of-the-line racing simulator product for many years to come.
- Page 3 • Adapter plate This is the manual for the Heusinkveld Accessory box, which contains: • USB cable Sim Handbrake. We advise you to read • Hex key tool it thoroughly in order to get the most • Elastomer springs enjoyment out of your handbrake.
- Page 4 Initial setup • The base can be mounted in a horizontal or vertical position. • The lever can be mounted in a horizontal or vertical position (relative to the base). In this section we’ll explain how to mount Changing the orientation of the lever the handbrake to your rig and make fine By default the lever is in a horizontal position.
- Page 6 Mounting the handbrake to your simulator If you have determined the general position of the handbrake, you can decide on how to mount the handbrake to the simulator. There are 2 options for mounting the handbrake to your simulator: 1) Using the 4 holes on each corner of the base to mount the handbrake directly to your simulator.
- Page 7 Yaw adjustment on the adapter plate The adapter plate has a 22,5 degrees yaw adjustment. Adjust the yaw of the handbrake by choosing different holes to bolt the adapter plate to your simulator.
- Page 8 Fine-tuning the position of the lever There is also an option to fine-tune the angle of the lever. In the vertical position you have 26 degrees of freedom. In the horizontal position you have 19,5 degrees of freedom (the lowest position can’t be used when the lever is horizontal).
- Page 9 Connecting the electronics We’ve provided a USB-cable with the handbrake. The controller board of the handbrake is integrated inside the base. One side of the USB-cable can be plugged into the handbrake. The other side should be connected directly to your pc. Please make sure there is always a bit of slack in the cable.
- Page 10 The following adjustments are available: Principle of operation • Resistance of the main elastomers (overall Your Sim Handbrake is force based. The harder you resistance). pull, the higher the signal output to the simulator • Travel on the metal coil spring.
- Page 11 28 mm soft rubber (softest option) 28 mm hard rubber (default) 19 mm hard rubber (hardest option)
- Page 12 The top stack has the lowest resistance. The bottom Please note that changing the elastomer does stack has the highest resistance. By default your not change the amount of force required to reach handbrake is set up with a medium resistance. maximum output on the handbrake.
- Page 13 Adjusting the travel on the metal coil spring Removing the metal coil spring Your Sim Handbrake is fitted with a metal coil spring. If you don’t want to to use the metal coil spring, you This metal coil spring simulates typical handbrake have the option to remove it completely.
- Page 14 SmartControl also includes a calibration wizard. heusinkveld.com. Click on Support (top bar). Scroll Because your handbrake has been pre-calibrated to Sim Handbrake. Click on Download SmartControl. during assembly, calibration is not required Save the file and run from a folder of your choice.
- Page 15 before it registers output. The effect of your deadzone Handbrake output mapping setting can be checked in realtime in the green A key feature of SmartControl is the ability to set vertical signal output bar. a custom signal output map for your handbrake. Traditionally race simulator controller output has had Handbrake force setting a one-on-one sensitivity in relation to the handbrake...
- Page 16 Use case 1: Handbrake curve on a low grip surface. Use case 2: Handbrake curve on a high grip surface. Rear wheels tend to lock up earlier on low a low grip Rear wheels tend to lock up later on a high grip surface surface such as gravel (for example at 50% handbrake such as tarmac (for example at 80% handbrake output).
- Page 17 Use case 3: Immediate lock for drifting In drifting competitions instant lock of the rear wheels may be required. By setting a very aggressive output curve, instant lock can be achieved at even the slightest pull at the handbrake lever.
- Page 18 1 and 2 per car in order an in-game method to calibrate the handbrake. In for your SmartControl adjustments to function order for the Sim Handbrake to function correctly in correctly in iRacing. iRacing, you must do the following:...
- Page 19 Good to know All profiles are saved relative to your personal calibration values. This means that you can exchange profiles with fellow Sim Handbrake owners and apply them without re-calibrating. Profile changes are applied directly onto the Sim Handbrake controller board. If your simulator...
- Page 20 Preventive maintenance Recommended lubricant The Sim Handbrake has been designed to not require If you do feel the need to lubricate parts of your any preventive maintenance. All pivot points contain handbrake, the recommended lubricant is PTFE Dry self-lubricating bearings and the elastomers have Spray.
- Page 21 Please take note of the following when using our pedals. General product description and intended use The Sim Handbrake is a sensor-based handbrake system with a lever that can be connected to a computer for use in a driving simulator.
- Page 22 Recycling & environment The packaging of the Sim Handbrake is If you are unsure how to responsibly recycle the product, you may always send it back by mail to made out of paper and cardboard where Heusinkveld. possible. Please use the appropriate paper...
- Page 24 Proud supplier of...
Need help?
Do you have a question about the Sim Handbrake and is the answer not in the manual?
Questions and answers