Advertisement
Quick Links
Advertisement

Related Manuals for Westbrook Trailers 48-048-KO8


Summary of Contents for Westbrook Trailers 48-048-KO8
- Page 1 Assembly Manual 4’ x 4’ - 4’ x 6’- 4’ x 8’ Galvanized Kit Trailers Carefully read and follow the assembly instructions in this manual. Before using the trailer, carefully read the owner’s manual. Save both manuals for future reference. www.westbrooktrailers.com...
- Page 2 Kit Trailer Assembly Manual...
-
Page 3: Safety Information
Congratulations on the purchase of your kit trailer. Thank you for choosing Westbrook. Safety Information • It is important to read and understand all the instructions. Failure to follow all assembly instructions may result in serious injury. • The edges of the trailer frame can be very sharp. To prevent injury wear safety gloves (included) during assembly. - Page 4 Step 2 - Hardware Using the pictogram and the table below, make sure you have all the hardware and fasteners required before you begin assembling the trailer. ITEM # DESCRIPTION 4’ x 4’ 4’ x 6’ 4’ x 8’ 500814 3/8-16 U-BOLT 501049 3/8-16 X 3/4”...
- Page 5 Hardware Item#501049 Item#501036 Item#501023 Item#501024 3/8-16 x 3/4 3/8-16 x 3/4 3/8-16 x 2-1/2 3/8-16 x 2-1/2 Hex Flange Bolt Carriage Bolt Hex Bolt Hex Bolt Item#500814 3/8-16 U-Bolt Item#501031 3/8-16 Nylon Insert Locking Nut Item#501033 3/8-16 x 1-1/2 Hex Bolt (full thread) Item#501032 3/8 Flat Washer If your kit includes stake...
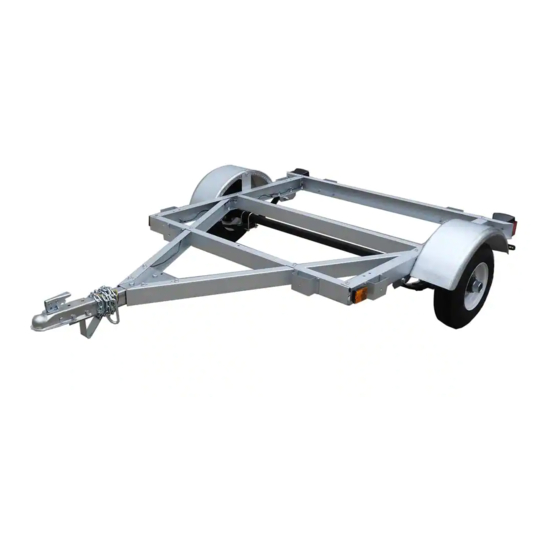
- Page 6 500300 4’ FRONT PASSENGER SIDE CHANNEL (4X8) 500301 4’ REAR PASSENGER SIDE CHANNEL (4X8) 500272 CONNECTION CHANNEL (4X8) 4’ x 4’ - refer to figure 2A • Model: 48-048-KO8 • GVW: 1000 Lbs. • Payload: 850 Lbs. • Dimension: 4’ x 4’...
- Page 7 4’x 4’ Kit Trailer Frame - Figure 2A (If your trailer kit includes stake pockets, please refer to page 18 prior to assembly) Loosely secure the frame in the numbered sequence below. AT THIS POINT DO NOT TIGHTEN Secure the top of the channel using item #501033 & 501031 and the bottom using item #501049 & 501031 •...
- Page 8 4’x 6’ Kit Trailer Frame - - Figure 2B (If your trailer kit includes stake pockets, please refer to page 18 prior to assembly) Loosely secure the frame in the numbered sequence below. AT THIS POINT DO NOT TIGHTEN Secure the top of the channel using item #501033 & 501031 and the bottom using item #501049 & 501031 •...
- Page 9 4’x 8’ Kit Trailer Frame - Figure 2C (If your trailer kit includes stake pockets, please refer to page 18 prior to assembly) Loosely secure the frame in the numbered sequence below. AT THIS POINT DO NOT TIGHTEN Secure the top of the channel using item #501033 & 501031 and the bottom using item #501049 & 501031 •...
- Page 10 Step 3 - Tongue Assembly • Gather the components below and layout as illustrated in figure 3A • Slide each tongue channel (Item#500527) into the front frame channel • Loosely secure the top tongue channel using the hex bolt & nut, and the bottom using the hex flange bolt and nut*** AT THIS POINT DO NOT TIGHTEN*** •...
- Page 11 Step 3 - Tongue Assembly • Feed each wire of the wire harness between the tongue channel and the cut outs on each side of the connection bracket. (FIGURE A) • Feed the yellow and brown on the driver’s side •...
-
Page 12: Step 4 - Axle Assembly
Step 4 – Axle Assembly • Place the slipper spring (500809)on each end of the axle (500047) making sure it is nested in the hole of the axle bracket. • Put the U-bolts (500814) through the mounting plate and secure using item #501031 for both springs. The axle sup- port plate (500259) has slotted holes and should runs the length of the leaf spring. - Page 13 Step 5 – Mount the Axle • Place the leaf spring mounting bracket on the square holes of the outer channels. Ensure the bracket holes are facing towards each other. (Figure 5A) and tightly secure using item #501036 & 501031. If there is no cross channel at the fastening location use item#501032 washer to allow correct tightening.
- Page 14 Step 6– Fender & Wheels • Align the fender support plate with the frame and secure with machine screw and nut. If the holes are not perfectly aligned use a punch to align them. • Align the tire with the studs on the hub and secure to rim using item #501001 •...
- Page 15 Step 7 – Hitch and safety chains • Insert the tongue support foot into the coupler channel (Figure 6A) • Loosely secure the chains using the item #501023 & 501031 • Secure the coupler to the channel using item #501021 & 501031making sure it’s tight enough that the tongue foot doesn’t move but the coupler spring releases •...
- Page 16 STEP 8 – Wiring & Lights • Feed the wire harness using the pre-cut holes all the way to the back. • Secure the wire to the frame with the zip ties using the holes provided in the frame. • Secure each marker light on the front side of frame.
-
Page 17: Wiring Diagram
Wiring Diagram WIRING COLORS CODE • Ground=White Wire Ground white wire grommet to frame • Tail/Running Lights/Marker Lights = Brown • Left Turn/Brake = Yellow • Right Turn/Brake = Green Amber Marker Light Amber Marker Light Driver’s Taillight & Red Marker Light & License Light Passenger’s Taillight &... - Page 18 STEP 9 – Stake Pocket Installation • Line the stake pocket to the pre-drilled holes of the frame. There are eight locations. • Use the 1/4” bolts and nuts to secure to the frame. • This should be installed on the channel prior to assembling the frame. If your kit doesn’t include the stake pocket, you can purchase them at www.westbrooktrailerparts.com ITEM # DESCRIPTION...
- Page 19 4ft x 4ft Plywood Drill Template (Plywood not included) Drill 3/8” holes in plywood using the dimensions outlined below and use the 3/8” x 1-1/2” full thread hex bolts to secure to the frame. Holes for tie down kit Optional - (Tie downs not included) Kit Trailer Assembly Manual...
- Page 20 4ft x 6ft Plywood Drill Template (Plywood not included) Drill 3/8” holes in plywood using the dimensions outlined below and use the 3/8” x 1-1/2” full thread hex bolts to secure to the frame. Holes for tie down kit Optional - (Tie downs not included) Kit Trailer Assembly Manual...
- Page 21 4ft x 8ft Plywood Drill Template (Plywood not included ) Drill 3/8” holes in plywood using the dimensions outlined below and use the 3/8” x 1-1/2” full thread hex bolts to secure to the frame. Holes for tie down kit Optional - (Tie downs not included) Kit Trailer Assembly Manual...
- Page 22 Cut List - Wood Plank (Wood not included) 4’ x 4’ 8pcs – 2x4 – 18” (12ft -2x4 makes 8pcs) 8pcs - 1x6 - 48” 4’ x 6’ 8pcs – 2x4 – 18” (12ft -2x4 makes 8pcs) 4pcs – 1x6 – 72” 4pcs –...
- Page 23 Cut List - Plywood (Wood not included) 4’ x 4’ 8pcs – 2x4 –18” (12ft -2x4 makes 8pcs) 4pcs – 3/4 x 14-3/4” x 48” 4’ x 6’ 8pcs – 2x4 –18” (12ft -2x4 makes 8pcs) 2pcs – 3/4 x 14-3/4” x 72” 2pcs –...
- Page 24 Trailer Accessories Tongue Jack Ramps 12” Wheel & Fender * Wheel Chock Spare Tire U-Bolt Support Tongue Extension www.westbrooktrailerparts.com 1.866.857.1445...
Need help?
Do you have a question about the 48-048-KO8 and is the answer not in the manual?
Questions and answers