Table of Contents
Advertisement
Available languages
Available languages
Quick Links
UV WATER DISINFECTION AND FILTRATION SYSTEM
Model UV8B
USER MANUAL
We are committed to ensuring that you are totally satisfied.
If you have any problems, don't go back to the store - please contact us !
QUESTIONS
CONTENTS
A. Introduction ...........................................2
B. Safety Instructions ..................................2
C. Water Quality Requirements ..................3
D. Installation..............................................3
E. Disinfection Procedure ...........................6
F. Ballast Features ......................................7
G. Operation and Maintenance ...................7
a. Winterizing the system ....................9
H. Troubleshooting .....................................9
I. Technical Specifications ..........................9
J. Parts List .................................................10
K. Warranty ................................................10
NSF/ANSI 61
CSA B483.1
Date of Installation
Thank you for purchasing a Rainfresh product.
Most issues can be resolved over the phone.
Canada Toll Free
1800 667 8072
Toronto and Area
(905) 884 9388
(Monday to Friday
8:00 AM to 5:00 PM EST)
Advertisement
Chapters
Table of Contents

Related Manuals for ENVIROGARD Rainfresh ACCUGARD

Summary of Contents for ENVIROGARD Rainfresh ACCUGARD
-
Page 1: Table Of Contents
UV WATER DISINFECTION AND FILTRATION SYSTEM Model UV8B USER MANUAL Thank you for purchasing a Rainfresh product. We are committed to ensuring that you are totally satisfied. If you have any problems, don’t go back to the store – please contact us ! Most issues can be resolved over the phone. -
Page 2: Introduction
(A) INTRODUCTION Rainfresh ACCUGARD UV System (model UV8B) makes water safe to drink by instantly destroying pathogenic bacteria (such as coliforms, E. coli, viruses etc.). It utilizes the proven disinfection properties of germicidal ultraviolet light (UV) emitted at 254 nm wavelength. UV systems are used by many... -
Page 3: Water Quality Requirements
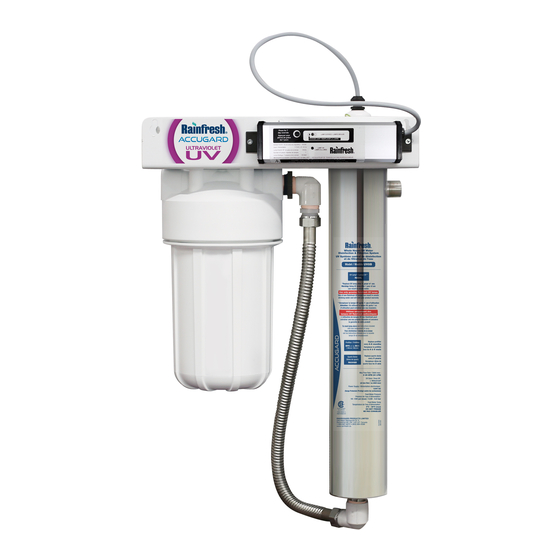
UV LAMP MUST BE REPLACED ANNUALLY. After 1 year of use (9,000 hours), it will no longer provide effective disinfection even though it stays lit. USE ONLY GENUINE RAINFRESH UV LAMPS. Use of non-Rainfresh UV lamps can result in unsafe drinking water and will void your product warranty. (see page 8 for details) (C) WATER QUALITY REQUIREMENTS The unit should only be operated with water that meets the following minimum criteria:... - Page 4 Unpacking the UV8B System : Your UV8B system includes the following items Ballast Nut & bolts Ballast Wrench R830B BH010-5 UV Lamp Quartz Dome Dome O-Ring Lamp Spring UV8B UNIT Gland Nut Power Cable R830L R830QD 4032 4036 (Filter cartridge inside 4030 with O-ring 4043 housing)
- Page 5 Installing the UV8B unit. 1. There are two mounting holes on the mounting bracket. At least one of them should be mounted directly on to a wall stud with appropriate screws to carry the weight of the unit. Alternatively you can attach a wider wood board on to two wall studs and then mount the UV8B system on to the board.
-
Page 6: Disinfection Procedure
Fig 6E Fig 6D Fig 6C Spring (4036) Lamp (R30L) 10. Slide the lamp connector cover 8. From the top of the gland 9. Holding the top 4-pin end of over the gland nut and tighten the nut, drop the lamp spring the lamp, carefully slide the black screw on it. -
Page 7: Ballast Features
(F) BALLAST FEATURES The micro-processor controlled electronic UV ballast supplied with your Rainfresh UV8B system has both audio and visual alarm indicators to indicate the lamp operation and an integral annual lamp change reminder timer. UV Power Source Initialization Sequence: When AC power is applied to the UV ballast, the lamp is ignited as indicated by the green lamp-ON LED and alarm buzzer consisting of three buzzer beeps and three red timer LED flashes. - Page 8 CHANGING FILTER CARTRIDGES & REPLACING O-RINGS 1. Shut off the inlet valve and open a faucet close by until pressure in the unit is relieved. Alternatively you can press the red vent button on top of the unit until pressure is released. 2.
-
Page 9: Winterizing The System
WINTERIZING YOUR SYSTEM: To winterize the system, unplug the unit first. Drain the pre-filter by removing the sumps and dumping the water. Let the filter cartridge dry out and then reinstall in the housing. To drain the UV, undo the SS flex connector from the bottom until the UV drains completely. -
Page 10: Parts List
Warrantor at the owner’s expense and in accordance with shipping instructions received from the Warrantor. This warranty does NOT cover, and is intended to exclude, any liability on the part of Envirogard for any incidental damages, consequential damages, labour charges or any other costs incurred in connection with the purchase, installation, use, maintenance or repair or the water filter whether under this warranty or any other warranty implied by law. - Page 11 MANUAL UTILISATEUR Nous vous remercions d'avoir acheté un de nos systèmes de désinfection ENVIROGARD/Rainfresh. Nous nous engageons à vous donner entière satisfaction. Si l'article vous cause un problème, ne retournez pas au magasin. Appelez-nous ! La plupart des problèmes peuvent être résolus par téléphone.
-
Page 12: Introduction
(A) Introduction Les systèmes UV Rainfresh ACCUGARD (modèle UV8B) rendent l’eau potable en détruisant instantanément les bactéries pathogènes (telles que les coliformes, E. coli, virus, etc.). Ces systèmes utilisent les propriétés désinfectantes éprouvées du rayonnement ultraviolet (UV) germicide émis à une longueur d’onde de 254 nm. -
Page 13: Exigences Relatives À La Qualité De L'eau
o N’utilisez pas de chalumeau à proximité du filtre. Si nécessaire, enveloppez la tête et le tuyau avec une serviette mouillée pour absorber la chaleur. Toutes les soudures devraient être effectuées avant le raccordement de la conduite à la tête. o N’utilisez pas de mèche ni de scellant pour les raccordements au filtre. - Page 14 o Le système doit être installé à l’intérieur dans une zone protégée où la température ne descend pas en dessous de 4 °C (40 °F) o Il est fortement recommandé d'installer la tuyauterie de dérivation avec une vanne d'arrêt autour de l'appareil. De cette façon, vous pouvez toujours avoir de l'eau à...
- Page 15 Accessoires nécessaires à l’installation (non inclus): Les raccords requis pour une installation typique sur un tuyau en cuivre de 3/4 po sont un manchon de 1 po par ¾ po et un adaptateur de 3/4 po FNPT femelle. Selon l’emplacement, certains raccords peuvent être requis (mais non nécessaires), à...
-
Page 16: Désinfection Du Système De Plomberie
Fig 6E Fig 6D Lampe UV Fig 6C Ressort de lampe (R30L) (4036) 10. Installer le couvre-douille et fixez-le 8. À partir haut de l’écrou de 9. En tenant l’extrémité supérieure en place en serrant la vis noire. serrage, déposez le ressort de la lampe à... -
Page 17: Caractéristiques Du Ballast
(F) Caractéristiques du ballast Remise à zéro du compteur: Le compteur doit être remis à zéro après le remplacement de la lampe. Pour ce faire, appuyez sur le bouton du compteur tout en rebranchant le cordon d'alimentation du régulateur de tension, et gardez-le enfoncé jusqu’à ce que le régulateur produise un bip de trois secondes. Le compteur est alors remis à... - Page 18 REMPLACEMENT DE LA CARTOUCHE ET DES JOINTS TORIQUES 1. Fermez les valves d’arrêt en amont et en aval du filtre et appuyez sur le bouton de purge pour dépressuriser le filtre. Vous pouvez aussi appuyer sur le bouton d’aération rouge sur le dessus de l’unité jusqu’à ce que la pression soit relâchée. Maintenant, fermez la sortie de la soupape pour éviter que l’eau contenue dans les conduites de plomberie circule continuellement dans le carter.
-
Page 19: Dépannage
PRÉPARATION DE VOTRE SYSTÈME POUR L’HIVER : Pour préparer le système pour l’hiver, débranchez d’abord l’appareil. Vidangez le pré-filtre en retirant les puisards et videz l’eau. Laissez la cartouche filtrante sécher, puis réinstallez-la dans le boîtier. Pour vidanger l’UV, débranchez le connecteur flexible en acier inoxydable par le bas jusqu’à ce que l’UV se vide complètement. - Page 20 été modifié ni endommagé par l'utilisateur. Cette garantie ne s'appliquera pas si l'eau traversant le système UV8B est en dehors des paramètres spécifiés dans le manuel. Aux termes de la présente garantie, Envirogard ne peut être tenue responsable d'aucun dommage indirect, y compris les frais de main-d'oeuvre et tout autres frais découlant de...
Need help?
Do you have a question about the Rainfresh ACCUGARD and is the answer not in the manual?
Questions and answers