Advertisement
Available languages
Available languages
Quick Links
Advertisement

Related Manuals for Joy Sport C60

Summary of Contents for Joy Sport C60
- Page 1 HANDLEIDING Joy Sport...
- Page 2 Deze garantie geldt gedurende 24 maanden voor elke fabricagefout aan uw JOY SPORT product die door een JOY SPORT dealer werd verkocht. Wanneer u garantie claimt bied JOY SPORT de mogelijkheid om naar eigen goeddunken het defecte apparaat of het betreffende onderdeel te herstellen of te vervangen.
- Page 3 Montage stap #1 B o x S p a n n e r ( 1 ) S-1 Curved washer for 19*2T bolt(4) S- 2 Acorn Nut S- 10 Carriage Bolt M8 for M8 Bolt 1. Monteer de voor stabilisator (E) op het hoofdframe (G) en gebruik hiervoor de 2 bouten (S-10), 2 gebogen ringen (S-1), en 2 moeren (S-2).
- Page 4 Montage stap #2 B o x S p a n n e r ( 1 ) A l l e n K e y ( 1 ) 1. Neem de kabel (D-6) uit de stuurstang, vóórdat u de stuurstang monteert. 2.
- Page 5 Montage stap #3 A l l e n K e y ( 2 ) a l l e n b o l t M 8 * 2 0 L ( 2 ) S-11 Flat Washer for£ p 8 * £ p 1 6*1T Blot (2) F l a t w a s h e r 3 8 .
- Page 6 Montage stap #4 B o x S p a n n e r ( 1 ) F l a t w a s h e r S-15 Spring Washer 1 * 2 T ( ) S-14 S-13 Knob (foot pedal) 6*2t(4) S- 19 M6*P1.0 (4)
- Page 7 Montage stap #5 B o x S p a n n e r ( 1 ) A l l e n K e y ( 1 ) S-3 Carrage Bolt S-22 Screw M3*15L(4) M8x40mm (4) S-16 Allen Bolt M7*P1.0*30L(1) S-1 Curved washer for 19*2T bolt(4) S-18 S-17...
- Page 8 Montage stap #6 B o x S p a n n e r ( 1 ) Steek de kabel die uit de stuurstang komt en de hartslagkabels in de computer (A). Monteer de computer (A) op de stuurstang en gebruik hiervoor de 4 schroeven (A-1). Steek de adapterkabel aan de achterkant in de crosstrainer en vervolgens de adapter in het stopcontact, de computer zal nu een pieptoon geven en oplichten.
- Page 9 Gereedschap & onderdelen legenda...
- Page 11 Computer handleiding Joy Sport C60 Functies toetsen: MODE/ENTER In stop modus, kunt u alle gegevens instellen (Time, DST,CAL, Pulse, etc). RESET Druk hierop wanneer in de STOP modus bent, om terug naar het hoofdmenu. Knop 5 seconden ingedrukt inhouden voor totale reset.
- Page 12 Ingang trainingsprogram Bij ingang in trainingsmode, knippert het venster. Druk UP& DOWN om programma te kiezen. MANUAL→PROGRAM→User program→H.R.C→WATT. Druk ENTER om in modus te komen Drukt u op START zonder selectie, komt u direct in de manuele modus en start. PROGRAMMA instellen In STOP modus, druk P1, P2, P3, ~, P12 om in relevant programma te komen .
- Page 13 Stand-by stand Als geen signaal wordt ontvangen(SENSOR, KEYBOARD, PULSE value display) gedurende 4 minuten, gaat het systeem in standy-by stand. Alle ingestelde waarden blijven bewaard. Wanneer weer wordt begonnen, start het systeem met de laatst ingestelde waarden. FUNCTION TIME Display range 0:00~99:99 ; Setting range 0:00~99:00 DISTANCE Display range 0.00~99.99 ;...
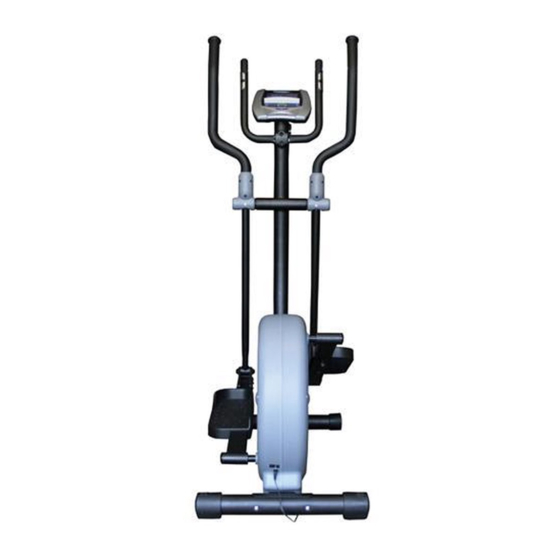
- Page 14 Montage overzicht:...
- Page 15 Onderdelenoverzicht:...
- Page 16 Onderdelenlijst Beschrijving Aantal computer Schroef Stuurset Eindkapje stuur Foam Hartslagsensoren Stuur Kabel Schroef Bovenste arm (links) Bovenste arm (rechts) Eindkapje Foam Afdekking (links, voor) Afdekking (links, achter) Afdekking (rechts, voor) Afdekking (rechts, achter) Stuurstang Schroef Ring Busje Schroef Schroef Bovenste kabel Voor stabilisator Transportwieltjes Schroef...
- Page 17 Sensorhouder Kapje Schroef Lager Ring Ring Klem Aandrijfriem G-10 Moer G-11R Behuizing (rechts) G-11L Behuizing (links) G-12 Schroef G-13 Schroef G-14 Sensorkabel G-16 Pedaal(R, L) Zwemnkarm (R, L) Lager Schroef Pedaal arm (R, L) Kapje Schroef Kapje (links) Kapje (rechts) As set Aandrijfwiel Bout...
- Page 18 Kapje Magneetset Magneet Ring Ring Bout Motor Spanner Ring Moer Ring Bout Ring Bout Wieltje met lager Bout Veer Vliegwielset Vliegwiel Moer Ring Lager Lager Moer Adapter Montageset Ring Moer Bout Ring Bout Ring Ring...
- Page 19 Ring Schroef S-10 Bout S-11 Ring S-12 Moer S-13 Knop S-14 Ring S-15 Ring S-16 Bout S-17 Ring S-18 Ring S-19 Bout S-20 Schroef S-21 Ring S-22 Schroef S-23 Kapje...
- Page 20 USER MANUAL Joy Sport...
- Page 21 Dear customer, We want to thank you for having chosen a JOY SPORT product, and wish you a lot of fun and success during training with your JOY SPORT exercisers. Please note and follow the enclosed safety and assembly instructions carefully.
- Page 22 Assembly Stage #1 B o x S p a n n e r ( 1 ) S-1 Curved washer for 19*2T bolt(4) S- 2 Acorn Nut S- 10 Carriage Bolt M8 for M8 Bolt 1. Fasten front stabilizer (E) to the main frame by using 2 screws (S-10), 2 curve washers (S-1), and 2 nuts (S-2).
- Page 23 Assembly Stage #2 B o x S p a n n e r ( 1 ) A l l e n K e y ( 1 ) 1. Pull the cable (D-6) out of the handlebar post before assembling. 2. First, loosen the pre-assembled screws. 3.
- Page 24 Assembly Stage #3 A l l e n K e y ( 2 ) a l l e n b o l t M 8 * 2 0 L ( 2 ) S-11 Flat Washer for£ p 8 * £ p 1 6*1T Blot (2) F l a t w a s h e r 3 8 .
- Page 25 Assembly Stage #4 B o x S p a n n e r ( 1 ) F l a t w a s h e r Spring Washer S-15 1 * 2 T ( ) S-14 S-13 Knob (foot pedal) 6*2t(4) S- 19 M6*P1.0 (4)
- Page 26 Assembly Stage #5 B o x S p a n n e r ( 1 ) A l l e n K e y ( 1 ) S-3 Carrage Bolt S-22 Screw M3*15L(4) M8x40mm (4) S-16 Allen Bolt M7*P1.0*30L(1) S-1 Curved washer for 19*2T bolt(4) S-18 S-17...
- Page 27 Assembly Stage #6 B o x S p a n n e r ( 1 ) Connect cable wire (upper) and Heart rate cable (upper) to the back of the computer. Mount the computer (A) on the plate with 4 screws(A-1). Connect the adaptor ( R ) between the crosstrainer and the plug.
- Page 28 TOOLS...
- Page 30 Computer manual Joy Sport C60 BUTTON FUNCTION: MODE/ENTER In stop mode, confirm all exercise data setting(Time, DST,CAL, Pulse, etc), and enter into program. RESET Press it in the STOP mode, return to the main menu. Press the mode 2s at any time, buzzer sound 1s and LCD display 2s then return to the main menu as “TOTAL RESET”.
- Page 31 ENTER TRAINING MODE When enter into training mde, MANUAL(MAN) flash 1Hz in the dot matrix. Press UP& DOWN to choose from MANUAL→PROGRAM→User program→H.R.C→WATT. Press ENTER/MODE to enter the mode. If press START without selection, directly enter into MANUAL MODE and start. PROGRAM SETTING In STOP mode, press P1, P2, P3, ~, P12 to enter relevant program accordingly quickly.
- Page 32 FUNCTION TIME Display range 0:00~99:99 ; Setting range 0:00~99:00 DISTANCE Display range 0.00~99.99 ; Setting range 0~99.90km CALORIES Display range 0~9999 ; Setting range 0.00~9990 PULSE Display range P-30~230 ; Setting range 0-30~230 You may use handepulse, or chest belt to check your pulse. WATT Display range 0~999 ;...
Need help?
Do you have a question about the C60 and is the answer not in the manual?
Questions and answers