Table of Contents
Advertisement
Available languages
Available languages
Quick Links
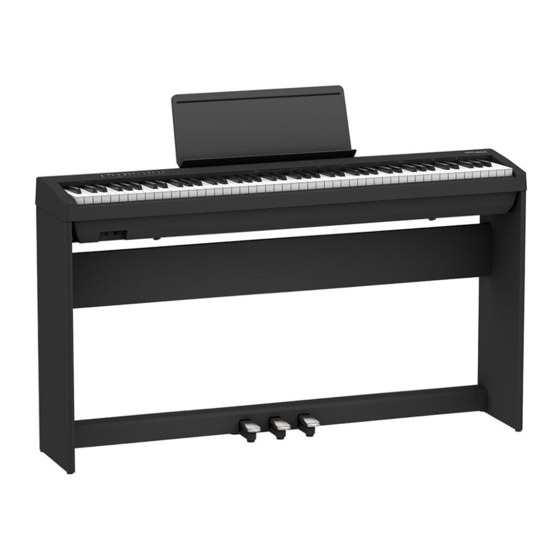
KSC-54/56
•
Prepare an area in which you can perform the assembly safely.
•
Make sure that another person is on hand to help with the assembly and setup.
•
Be very careful, when you assemble and move the piano, to make sure that you do not drop it on your hands or feet.
•
To move the piano, lift it carefully—all the while keeping it level.
•
Do not use a power tool (e.g., an electric screwdriver) to assemble the stand. You risk damaging or stripping the screws.
•
This product is quite heavy; when moving it, please obtain the help of a sufficient number of other people so that it can be
moved without danger or strain.
•
To prevent accidental ingestion or choking, any screws you remove and cords you disconnect must be placed in a safe
location, out of the reach of children.
Parts Check
Before you begin assembling the stand, check that all the parts
were supplied. You will also need to have a Phillips screwdriver.
fig.parts.eps
KSC-54
A
A
D
a
b
C
B
Assembly Procedure
* Finger-tighten the screws to assemble the stand provisionally, and then use a screwdriver to tighten the screws firmly. Perform the assembly on a stable and
flat location.
* Do not allow the pedal cord or power cord to get twisted or pinched while assembling the stand.
* Do not set up the instrument on long-piled carpeting. This can cause instability in the stand and unsteadiness in the pedals, possibly resulting in damage to
the unit.
* The piano unit and the surface of the stand are very delicate; handle with care to avoid scratching them.
* Do not place the piano unit directly on the floor. Doing so will damage the bottom panel case and the connectors and holders on the bottom of the piano.
1
Assembly procedure
•
At first, assemble the entire stand in a temporary fashion, without really tightening the screws. Then, after checking the overall alignment of the
boards (and gently shifting certain parts where necessary), go around and tightly fasten each of the screws.
•
If necessary, spread out a blanket or similar material to prevent the stand or floor from being scratched during assembly.
•
Be careful not to pinch the pedal cord during assembly.
1.
As shown in the illustration, place the left and right side boards on the
pedal board so that the metal brackets are on the inside, and fasten
them provisionally using screws "a" (M5 x 40 mm).
2.
After you have provisionally tightened screws "a" (four locations), use a
screwdriver to tighten them firmly.
When attaching the pedalboard, do not allow any gap to remain
between the side board and pedalboard when the pieces are
assembled.
fig.1-1-1.eps
Improper
Correct
Side
Side
board
board
Pedal
Pedal
board
board
Space
Screw "a"
(2 screws)
Leave the pedal
Screw "a"
cord extended
(2 screws)
3.
With the help of another person, raise the left and right side boards to an
upright position.
* Take care that the pedal boards are not twisted.
fig.1-1-2.eps
STAND ASSEMBLY
Items required for assembly
A: Side Board (left)
B: Side Board (right)
C: Pedal Board
D: Rear Board
a: Screw "a" (M5 x 40 mm) x 4
b: Screw "b" (M5 x 20 mm) x 6
Phillips screwdriver
4.
Loosen the screws attached to the left and right side boards
approximately three turns, so that they protrude about 3 mm, as shown
in the illustration.
fig.1-2.eps
5.
Hook the metal brackets of the rear board over the screws you loosened,
as shown in the illustration.
6.
Use four screws "b" (M5 x 20 mm) to provisionally fasten the pedal
board.
7.
Securely tighten the two side board screws and four pedal board screws.
* When attaching the rear board, before tightening the screws, adjust
things as necessary at all the points where there are screws so as to
assure that the rear board is aligned in parallel with the pedal
board.
fig.1-3.eps
Rear view
Screws you loosened
in step 4 (2 screws)
Screw "b" (4 pieces)
2
Install the piano onto the stand
1.
Align the screws on the bottom of the piano (one each at left and right)
with the metal brackets on the side boards, and while keeping the front
of the piano slightly raised, pull it toward yourself to engage the screws
in the metal brackets.
* When handling the piano, firmly grasp it. Be careful, so you do not
get your fingers pinched.
2.
Fasten the piano to the stand with the screw "b" (M5 x 20 mm).
fig.2-1.eps
Screw "b"
Pull the piano toward yourself while
keeping the front slightly raised.
3
Connecting the pedal cord
1.
Connect the pedal cord to the Pedal connector.
ˆ
* Plug the pedal cord all the way into the Pedal connector.
4
Connecting the power cord
Models with a power cord
1.
Connect the included power cord to the AC In jack located on the piano's
Space
bottom panel.
3 mm
2.
Plug the power cord into an AC outlet.
When Moving the Piano
1.
Close the keyboard lid.
2.
Disconnect the power cord or AC adaptor.
3.
Raise the stand's adjuster.
4.
Keep the piano level when you lift it, and take care not to pinch your
hands or drop the piano on your feet.
5.
After placing the piano in its new location, perform steps
the "Assembly Procedure."
Models with an AC adaptor
1.
Connect the supplied AC adaptor and AC cord.
2.
Connect the AC adaptor to the DC In jack on the rear panel.
Rear view
AC adaptor cord
3.
Plug the power cord into an AC outlet.
5
Fastening the cords
Please don't get your
fingers pinched.
As needed, use the plastic-coated clips on the bottom of the piano to
secure the power cord and pedal cord.
6
Adjusting the adjuster
Turn the adjuster to lower it until the adjuster is in firm contact with the
floor. In particular, when you've placed the piano on carpet, you must
turn the adjuster until it is pressing firmly against the floor.
* The pedal may be damaged if there is a gap between the adjuster
and the floor.
fig.5-1.eps
Power cord
Be sure to keep this leaflet together with the owner's manual.
4
6
–
of
Copyright© 2009 ROLAND CORPORATION
All rights reserved. No part of this publication may be reproduced in
any form without the written permission of ROLAND CORPORATION.
Coated clip
Adjuster
1
KSC-54/56
Advertisement
Table of Contents

Related Manuals for Roland KSC-54/56


Summary of Contents for Roland KSC-54/56
- Page 1 Copyright© 2009 ROLAND CORPORATION fig.1-1-2.eps the “Assembly Procedure.” All rights reserved. No part of this publication may be reproduced in any form without the written permission of ROLAND CORPORATION. Screws you loosened in step 4 (2 screws) Screw “b” (4 pieces)
- Page 2 Nach der Aufstellung des Pianos am neuen Ort müssen Sie die Schritte unter “Arbeitsweise für den Zusammenbau” wiederholen. Copyright © 2009 ROLAND CORPORATION Alle Rechte vorbehalten. Diese Bedienungsanleitung darf ohne die schriftliche Genehmigung der ROLAND CORPORATION weder aus- Spalt zugsweise, noch vollständig kopiert werden. Zwei Schrauben, die Sie in Schritt 4 gelöst haben...
- Page 3 à ne pas laisser tomber l’instrument sur vos pieds. gauche et droit en position verticale. Après avoir placé le piano à l’endroit voulu, effectuez les opérations Copyright © 2009 ROLAND CORPORATION * Assurez-vous que le pédalier n’est pas de travers. de la “Procédure d’assemblage”.
- Page 4 Spazio di “Procedura di Montaggio”. Viti che avete allentato al punto Copyright © 2009 ROLAND CORPORATION 4 (due viti) Tutti i diritti sono riservati. Nessuna parte di questa pubblicazione può essere riprodotta in qualsiasi forma senza il permesso scritto di Vite “b”...
- Page 5 Después de colocar el piano en su nueva ubicación, realice los pasos del “Procedimiento de montaje”. Copyright © 2009 ROLAND CORPORATION Todos los derechos reservados. Ninguna parte de esta publicación podrá reproducirse de ninguna forma sin el permiso escrito de ROLAND CORPORATION. Espacio Apriete los tornillos aflojados en el paso 4 (2 tornillos) Tornillo “b”...
- Page 6 “Werkwijze voor de assemblage” uitvoeren. Alle rechten voorbehouden. Het kopiëren, verveelvoudigen of open- baar maken van dit document, hetzij gedeeltelijk, hetzij in z’n geheel, is Spleet zonder de schriftelijke toestemming van ROLAND CORPORATION Twee schroeven die u in stap 4 losgedraaid hebt verboden.
- Page 7 スタンドの組み立て方 KSC-54/56 AC アダプターの機種 • 安全に作業できるスペースを確保してください。 本体とスタンドの組み合わせ • 組み立て作業は、必ず 2 人以上で行ってください。 1 1 1 1 ..• 本機を組み立てたり、移動したりする際は、手をはさんだり、足の上に落とさないよう、十分に注意してください。 付属の AC アダプターと電源コードを接続します。 • 本機を移動する際は、水平に持ち上げるようにしてください。 1 1 1 1 ..ピアノ本体の底面にあるネジ(左右各1本)をサイド・ボー • 電動工具を使用して組み立てないでください。ネジが空回りする恐れがあります。 2 2 2 2 ..
- Page 8 STAND ASSEMBLY ZUSAMMENBAU DES STÄNDERS ASSEMBLAGE DU PIED MONTAGGIO DEL SUPPORTO MONTAJE DEL SOPORTE ASSEMBLAGE VAN DE STAND スタンドの組み立て方 KSC-54/56...
Need help?
Do you have a question about the KSC-54/56 and is the answer not in the manual?
Questions and answers