Table of Contents
Advertisement
Quick Links
Advertisement
Table of Contents

Related Manuals for Infinite FlexCell

Summary of Contents for Infinite FlexCell
- Page 1 FlexCell Installation and Setup Guide for the Prosthetist...
- Page 2 All rights reserved. FlexCell is a trademark of Infinite Biomedical Technologies, LLC. This document provides information for the prosthetist that will be installing FlexCell. This symbol is used throughout the guide to indicate important cautionary information. Text following this symbol should be read carefully.
- Page 3 FlexCell Installation and Setup Guide for the prosthetist Thank you for choosing FlexCell to help your patient better power their prosthesis. Whether you’re retrofitting FlexCell into your patient’s existing prosthesis or you’re building a new prosthesis from the ground up, this guide will introduce you to FlexCell and help you install the system.
-
Page 4: Table Of Contents
1.1 Specifications ..............6 1.2 Outputs ................7 2. INSTALLATION GUIDE 2.1 Before You Begin ............. 9 2.2 Bend Radius ..............12 2.3 How to Install FlexCell ..........14 3. USING FLEXCELL 3.1 Turning On/Off ...............19 3.2 Checking Charge ............21 3.3 Charging the Batteries ..........22 4. -
Page 5: Meet Flexcell
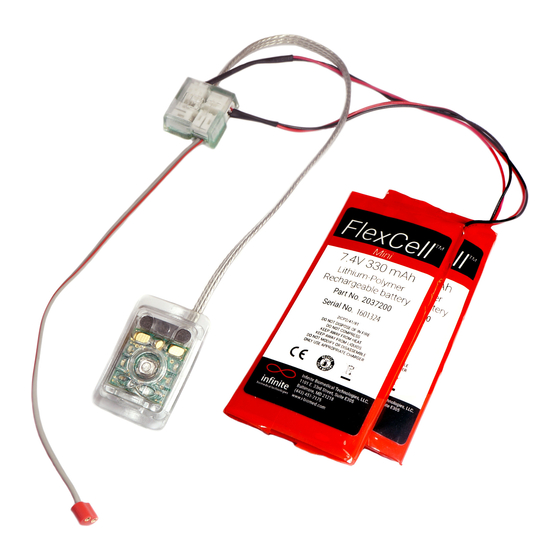
The FlexCell system is intended to power upper-limb prosthetic devices. The system consists of a charging port with an on/off button, a charger, and flexible lithium-polymer gel batteries. The flexibility of the batteries allow practitioners to conform them to the inner surface of the prosthesis shell. -
Page 6: Specifications
1.1 Specifications C to +49 C (32 F to 120 Temperature range (use) C to +49 C (32 F to 120 Temperature range (transport and storage) 0% to 90% Humidity range (use) 0% to 95% Humidity range (storage and transport) 4.9”... -
Page 7: Outputs
Otto Bock Motion Control FlexCell is compatible with most terminal devices. FlexCell is available with three types of output connectors and has been tested with several prosthetic terminal devices such as hands, wrists, and elbow units. However, always confirm that your terminal device is compatible with FlexCell’s specifications. -
Page 8: Installation Guide
This section covers the following: • Before you Begin • Bend Radius • How to Install FlexCell... -
Page 9: Before You Begin
2.1 Before You Begin Included in the package: (A) FlexCell battery (B) FlexCell Mini battery (if applicable) (C) Wall adapter (D) Charging port (E) 2 flanges for charging port (F) Charger adapter... - Page 10 FlexCell / FlexCell Mini Battery connector Charging Port Junction box Interface Output Connector...
- Page 11 Charger Adapter Adapter Plug Magnetic Connector...
-
Page 12: Bend Radius
Long Axis Pictured above is the to-scale maximum bend radius for the long axis of a FlexCell battery. The maximum bend curvature of the FlexCell cannot exceed the curvature depicted above. The FlexCell 550 mAh battery is not intended to bend around the short axis;... - Page 13 Short Axis FOR FLEXCELL MINI ONLY Short axis example Pictured above is the to-scale maximum bend radius for the short axis of a FlexCell Mini battery. The maximum bend curvature of the FlexCell Mini cannot exceed the curvature depicted above.
-
Page 14: How To Install Flexcell
2.3 How to Install FlexCell A. If the charging port will be mounted on the prosthesis surface, place the provided flange in the desired location when molding the shell to create an accurate opening. - Page 15 B. Place the FlexCell batteries anywhere within the prosthesis shell, taking care to ensure the batteries are not compressed and will never be in contact with the user’s skin. Adhesives can be used to secure the batteries to the shell’s inner surface.
- Page 16 Check the orientation if it does not plug in easily. Only use FlexCell batteries with the FlexCell charging port and junction box D. Connect the output connector to the terminal device. Pay close attention to the polarity of the connector depicted below.
- Page 17 E. Insert the charging port into the flange. It is designed to only insert one way and should snap in easily. Check the orientation if it does not insert easily.
-
Page 18: Using Flexcell
This section covers the following: • Turning On/Off • Checking Battery Charge • Charging the Batteries... -
Page 19: Turning On/Off
3.1 Turning On/Off Charging Port Interface On/Off Button Charging Pads... - Page 20 3 seconds. The seven LEDs will illuminate around the button in a clockwise direction and flash. To turn off FlexCell, press and hold the Control Unit button for 3 seconds. The seven LEDs will illuminate around the button in a counter-clockwise direction.
-
Page 21: Checking Charge
3.2 Checking Battery Charge Press the charging port button to check the battery charge level. The number of lights that turn on (out of seven) provide an indication of capacity. The LEDs will blink when the system is turned off. ~57% ~15% 100%... -
Page 22: Charging The Batteries
3.3 Charging the Batteries 1. Plug the supplied wall adapter block into a wall outlet. 2. Connect the FlexCell charger adapter to the plug of the wall adapter, depicted above right. Only use wall adapters provided by Infinite Biomedical Technologies. - Page 23 3. To charge the batteries, place the magnetic connector over the charging port’s charging pads. The two magnets on the magnetic connector align with the steel bar on the charging port. The magnetic connector will snap in place.
- Page 24 The green light will disappear when the batteries are done charging. To stop charging the batteries, remove the connector and place it on the housing attachment to prevent damage to the connector pins. FlexCell battery systems charge fully in approximately 3 hours.
-
Page 25: Maintaining Flexcell
This section covers the following: • Preventative Inspection • Service and Cleaning • Safety and Warnings... -
Page 26: Preventative Inspection
If batteries become inflated or excessively hot, discontinue use immediately and contact Infinite Biomedical Technologies. Use a dry cloth to clean FlexCell components as necessary. The metal contacts on the charging port should be cleared of any debris build-up using a q-tip or other non-metallic object such as a toothpick. -
Page 27: Safety And Warnings
Liquid damage warning: FlexCell is not designed to be waterproof. Do not submerge or spill liquid on or into the prosthesis as it will likely cause a malfunction in FlexCell. If the prosthesis will be worn in wet environments, ensure that FlexCell is sufficiently protected from the external environment. - Page 28 Heat warning: Do not expose FlexCell to a heat source such as a fire, even if FlexCell is within the prosthesis. Do not leave FlexCell in a high-temperature environment (e.g. under direct sunlight or in a closed vehicle during hot weather)
- Page 29 Notes...
- Page 30 Notes...
- Page 31 Notes...
- Page 32 Infinite Biomedical Technologies, LLC. 8 Market Place, Suite 500 Baltimore, MD 21202 P. 443.451.7175 F. 443.451.7179 www.i-biomed.com Z0000025rev3 Aug 2018...
Need help?
Do you have a question about the FlexCell and is the answer not in the manual?
Questions and answers