Table of Contents
Advertisement
Quick Links
Advertisement
Table of Contents

Related Manuals for Broadrack EC 17 Series

Summary of Contents for Broadrack EC 17 Series
- Page 1 EC 17 / 19 Series Cost Effective Single Rail LCD Console User Manual Rev 2.0...
-
Page 2: Safety Instructions
EC 17 /19 Series User Manual Packing List The complete EC 17 / 19 package consists of: One 1U 19” rack mount console Two rails with front and rear bracket One VGA cable One USB cable One DC power adapter ... - Page 3 EC 17 /19 Series User Manual place anything over power cord. The power cord must rate for the voltage and current marked on the product’s electrical ratings label. The voltage and current rating of the cord should be greater than the voltage and the current rating marked on the product.
-
Page 4: Table Of Contents
EC 17 /19 Series User Manual Index of Contents Packing List ......................I Safety Instructions ....................I Index of Contents ....................III 1. General Information ..................4 1.1 Overview ....................4 1.2 Features ....................2 1.3 Product Specification ................3 1.3.1 EC 17 Specification .............. -
Page 5: General Information
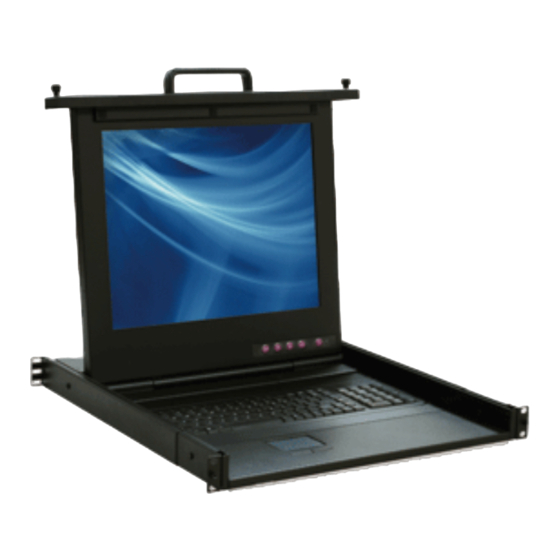
EC 17 /19 Series User Manual 1. General Information 1.1 Overview The KVM console is an ideal solution for network administration with multiple servers / platforms. Their 17-inch and 19-inch large size TFT LCD color display and ultra-low-profile compact industrial keyboard / touchpad provide the user-friendliest and most reliable environment for network administrators. -
Page 6: Features
EC 17 /19 Series User Manual 1.2 Features EC 17 / 19 single rail LCD console provides more competitive price and more flexible combination. It keeps all original characteristic of single rail LCD console, easy to install and use. With replaceable keyboard design, you can easily replace more than 5 various keyboards. -
Page 7: Product Specification
EC 17 /19 Series User Manual 1.3 Product Specification 1.3.1 EC 17 Specification Model name EC 17 Number of ports Dimension 509.2 x 482.0 x 43.3 mm / 20.0 x 19.0 x 1.7 inches Package Dimension 687 x 558 x 241 mm / 27.0 x 22.0 x 9.5 inches Net Weight 10.4 Kg / 22.9 lbs Gross Weight... - Page 8 EC 17 /19 Series User Manual Figure 1-1. EC 17 Dimension...
-
Page 9: Ec 19 Specification
EC 17 /19 Series User Manual 1.3.2 EC 19 Specification Model name EC 19 Number of ports Dimension 549.2 x 482.0 x 43.3 mm / 21.6 x 19.0 x 1.7 inches Package Dimension 727 x 558 x 241 mm / 28.6 x 22.0 x 9.5 inches Net Weight 11.2 Kg / 24.7 lbs Gross Weight... - Page 10 EC 17 /19 Series User Manual Figure 1-2. EC 19 Dimension...
-
Page 11: Panel Controls And Osd Function
EC 17 /19 Series User Manual 2. Panel Controls and OSD Function Controls Description Soft power on/off button. Adjacent LED is lit when Auto-synchronize and scale down display to any Auto valid factory preset timings. Press to scroll the function you want to adjust. Press to scroll the function you want to adjust. -
Page 12: Brightness
EC 17 /19 Series User Manual Exit 3. Press the“menu”button to enter,and you will see: VGA / DVI 4. Use the “Down” and “Up” button to select the input source of signal. 5. Press the “menu” button to enter 2.3 Brightness 1. -
Page 13: Color
EC 17 /19 Series User Manual 3. Press the “menu” button to enter. 4. Use the “Down” and “Up” button to adjust the contrast of the display. 5. Press the “menu” button to enter. 2.5 Color 1. Press the “menu” button. 2. -
Page 14: Language
EC 17 /19 Series User Manual Input Source Brightness Contrast Color Position Language Recall Exit 3. Press the “menu” button to enter. And you will see: Icon Description Image Pos To adjust the position of the image. OSD Pos To adjust the position of the OSD. Return To exit and return to the previous page Table 2-3. -
Page 15: Recall
EC 17 /19 Series User Manual Italian Spanish 4. Use the “Down” and “Up” button to scroll. 5. Press the “menu” button to enter. 2.8 Recall 1. Press the “menu” button. 2. Use the “Down” and “Up” button to scroll. Auto tune. -
Page 16: Installation
EC 17 /19 Series User Manual 3. Installation 3.1 Install LCD Console Into Cabinet 3.1.1 Notes 1. Please check all peripherals according the list before installation. To make sure that the whole unit was not damaged and lost during shipping process. If you encounter any problem, please contact your dealer. -
Page 17: Installation Steps
EC 17 /19 Series User Manual 3.1.3 Installation Steps 1. Adjust rail until one screw appear. Loose (Not release) two rear screws then adjust rear bracket to fit your cabinet. Rail 2. Install front and rear bracket on cabinet. 3. Tight-up two rear screws. 4. - Page 18 EC 17 /19 Series User Manual 5. Pull rail until it lock and keep the part A in front of the rail (Both sides).Then push console into left and right rails. DO NOT removes protective tapes. Part A Tape 6. Pull rail–release switch (left and right at the same time) then push console to the end.
- Page 19 EC 17 /19 Series User Manual 7. Install two screws in rear of the console (Both sides). Remove protective tapes. 8. Finish installation as below.
-
Page 20: Unload Steps
EC 17 /19 Series User Manual 3.1.4 Unload Steps 1. Make sure the console has locked and turned off. 2. Release two screws in rear of the console. (Both sides) 3. Unlock. 4. Pull the console all the way out. Then pull rail-release switch and pull console out. -
Page 21: Installing The Video Card And Video Driver
EC 17 /19 Series User Manual 3.2 Installing the Video Card and Video Driver Before connecting the LCD console, make sure your computer has a video card already installed for the monitor. After you connect the console, install the video software driver. -
Page 22: Connecting The Console
EC 17 / 19 Series User Manual 3.2.2 Connecting the Console To connect an LCD console to a computer, perform the following steps Figure 3-1. The rear view of LCD console 1. Turn off your computer. You should always turn off your computer before connecting or disconnecting a device. - Page 23 EC 17 / 19 Series User Manual You can adjust the horizontal and vertical position, contrast, and brightness to better suit your video card and your personal preference. Refer to Chapter 2 for more information on using the on-screen menu to adjust the video display.
Need help?
Do you have a question about the EC 17 Series and is the answer not in the manual?
Questions and answers