
Related Manuals for Car Solutions BM16-ID7


Summary of Contents for Car Solutions BM16-ID7
- Page 1 Installation Manual Multimedia Interface for BMW/MINI ID7 car-solutions.com support@car-solutions.com...
-
Page 2: Audio Out
Compatibility: BMW/MINI EVO ID7 2019~ Components: Interface Main*1 Interface Input / Output specification : Input: LVDS*1 A/V*2 CVBS(Front Camera)*1 CVBS(Rear Camera)*1 Input Option: HDMI *2 Output: To LCD*1 AUDIO OUT*1 Power Spec: Input Power: 8VDC ~ 18VDC Consumption: 5WATT Switch input mode: External video sources skip function: Able to control input videos on and off via Dip switches Able to switch videos via the remote and button switch... - Page 3 MAIN BOARD POWER CABLE LCD CABLE AV CABLE BUTTON CABLE REMOTE CONTROL IR CABLE UART Touch Cable OPTION Power Cable (UNDER IDRIVE) car-solutions.com support@car-solutions.com...
- Page 4 * ON: DOWN / OFF: UP Please make sure to disconnect the power cable of interface and reconnect to apply dip switch setting whenever changing DIP switch. 4POL DIP SWITCH SETTING DIP S/W STATUS DESCRIPTION LVDS Navigation Mode DIP1 LVDS Navigation Mode Skip AV1 Mode DIP2...
- Page 5 FUNCTION POWER & PIP MENU Activating OSD menu Making a selection, changing image display ▲ Moving upward ▼ Moving downward Moving leftward ◀ (If you press this button 2 seconds long, you can access the factory mode) Moving rightward ▶ (If you press this button 2 seconds long, you can reset all the data about user environment) car-solutions.com...
- Page 6 Menu of FACTORY IMAGE IMAGE H-POSITION PARK V-POSITION H-POSITION/V-POSITION Setting UTIL1 LVDS MODEL UTIL2 LVDS MODEL: INFO (Android, Car-play, Navigation Model Setting) MENU to Return SEL to Select/Save Menu of FACTORY IMAGE PAS TYPE PARK PAS SETUP UTIL1 REAR TYPE UTIL2 SAFE ENABLE INFO...
- Page 7 Menu of FACTORY UTIL1 IMAGE AVOUT SELECT AVOUT SELECT: Select audio channel transmitted PARK FCAM TIME UTIL1 IR MEMORY through AUX(Default/AV1/AV2) UTIL2 CALIBRATE INFO FACTORY RESET FCAM TIME: Front Camera Display Setting IR MEMORY: Register IR memory of remote control MENU to Return SEL to Select/Save for DTV, DVD(AV1/AV2)
- Page 8 * Switch mode or activate the function by OEM button <Steering wheel> <I-Drive> <Memory Button> Section Button Operation Function long press(3sec) Mode change Return to orignal IDRV MENU (When entering the front ca short press mera mode, return to before mode) long press(3sec) Mode change...
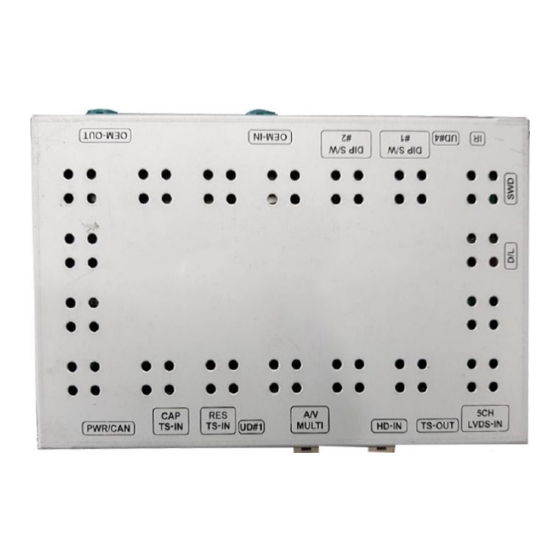
- Page 9 OEM Monitor OEM Head Unit OEM LCD Cable to Supplied LCD interface “LVDS IN” Cable to interface “LVDS OUT” IR receiver * Please Refer A/V input *2 to Next page Rear camera input *1 Front camera input *1 AUX output *1 CARPLAY Power/CAN Resistive...
- Page 10 * Two ways to connect POWER/CAN cable: Connect I-Drive jack by jack cable under I-Drive, in this case only supports CAN data bypass mode. (TV free is not supported) * I-Drive Jack by Jack: Detach OEM cable from I-Drive and connect with supplied power cable. OEM cable Supplied Power cable...
- Page 11 •Two ways to connect POWER/CAN cable: Connect Head-unit jack by jack cable behind Head unit, in this case CAN data in/out mode and bypass mode could be set by Dip switch #8. (If you want to use TV free, please set Dip switch #8 to CAN data in/out mode) * Head-unit Jack by Jack: ❶...
- Page 12 QDIS CAP TS/OUT UART touch cable pin assignment Some QDIS RGB cable Pin#7 is for NAVI-IR or UART-TX Touch Out * Please connect IR-NAVI of “RGB Cable” or of “TS Out Cable” from the interface with TOUCH-RX of UART-TOUCH from “QROI2 MULTI CABLE” for QROI2 OEM TOUCH CONTROL.
- Page 13 Q. I cannot change mode A. Check connection of Ground cable and IR Cable. Check LED lamp is on, if not check connection of POWER cable. Q. All I got on the screen is black. A. Check second LED lamp of the interface is on, if not, check A/V sources connected are working well.
Need help?
Do you have a question about the BM16-ID7 and is the answer not in the manual?
Questions and answers