Advertisement
Quick Links
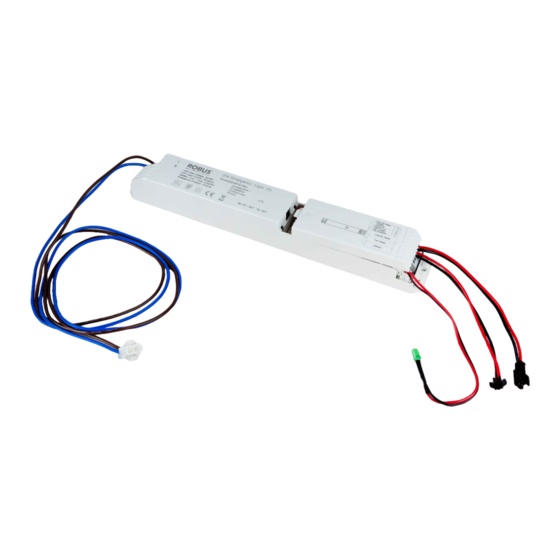
HARBOUR 2W, 3 HOUR PLUG-IN EMERGENCY PACK WITH LIFEPO4
RHA2WEMPK-PSU
PLEASE READ INSTRUCTION BEFORE COMMENCING INSTALLATION AND RETAIN FOR FUTURE REFERENCES.
! Electrical products can cause death or injury, or damage to property. If in any doubt about the installation or use of this product,
consult a competent electrician
Product technical information and specification may change over time without prior notification. For the latest technical
information please visit our web site www.robus.com or robusdirect.com
-10°C < Ta < +25°C, 220-240V ~ 50/60Hz, Class II, IP20, Battery 3 years warranty
Suitable for mounting on a Aluminum plate of standard Harbour fittings.
Installation
1. Ensure mains supply is switched off before commencing
work
2. Safety note! The power supply cord must not be
exposed to mechanical damage.
3. Disassemble the fitting base from the fitting.
4. Choose the suitable location on aluminium plate. Align
the holes on the emergency pack and aluminium plate,
insert the push rivets into the holes and rotate 90
degree.
5. Fix the emergency indicator into aluminum plate.
6. Connect the wires as per figure 1.
7. Remove battery cover. Connect battery. Attach battery
cover. Write installation date on emergency pack.
8. Refit aluminum plate to base and ensure that it fits
securely.
9. Attach diffuser to base using clips provided
Note: This luminaire has no user serviceable parts. If
damaged, disconnect from mains and discontinue use.
Switch on supply: The green LED should come on
indicating correct battery charge status. Interrupt supply by
pressing the test switch, the fitting will then operate in
emergency mode for a short period of time.
220/240V
Figure1
N
L
~50/60Hz
Information for the Product user:
1. Please note the requirement to dispose of Waste Electrical & Electronic Equipment separately from household waste
(WEEE marked with crossed out wheelie bin symbol).
2. Please consider your role in contributing to re-use and recycling by returning this product at end of life to a collection centre
for waste electrical equipment or a Civic Amenity site, or to a retail outlet from which you are purchasing a replacement.
3. This equipment may contain substances that are hazardous to health and the environment if disposed of carelessly. It is
important that it is separated from normal household waste and recycled in the WEEE chain
4. The "crossed out wheelie bin symbol" on a product indicates this equipment must not be disposed of in normal household
waste, but should be disposed of according to local WEEE regulations
The Installation must be carried out by a qualified electrician
Issue 2 040621
INSTRUCTION MANUAL
Note:
Testing
The emergency lighting must be inspected and tested
regularly in accordance with local codes of practice:
note: for safety reasons tests should be carried out
during daylight hours.
The minimum recommended test schedule is as follows:
After installation, allow 24 hours to ensure full battery
charge and then interrupt the supply; the maximum
duration time is 3 hours check that LEDs are still
lighting.
1. Daily check that charge indicator LED is working
2. Monthly, interrupt mains for a short period and
check LED lights
3. Annual 12 month check, full duration test.
Interrupt mains supply, LEDs will light and
should last for a minimum 3 hours operation:
batteries must be replaced when they can no
longer support 3 hour operation.
4. Complete record sheet on installation and retain in
maintenance file.
5. Update file with ongoing test records for inspection
by fire officer or other duly authorised person
+ Red
From LED
- Black
Driver
+ Red
Output
to LED
- Black
Test Switch
LED indicator
EN
HARBOUR 2W, NOODSTOP VAN 3 UUR MET LIFEPO4
RHA2WEMPK-PSU
LEES DE INSTRUCTIES VOORDAT U BEGINT MET DE INSTALLATIE EN HOU ZE BIJ VOOR LATER.
! Elektrische producten kunnen de dood of letsel veroorzaken of eigendommen beschadigen. Als u twijfelt over de installatie of
het gebruik van dit product, raadpleeg dan een erkende elektricien
Technische gegevens en specificaties van dit product kunnen zonder voorafgaande kennisgeving wijzigen. Ga voor de meest
recente technische gegevens naar onze website www.robus.com of robusdirect.com
-10°C < Ta < +40°C, 220V – 240V ~ 50/60Hz, Class II, IP20, Batterij 3 jaar garantie
Geschikt voor montage op een aluminiumplaat met standaard havenfittingen.
Installatie
1. Zorg dat de netvoeding is uitgeschakeld voordat ubegint
2. Veiligheidsopmerking! Het stroomsnoer mag niet worden
blootgesteld aan mechanische beschadiging.
3. Demonteer de basis van de armatuur
4. Kies de geschikte locatie op aluminium plaat en lijn
vervolgens de gaten op het noodpakket en de
aluminiumplaat uit, steek de druknagels in de gaten
en draai deze 90 graden.
5. Bevestig de noodindicator in aluminium plaat.
6. Verbind de draden volgens figuur 1.
7. Verwijder het deksel van de batterij. Sluit de batterij aan.
Bevestig de batterijhoes. Schrijf de installatiedatum op
het noodpakket.
8. Plaats de aluminium plaat terug op de basis en zorg dat
deze goed vast zit.
9. Bevestig de lichtverspreider aan de basis met de
bijgeleverde klemmen
Opmerking: Deze verlichtingsarmatuur bevat geen
onderdelen die door de gebruiker kunnen worden
gerepareerd. In het geval van schade, koppel de lamp af
van het lichtnet en stop met gebruiken.
Schakel levering in: De groene LED moet gaan branden
om aan te geven dat de batterij correct is opgeladen.
Onderbreek de toevoer door op de testschakelaar te
drukken, de fitting zal dan gedurende een korte tijd in de
noodmodus werken.
220/240V
N
L
~50/60Hz
Informatie voor de gebruiker van het product:
1. Hou bij het verwijderen van afval rekening met de regeling voor afgedankte elektrische en elektronische apparatuur, gescheiden van
gewoon huishoudelijk afval (AEEA, pictogram van een kliko met een kruis erdoorheen).
2. Neem uw verantwoordelijkheid op het vlak van hergebruik en recycling door dit product aan het einde van zijn levenscyclus in te
leveren bij een inleverpunt voor elektronisch afval, een milieupark of een winkel waar u een nieuw product koopt.
3. Deze apparatuur kan stoffen bevatten die gevaarlijk zijn voor de gezondheid en het milieu indien ze onachtzaam wordt weggegooid.
Het is belangrijk dat ze gescheiden gehouden wordt van het normaal huishoudelijk afval en gerecycled wordt in het netwerk voor
AEEA.
4. Het pictogram van een kliko met een kruis erdoorheen op een product betekent dat dit apparaat niet samen met het gewone
huishoudelijk afval mag worden weggegooid, maar dat het dient te worden verwijderd in overeenstemming met de lokale regelgeving
voor AEEA (afgedankte elektrische en elektronische apparatuur).
Opmerkingen:
Testen
De noodverlichting moet regelmatig worden
gecontroleerd en getest in overeenstemming met de
plaatselijke praktijkrichtlijnen. Opmerking: om
veiligheidsredenen moeten testen tijdens daglichturen
worden uitgevoerd. Het minimum aanbevolen
testschema ziet er als volgt uit:
Na installatie 24 uur wachten om ervoor te zorgen dat
de batterij volledig is opgeladen en daarna de
stroomvoorziening onderbreken; de maximum duur is 3
uur. Controleer of de leds nog licht geven.
1. Controleer dagelijks of de ladingindicator van de led
werkt.
2. Schakel maandelijks de stroomvoorziening even uit
en controleer de ledlampen.
3. Verricht jaarlijks een complete inspectie, een test van
volledige duur. Schakel de stroomvoorziening uit. De
leds zullen oplichten en dienen ten minste 3 uur mee
te gaan. De batterijen moeten worden vervangen als
ze geen 3 uur meer werken.
4. Vul het registratieblad van de installatie in en bewaar
in het onderhoudsbestand.
5. Werk het bestand bij met de verschillende
testresultaten ter inspectie van de brandweer of een
andere naar behoren bevoegde persoon.
Figuur1
+ Rood
Van LED-
- Zwart
driver
+ Rood
Uitvoer
naar LED
- Zwart
test schakelaar
LED-indicator
De installatie dient te worden uitgevoerd door een elektricien
NL
Page 1
Advertisement

Subscribe to Our Youtube Channel
Related Manuals for Robus RHA2WEMPK-PSU


Summary of Contents for Robus RHA2WEMPK-PSU
- Page 1 Product technical information and specification may change over time without prior notification. For the latest technical Technische gegevens en specificaties van dit product kunnen zonder voorafgaande kennisgeving wijzigen. Ga voor de meest information please visit our web site www.robus.com or robusdirect.com recente technische gegevens naar onze website www.robus.com of robusdirect.com -10°C <...
- Page 2 Les informations techniques et caractéristiques peuvent changer au fil du temps sans notification préalable. Pour rester informé de ces unsere Webseite www.robus.com oder robusdirect.com für aktuelle technische Informationen. possibles modifications, veuillez consulter le site internet www.robus.com ou robusdirect.com. -10°C < UT < +40°C, 220-240V ~ 50/60Hz, Klasse II, IP20, Batterie 3 Jahre Garantie -10°C <...
- Page 3 HARBOUR 2W, VTIČNI KOMPLET ZA 3-URNO ZASILNO DELOVANJE LIFEPO4 RHA2WEMPK-PSU ! Električni izdelki lahko povzročijo smrt, telesne poškodbe ali materialno škodo. Če imate kakršne koli dvome o namestitvi ali uporabi tega izdelka, se posvetujte s kvalificiranim električarjem Opomba: Tehnične informacije in specifikacije izdelka se lahko sčasoma spremenijo brez predhodnega obvestila. Za najnovejše tehnične informacije obiščite naše spletno mesto www.ledgrouprobus.
- Page 4 L.E.D lighting & Electrical Distribution Group UC Tel: +353 1 7099000 IRE: Nangor Road, Dublin 12, D12 E7VP, Ireland Fax: +353 1 7099060 UK: Bracknell Enterprise & Innovation Hub, Ocean Email: info@robus.com House, 12th Floor, The Ring, Bracknell, Website: www.robus.com Berkshire RG12 1AX, UK Page 4...
Need help?
Do you have a question about the RHA2WEMPK-PSU and is the answer not in the manual?
Questions and answers