Advertisement
Quick Links
Advertisement

Related Manuals for Fisher-Price GHP39


Summary of Contents for Fisher-Price GHP39
- Page 1 GHP39 GKH38 GKH40 GKH41 OWNER’S MANUAL | MANUAL DEL USUARIO | GUIDE DE L’UTILISATEUR...
- Page 2 WARNING Prevent serious injury or death from falls or strangling in the restraint system: • Never leave child unattended. • This product is not intended to replace a crib or bassinet for prolonged periods of sleep. • Children have STRANGLED in loose or partially buckled harness straps. Fully restrain the child at all times.
- Page 3 ATTENTION Prévenir les blessures graves ou mortelles dues aux chutes et l’étranglement par le système de retenue : • Ne jamais laisser l’enfant sans surveillance. • Ce produit n’est pas conçu pour remplacer un lit d’enfant ou une couchette pour de longues périodes de sommeil.
- Page 4 BEFORE YOU BEGIN | ANTES DE EMPEZAR AVANT DE COMMENCER IMPORTANT! Keep these instructions for future reference. Before assembly and each use, inspect this product for damaged hardware, loose joints, missing parts or sharp edges. Do not use the product if any parts are missing, damaged or broken.
- Page 5 Four C (LR14) alkaline batteries are required (not included). For longer life, use alkaline batteries. 1,5V C (LR14) IMPORTANT! Remove batteries for long term storage. Funciona con 4 pilas alcalinas C (LR14) x 1,5V (no incluidas). Para una mayor duración, usar solo pilas alcalinas. ¡IMPORTANTE! Sacar las pilas que lleven mucho tiempo en el producto.
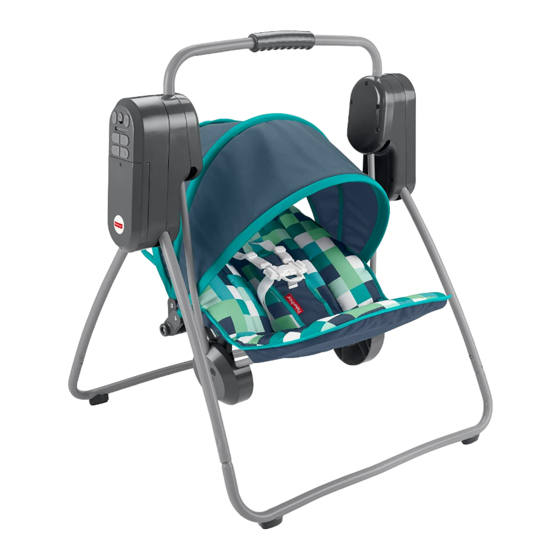
- Page 6 PARTS | PIEZAS | PIÈCES IMPORTANT! Please remove all parts from the package and identify them before assembly. Some parts may be packed in the pad. ¡IMPORTANTE! Sacar todas las piezas del empaque e identificarlas antes de empezar con el montaje.
- Page 7 ASSEMBLY | MONTAJE | ASSEMBLAGE Fit the ends of the base (one at a time) into the ends to the frame legs. Make sure you hear a “click” Note: The bases are designed to fit the legs one way. If the base doesn’t seem to fit, turn it around or try the other base.
- Page 8 ASSEMBLY | MONTAJE | ASSEMBLAGE Fit the frame arm into the socket in the seat hub. Colocar el brazo del armazón en las union de la conexion del asiento. Insérer l’bras du cadre dans le ouverture de pivot du siège.
- Page 9 ASSEMBLY | MONTAJE | ASSEMBLAGE Fit the frame arm into the socket in the seat hub. Colocar el brazo del armazón en la union de la conexion del asiento. Insérer l’bras du cadre dans le ouverture de pivot du siège.
- Page 10 ASSEMBLY | MONTAJE | ASSEMBLAGE Pull the hubs to be sure the seat is Pull the hubs to secure to the frame. secure to the fr Empuje hacia abajo en las conexiones Empuje hacia ab para asegurarse de que el asiento está para asegurarse segura en el armazón.
- Page 11 ASSEMBLY | MONTAJE | ASSEMBLAGE...
- Page 12 ASSEMBLY | MONTAJE | ASSEMBLAGE Pull up on the handle to be sure it’s secure. Jala hacia arriba en el asa para asegurarte de que está seguro. Tirer sur la poignée pour s’assurer qu’il est bien fixé. Lower the seat bottom tube. Baja la barra inferior del asiento.
- Page 13 ASSEMBLY | MONTAJE | ASSEMBLAGE Lower the canopy. Baja la cubierta. Baisser le pare-soleil. Fit the pad upper pocket over ocket over the seat back. Ajusta la funda superior de la erior de la almohadilla sobre el respaldo. respaldo. Passer le repli supérieur ieur à...
- Page 14 ASSEMBLY | MONTAJE | ASSEMBLAGE Lift the seat bottom tube to fit the lower pocket around it. Levanta la barra inferior del asiento para ajustar el bolsillo inferior a su alrededor. Lever le tube inférieur du siège pour passer le repli inférieur sur celui-ci.
- Page 15 ASSEMBLY | MONTAJE | ASSEMBLAGE Fasten the canopy strap. Fija la correa cubierta. Puis serrer la courroie du pare-soleil. Insert the waist belts through the lowest slots in the seat pad. Make sure the waist belts are not twisted. Insertar los cinturones de la cintura en las ranuras más bajas de la almohadilla.
- Page 16 ASSEMBLY | MONTAJE | ASSEMBLAGE Smaller Baby Insert the ends of the shoulder belts through the lower slots in the seat pad back. Make sure the shoulder belts are not twisted. Bebé más pequeño Insertar los extremos de los cinturones de los hombros en las ranuras inferiores de la parte trasera de la almohadilla.
- Page 17 BATTERY INSTALLATION | COLOCACIÓN DE LAS PILAS INSTALLATION DES PILES The battery compartment is located on the swing frame. Loosen the screws in the battery compartment door and lift to remove the door. Insert four C (LR14) alkaline batteries. Replace the battery compartment door and tighten the screws.
- Page 18 4 POSITION CANOPY | CUBIERTA CON 4 POSICIONES PARE-SOLEIL À 4 POSITIONS...
- Page 19 4 POSITION CANOPY | CUBIERTA CON 4 POSICIONES PARE-SOLEIL À 4 POSITIONS...
- Page 20 RESTRAINT SYSTEM | SISTEMA DE SUJECIÓN SYSTÈME DE RETENUE Fit the loops on the shoulder straps onto the ends of the waist straps. Position the restraint pad between your child’s legs and fasten the restraint belts to each side of the restraint pad. Make sure you hear a “click” on both sides. Check to be sure the restraint system is securely attached by pulling it away from your child.
- Page 21 RESTRAINT SYSTEM | SISTEMA DE SUJECIÓN SYSTÈME DE RETENUE To tighten: Feed the attached end of the waist belt into the buckle to form a loop. Then, pull the free end of the waist belt. Para apretar: Mantén el extremo conectado del cinturón dentro de la hebilla para formar un bucle.
- Page 22 CUSTOMIZE SOOTHING | PERSONALIZA RELAJACIÓN DÉTENTE PERSONNALISÉE Swing Slide the power switch Press the swing speed buttons to select any of six speed settings. The swing speed LEDs light up to indicate the speed selected. To stop swinging, slide the power switch OFF.
- Page 23 CUSTOMIZE SOOTHING | PERSONALIZA RELAJACIÓN DÉTENTE PERSONNALISÉE Columpio Poner el interruptor de encendido en ENCENDIDO. Presionar los botones de velocidad del columpio para seleccionar una de seis velocidades de movimiento. Las luces LED de velocidad del columpio se prenderán para indicar la velocidad seleccionada.
- Page 24 STORAGE | ALMACENAMIENTO | RANGEMENT Press the frame buttons (one at a time) and push the bases (one at a time) toward each other. Note: To open the frame, simply pull the bases apart. Presiona los botones del armazón y (uno a la vez) empuja las bases (uno a la vez) entre sí.
- Page 25 CARE | MANTENIMIENTO | ENTRETIEN The pad is machine washable. Unbuckle the restraint system. Lift the seat bottom tube and remove the pad pocket from the tube. Then pull the pad off of the restraint system and seat back. Machine wash the pad in cold water on the Protect the environment by not disposing of gentle cycle with a mild detergent.
- Page 26 BATTERY SAFETY INFORMATION INFORMACIÓN DE SEGURIDAD ACERCA DE LAS PILAS MISES EN GARDE AU SUJET DES PILES In exceptional circumstances, batteries Lors de circonstances exceptionnelles, may leak fluids that can cause a chemical des substances liquides peuvent s’écouler burn injury or ruin your product. To avoid des piles et provoquer des brûlures battery leakage: chimiques ou endommager le produit.
- Page 27 CONSUMER INFORMATION | INFORMACIÓN AL CONSUMIDOR RENSEIGNEMENTS POUR LES CONSOMMATEURS FCC STATEMENT (UNITED STATES ONLY) • Cambiar la orientación o localización de la antena receptora. This equipment has been tested and found • Aumentar la distancia entre el equipo to comply with the limits for a Class B digital y el receptor.
- Page 28 UNITED STATES Fisher-Price, Inc., 636 Girard Avenue, East Aurora, NY 14052. Consumer Services: 1-800-432-5437. CANADA Mattel Canada Inc., 6155 Freemont Blvd., Mississauga, Ontario L5R 3W2. Consumer Services/Service à la clientèle : 1-800-432-5437. MÉXICO Importado y distribuido por Mattel de México, S.A. de C.V., Miguel de Cervantes Saavedra No.
Need help?
Do you have a question about the GHP39 and is the answer not in the manual?
Questions and answers