
Related Manuals for Canon MV900


Summary of Contents for Canon MV900
-
Page 1: Instruction Manual
Digital Mini Video Cassette Digital Video Camcorder Instruction Manual PUB.DIE-253 English English Introduction Basic Functions Advanced Functions Editing Additional Information... -
Page 2: Important Usage Instructions
Important Usage Instructions Introduction WARNING! TO REDUCE THE RISK OF FIRE OR ELECTRIC SHOCK, DO NOT REMOVE COVER (OR BACK) NO USER SERVICEABLE PARTS INSIDE. REFER SERVICING TO QUALIFIED SERVICE PERSONNEL. WARNING! TO REDUCE THE RISK OF FIRE OR ELECTRIC SHOCK, DO NOT EXPOSE THIS PRODUCT TO RAIN OR MOISTURE. -
Page 3: Using This Manual
Using this Manual Thank you for purchasing the Canon MV920/MV901/MV900/MV890. Please read this manual carefully before you use the camcorder and retain it for future reference. Should your camcorder fail to operate correctly, refer to the Troubleshooting table ( Change the display language before you begin ( Symbols and References Used in This Manual : Precautions related to the camcorder operation. -
Page 4: About The Operating Modes
About the Operating Modes The operating modes are determined by the position of the Operating Modes Switch CAMERA PLAY : Function can be used in this mode. : Function cannot be used in this mode. Trademark Acknowledgments • is a trademark. ®... -
Page 5: Table Of Contents
Table of contents Introduction Using this Manual ...3 Checking the Supplied Accessories ...7 Components Guide...8 Basic Functions Preparations Preparing the Power Supply ...10 Loading/Unloading a Cassette ...13 Preparing the Camcorder ...14 Adjusting the LCD Screen ...15 Setting the Time Zone, Date and Time...16 Recording Recording Movies on a Tape ...18 Zooming...22... - Page 6 List of Messages...70 Maintenance/Others ...71 Troubleshooting ...76 System Diagram (Availability differs from area to area) ...79 Optional Accessories...80 Specifications...82 Index...84...
-
Page 7: Checking The Supplied Accessories
Checking the Supplied Accessories CA-570 Compact BP-2L5 Battery Pack Power Adapter (incl. power cord) STV-250N Stereo PC-A10 SCART Video Cable Adapter* * Europe only. ** Not included with the Lithium Button Battery CR1616 SS-900 Shoulder Strap**... -
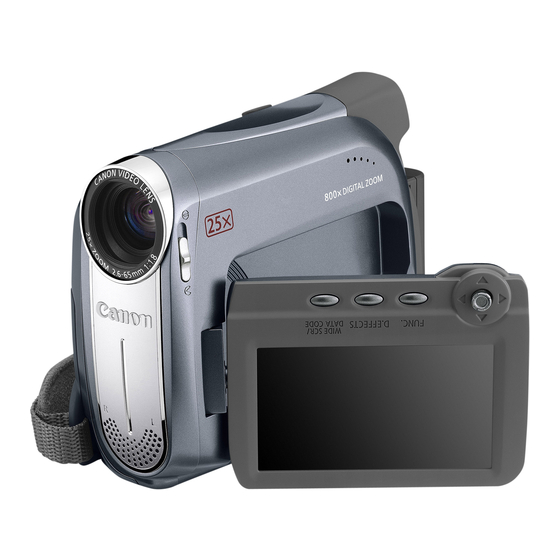
Page 8: Components Guide
Components Guide MV920/MV901/MV900/MV890 Left side view Right side view Lens cover switch ( open, closed) LCD BACKLIGHT button ( Speaker ( CHARGE indicator ( Terminal cover switch ( Grip belt ( AV terminal ( MIC (microphone) terminal ( DV terminal (... -
Page 9: Bottom View
Front view Rear view Stereo microphone Viewfinder ( Dioptric adjustment lever ( BATT. (battery release) button ( LCD screen ( Joystick ( FUNC. button ( D.EFFECTS button ( WIDE SCR button ( 54) / DATA CODE button ( Bottom view Backup battery compartment ( Start/stop button ( Battery attachment unit (... -
Page 10: Preparing The Power Supply
Preparing the Power Supply Basic Functions Preparations Attaching the Battery Pack 1. Turn the 2. Attach the battery pack to the camcorder. • Remove the terminal cover of the battery pack. • Press lightly and slide the battery pack in the direction of the arrow until it clicks. -
Page 11: Using A Household Power Source
Using a Household Power Source Connect to a household power source to use the camcorder without worrying about the battery power. You can keep the battery pack attached; the battery power will not be consumed. 1. Turn the switch to 2. -
Page 12: Installing The Backup Battery
Charging, Recording and Playback Times The following times are approximate and vary according to the charging, recording or playback conditions. Battery Pack Charging Time Max. Recording Time Viewfinder Typical RecordingTime* Viewfinder Playback Time * Approximate times for recording with repeated operations such as start/stop, zooming, power on/off. -
Page 13: Loading/Unloading A Cassette
Loading/Unloading a Cassette Use only videocassettes marked with the 1. Slide the OPEN/EJECT and open the cassette compartment cover. The cassette compartment opens automatically. 2. Load/unload the cassette. • Load the cassette with the window facing the grip belt. • Unload the cassette by pulling it straight out. -
Page 14: Preparing The Camcorder
Preparing the Camcorder Adjusting the Viewfinder (Dioptric Adjustment) 1. Turn on the camcorder and keep the LCD panel closed. 2. Adjust the dioptric adjustment lever. Fastening the Grip Belt Adjust the grip belt so that you can reach the zoom lever with your index finger, and the start/stop button with your thumb. -
Page 15: Adjusting The Lcd Screen
Adjusting the LCD Screen Rotating the LCD Screen Open the LCD panel 90 degrees. • You can rotate the panel by 90 degrees outward. • You can rotate the panel by 180 degrees inward. LCD Backlight LCD BACKLIGHT button You can switch the brightness of the LCD screen between normal and bright by pressing the LCD BACKLIGHT button. -
Page 16: Setting The Time Zone, Date And Time
Setting the Time Zone, Date and Time Set the time zone, date and time when you first start using your camcorder, or when you have replaced the backup battery. Setting the Time Zone/Daylight Saving Time MENU 1. Press the FUNC. button to open the FUNC. menu. The FUNC. - Page 17 8. Press the FUNC. button to close the menu. Time Zones and Difference from GMT/UTC. London Paris Cairo Moscow Dubai Karachi Dacca Bankok Singapore Tokyo Sydney Solomon Once you have set time zone, date and time, you do not need to reset the clock each time you travel to another time zone.
-
Page 18: Recording
Recording Movies on a Tape Recording Before You Begin Recording Make a test recording first to check if the camcorder operates correctly. If necessary, clean the video heads ( Recording 1. Open the lens cover (move the lens cover switch down to 2. -
Page 19: Allowing The Subject To Monitor The Lcd Screen
About the LCD and viewfinder screen: The screens are produced with extremely high-precision manufacturing techniques, with more than 99.99% of the pixels operating to specification. Less than 0.01% of the pixels may occasionally misfire or appear as black or green dots. This has no effect on the recorded image and does not constitute a malfunction. -
Page 20: Reviewing And Searching When Recording
Reviewing and Searching when Recording Joystick Record Review In record pause mode, this function allows you to review the last few seconds of your recording to check if it has been recorded properly. 1. Set the program selector to 2. If the joystick guide does not appear on screen, press ( ) to display it. -
Page 21: Screen Displays During Recording
When the camcorder shuts off automatically, the record review and record search functions will not work. To resume normal operation turn the and then back to CAMERA. Screen Displays during Recording Time Code Indicates the recording time in hours, minutes and seconds. Remaining tape Indicates the remaining time of the tape in minutes. -
Page 22: Zooming
Zooming The camcorder is equipped with optical zoom and digital zoom. Optical Zoom 25x optical zoom Move the zoom lever toward W to zoom out (wide- angle). Move it toward T to zoom in (telephoto). You can also change the zoom speed ( Keep at least 1 m to the subject. -
Page 23: Digital Zoom
Digital Zoom When the digital zoom is activated, the camcorder automatically switches between optical and digital zoom. With digital zoom, image resolution becomes lower the more you zoom 100x/800x digital zoom MENU CAMERA SETUP 1. Press the FUNC. button to open the FUNC. menu. 2. -
Page 24: Selecting The Zoom Speed
Selecting the Zoom Speed You can set the zoom speed to variable or to one of 3 levels of fixed zoom speeds. When set to [VARIABLE], the zoom speed depends on how you activate the zoom lever. Press softly for a slower zoom or press more strongly for a faster zoom. MENU 1. -
Page 25: Tips For Making Better Videos
Tips for Making Better Videos Holding the Camcorder For maximum stability, grip the camcorder in your right hand and keep your right elbow pressed against your body. If necessary, support the camcorder with your left hand. Be careful that your fingers do not touch the microphone or lens. -
Page 26: Playing Back A Tape
Playing Back a Tape Playback If the playback picture is distorted, clean the video heads using a Canon Head Cleaning Cassette or a commercially available digital video head-cleaning cassette ( 1. Set the camcorder to mode. Set the switch to PLAY. -
Page 27: Special Playback Modes
Special Playback Modes Joystick (Playback Pause) During normal playback, push the joystick ( (Fast Forward Playback) / Plays back the tape at 11.5 times normal speed (forward or reverse). During normal playback, hold the joystick pushed ( Release the joystick to return to normal playback. There is no sound during special playback. -
Page 28: Adjusting The Volume
Adjusting the Volume When you use the LCD screen for playback, the camcorder plays back the sound using the built-in speaker. The sound will be muted when the LCD panel is closed. Joystick MENU SPEAKER VOLUME 1. Press the FUNC. button to open the FUNC. menu. 2. -
Page 29: Playing Back On A Tv Screen
Playing Back on a TV Screen TVs with SCART Terminal Refer also to the TV or VCR instruction manual. STV-250N Stereo Video Cable (supplied) 1. Turn off all the devices before starting the connections. 2. Connect the PC-A10 SCART Adapter to the TV or VCR’s SCART terminal. - Page 30 TVs with Audio/Video Terminals Refer also to the TV or VCR instruction manual. 1. Turn off all the devices before starting the connections. 2. Connect the STV-250N Stereo Video Cable to the camcorder’s AV terminal and the audio/video terminals on the TV/VCR. Connect the white plug to the white audio terminal L (left), the red plug to the red audio terminal R (right) and the yellow plug to the yellow video terminal VIDEO.
-
Page 31: Selecting The Type Of Tv
Selecting the Type of TV During playback set the [TV TYPE] option according to the TV set to which you connect the camcorder. MENU VCR SETUP 1. Press the FUNC. button to open the FUNC. menu. 2. With the joystick select ( 3. -
Page 32: Selecting The Audio Output Channel
Selecting the Audio Output Channel You can select the output channels when playing back a tape with audio recorded on two channels. MENU 1. Press the FUNC. button to open the FUNC. menu. 2. With the joystick select ( 3. Select ( ) the [AUDIO SETUP] menu and press ). -
Page 33: Menus And Settings
Menus and Settings Advanced Functions The camcorder’s functions and settings are controlled from a series of menus that appear when you press the FUNC. button. Most basic functions appear on the first menu screen - the FUNC. menu. For more advanced settings you have to open the setup menus by selecting the [MENU] option from the FUNC. - Page 34 Menu and Default Settings Default settings are shown in boldface. Submenu FUNC. menu Recording Programs* White Balance Image Effect Self Timer Digital Effects CAMERA SETUP SHUTTR SPEED* A.SL SHUTTER D.ZOOM ZOOM SPEED IMG STAB* VCR SETUP REC MODE AUDIO SETUP WIND SCREEN* AUDIO MODE DISPLAY SETUP/...
- Page 35 Submenu Menu Item FUNC. menu Speaker Volume Recording Pause End Search Digital Effects VCR SETUP REC MODE TV TYPE AUDIO SETUP OUTPUT CH 12bit AUDIO MIX BALANCE AUDIO MODE DISPLAY SETUP/ BRIGHTNESS TV SCREEN DISPLAYS 6SEC.DATE DATA CODE LANGUAGE SYSTEM SETUP BEEP START-UP IMG DATE/TIME SETUP...
-
Page 36: Using The Recording Programs
Using the Recording Programs Recording Easy Recording Program The camcorder adjusts focus, exposure and other settings automatically, allowing you to just point and shoot. Recording Programs Program AE The camcorder adjusts focus, exposure and other settings automatically. However, you have the option of adjusting the settings manually. - Page 37 Beach Use this mode to record on a sunny beach. It prevents the subject from being underexposed. Sunset Use this mode to record sunsets in vibrant colors. Spotlight Use this mode to record spotlit scenes. Fireworks Use this mode to record fireworks.
-
Page 38: Selecting The Easy Recording Program
Joystick Availability of Functions in Each Mode: Program Selector Recording Program Image Stabilizer (on) Focus White Balance Wind Screen Shutter Speed Exposure Adjustment Digital Effects : Available : Not available Selecting the Easy Recording Program Set the program selector to “... - Page 39 Selecting a Recording Program MENU PROGRAM AE 1. Set the program selector to 2. Press the FUNC. button to open the FUNC. menu. 3. With the joystick select ( programs icon. 4. Select ( ) the recording program from the options on the bottom bar.
-
Page 40: Adjusting The Exposure Manually
Adjusting the Exposure Manually Adjust the exposure when a backlit subject becomes underexposed, or overexposed due to bright light. Joystick 1. Set the program selector to 2. If the joystick guide does not appear on screen, press ( ) to display it. 3. -
Page 41: Adjusting The Focus Manually
Adjusting the Focus Manually Autofocus may not work well on the following subjects. In such case, focus manually. Subjects with low Reflective contrast or without surfaces vertical lines Joystick 1. Set the program selector to 2. Adjust the zoom. When you operate the zoom after adjusting the focus, the subject may not stay in focus. -
Page 42: Infinity Focus
• To return to autofocus, push the joystick ( disappear and [FOCUS] will turn white again. 6. Push the joystick ( 7. If necessary, press ( The manual focus will reset to autofocus when you set the program selector to Infinity Focus Use this function when you wish to focus on faraway subjects such as mountains or fireworks. -
Page 43: Setting The White Balance
Setting the White Balance You can use the preset modes to reproduce colors more accurately, or set a custom white balance to obtain the optimal setting. AUTO Settings are automatically set by the camcorder. For recording outdoors on a bright day. DAYLIGHT For recording under tungsten and tungsten type (3-wavelength) TUNGSTEN... -
Page 44: Selecting An Image Effect
Use the auto setting for normal outdoor scenes. When the program selector is set to [AUTO]. The camcorder retains the custom white balance setting even if you turn it off. When you have set the custom white balance: - Depending on the light source, “ better than with the auto setting. -
Page 45: Setting The Shutter Speed
Setting the Shutter Speed You can adjust the shutter speed manually to make stable shots of fast moving subjects. Available shutter speed settings: AUTO, 1/50, 1/120, 1/250, 1/500, 1/1000, 1/2000 MENU CAMERA SETUP 1. Set the program selector to 2. Press the FUNC. button to open the FUNC. menu. 3. -
Page 46: Auto Slow Shutter
Auto Slow Shutter In the Easy Recording mode or when the shutter speed is set to [AUTO] in the Program AE recording program, the camcorder uses shutter speeds down to 1/25. This allows you to obtain a brighter recording in places with insufficient lighting. However, you can set the camcorder not to use a slow shutter speed. -
Page 47: Using The Self-Timer
Using the Self-Timer FUNC. button MENU SELF TIMER OFF 1. Open the FUNC. menu and select ( 2. Set ( ) it to [SELF TIMER ON] and close the menu. 3. Press the start/stop button. The camcorder starts recording after a 10-second countdown. The countdown appears on the screen. -
Page 48: Changing The Recording Mode (Sp/Lp)
Changing the Recording Mode (SP/LP) You can choose between SP (standard play) and LP (long play). LP extends the tape usage by 1.5 times. MENU 1. Open the FUNC. menu, select ( 2. Select ( ) the [VCR SETUP] menu and press ( the [REC MODE] option and press ( 3. -
Page 49: Audio Recording
Audio Recording Changing the Audio Mode You can record sound in two audio modes—16-bit and 12-bit. The 12-bit mode records sound on two channels (stereo 1), leaving 2 channels free (stereo 2) for adding new sound later with another editing device. Select the 16-bit mode for higher sound quality. MENU AUDIO SETUP 1. -
Page 50: Using An External Microphone
Using an External Microphone You can connect an external microphone to the MIC terminal. Use commercially available condenser microphones with their own power supply. You can connect almost any stereo microphone equipped with a Ø 3.5 mm plug but the audio level will be different than with the built-in microphone. MIC terminal Open the terminal cover... -
Page 51: Using Digital Effects
Using Digital Effects Faders ( Begin or end scenes with a fade to or from black. Fade Trigger (FADE-T) Corner Wipe (CORNER) Flip (FLIP) Zigzag (ZIGZAG) Tide (TIDE) Wipe (WIPE) Jump (JUMP) Puzzle (PUZZLE) Beam (BEAM) -
Page 52: Selecting A Fader
Effects ( Add flavor to your recordings. Black and White (BLK&WHT) Mosaic (MOSAIC) Wave (WAVE) Selecting a Fader mode, set the program selector to * Not available if the TV type is set to [NORMAL TV]. MENU D.EFFECT OFF 1. Open the FUNC. menu and select ( effects icon. -
Page 53: Selecting An Effect
Fade out: During recording, press the D.EFFECTS button and pause recording by pressing the start/stop button. The fader can be activated/deactivated by pressing the D.EFFECTS button. 4. Fade in: In playback pause mode, press the D.EFFECTS button and begin playback by pushing the joystick ( ) towards Fade out: During playback, press the D.EFFECTS... -
Page 54: Widescreen Tv Recording (16:9)
Widescreen TV Recording (16:9) The camcorder uses the full width of the CCD providing high-resolution 16:9 recording. Press the WIDE SCR button. • “ ” disappears and the picture changes to 4:3 aspect ratio. • On the LCD screen: Widescreen video will display normally; video in 4:3 aspect ratio will appear with black side bars. -
Page 55: Magnifying The Image
Magnifying the Image Playback The playback image can be magnified up to 5 times. Joystick 1. Move the zoom lever toward T. • The image is magnified by 2 times. • A frame appears indicating the position of the magnified area. •... -
Page 56: Displaying The Data Code
Displaying the Data Code The camcorder maintains a data code containing the recording date and time. You can select the data code combination and display it during playback. Joystick MENU 1. Open the FUNC. menu, select ( 2. Select ( ) the [DISPLAY SETUP/ select ( ) the [DATA CODE] option and press (... -
Page 57: End Search
End Search When you have played back a tape, you can use this function to locate the end of the last recorded scene. Joystick In stop mode: 1. Open the FUNC. menu, select ( 2. Select ( ) [EXECUTE] and press ( •... -
Page 58: Playing Back A Tape With Added Sound
Playing Back a Tape with Added Sound You can select to play back Stereo 1 (original sound), Stereo 2 (added sound), or adjust the balance of both sounds. MENU 1. Open the FUNC. menu, select ( 2. Select ( ) the [AUDIO SETUP] menu and press ( ) the [12bit AUDIO] option and press ( 3. -
Page 59: Changing The Display Language
Changing the Display Language Other Functions The language used for screen display and menu items can be changed. The available set of languages varies depending on the region. Follow the procedure below to check which set of languages are provided with your camcorder. Language Set A English, German, Spanish, French, Italian, Polish, Russian, Simplified Chinese, Japanese... -
Page 60: Other Camcorder Settings
Other Camcorder Settings Beep You will hear a beep upon camcorder operations such as power on/off, start/stop, self- timer countdown, and unusual conditions of the camcorder. If you turn off the beep, all camcorder sounds will be turned off. MENU To turn off the beep: 1. -
Page 61: Turning Off The Image Stabilizer
The image stabilizer might not be as effective when using the recording program. Changing the Display of the Start-Up Image You can set whether the Canon logo will be displayed or not when you turn on the camcorder. MENU SYSTEM SETUP To turn off the start-up image: 1. -
Page 62: Demonstration Mode
Demonstration Mode The demonstration mode displays the camcorder’s main features. It starts automatically when you leave the camcorder turned on (using the power adapter) without loading a recording media for more than 5 minutes. However, you can set the camcorder not to start the demonstration mode. -
Page 63: Connecting The Devices
Recording to a VCR or Digital Video Editing Device You can copy your recordings by connecting the camcorder to a VCR or a digital video device. If you connect a digital video device, you can copy recordings with virtually no generation loss in image and sound quality. - Page 64 We recommend powering the camcorder from a household power source. When connecting a VCR, the quality of the edited tape will be slightly lower than that of the original. When connecting a digital video device: - If the picture does not appear, reconnect the DV cable or turn the camcorder off and back on again.
-
Page 65: Recording From Digital Video Devices (Dv Dubbing)
Recording from Digital Video Devices (DV Dubbing) You can record from other digital video devices equipped with a DV terminal with virtually no loss in picture and sound quality. 1. Connect the camcorder to the digital video device. See Connecting a Digital Video Device ( 2. -
Page 66: Concerning Copyright
Concerning Copyright Copyright Precaution Certain pre-recorded video tapes, films and other materials, as well as some television programmes are copyrighted. Unauthorised recording of these materials may violate copyright protection laws. Copyright Signals During playback: If you try to play back a tape that contains copyright control signals for protection of software, “COPYRIGHT PROTECTED PLAYBACK IS RESTRICTED”... -
Page 67: Transferring Using A Dv Cable
Transferring Video Recordings to a Computer Transferring Using a DV Cable You can transfer recordings to a computer equipped with a IEEE1394 (DV) terminal or IEEE1394 capture board. Use the editing software supplied with your computer/capture board to transfer video recording from tape to computer. Refer to the instruction manual of the software. -
Page 68: Screen Displays
Screen Displays Additional Information Hiding the Displays on the LCD Screen You can hide the displays on the LCD screen to have a clear screen for playback. MENU 1. Open the FUNC. menu, select ( 2. Select ( ) the [DISPLAY SETUP/ select ( ) the [DISPLAYS] option and press ( 3. - Page 69 Screen Displays during Recording/Playback (see also Operating mode ( 4), Zoom ( Exposure adjustment ( Recording program ( White balance ( Image effects ( Self-timer ( Digital effects ( Shutter speed ( Exposure lock ( Recording reminder ( Manual focus ( Image stabilizer ( Recording mode ( Tape operation...
-
Page 70: List Of Messages
List of Messages Message SET THE TIME ZONE, DATE AND TIME CHANGE THE BATTERY PACK THE TAPE IS SET FOR ERASURE PREVENTION REMOVE THE CASSETTE CHECK THE INPUT CONDENSATION HAS BEEN DETECTED CONDENSATION HAS BEEN DETECTED REMOVE THE CASSETTE TAPE END INCORRECT TAPE SPECIFICATION PLAYBACK IS... -
Page 71: Maintenance/Others
Maintenance/Others Camcorder Handling Precautions Do not carry the camcorder by the LCD panel. Do not leave the camcorder in places subject to high temperatures, such as a sun- heated car, and high humidity. Do not use the camcorder near strong electric or magnetic fields such as above TVs, near plasma TVs or mobile phones. - Page 72 When the playback picture becomes distorted, the video heads need to be cleaned. To maintain the best picture quality, we recommend cleaning the video heads frequently with the Canon DVM-CL Digital Video Head Cleaning Cassette or a commercially available dry cleaning cassette.
-
Page 73: When Condensation Is Detected
When condensation is detected: The camcorder stops operating and the warning message “CONDENSATION HAS BEEN DETECTED” appears for approx. 4 seconds and “ If a cassette is loaded, the warning message “REMOVE THE CASSETTE” appears and “ ” starts flashing. Remove the cassette immediately and leave the cassette compartment open. - Page 74 About the battery terminal cover The battery terminal cover has a [ differentiate between charged and uncharged battery packs. For example, with charged battery packs, attach the terminal cover so that the [ label. Back side of the battery pack Lithium Button Battery Handling Precautions WARNING! •...
-
Page 75: Using The Camcorder Abroad
You can use the compact power adapter to operate the camcorder and to charge battery packs in any country with power supply between 100 and 240 V AC, 50/60 Hz. Consult the Canon Service Center for information on plug adapters for overseas use. Playback on a TV Screen You can only play back your recordings on TVs with PAL system. -
Page 76: Troubleshooting
Troubleshooting If you have a problem with your camcorder, refer to this checklist. Consult your dealer or a Canon Service Center if the problem persists. Power Source Problem Camcorder will not turn on. The camcorder switches off by itself. Cassette compartment will not open. - Page 77 Recording Problem Image will not appear on the Camcorder is not set to screen. “SET THE TIME ZONE, Time zone, date and time are DATE AND TIME” appears on not set. the screen. Backup battery is exhausted. Backup battery is inserted the wrong way.
- Page 78 Playback Problem Pressing the playback button does not start playback. Tape is running, but image will not appear on the TV screen. No sound from the built-in speaker. Cause Camcorder is turned off, or is not set to mode. Cassette is not loaded. Tape reached the end (“...
-
Page 79: System Diagram (Availability Differs From Area To Area)
System Diagram WS-20 Wrist Strap Shoulder Strap MiniDV Video Cassette * The BP-2L5 is not available as a separate optional accessory. (Availability differs from area to area) CB-2LTE CBC-NB2 Battery Charger Car Battery Charger STV-250N Stereo Video Cable CV-150F/CV-250F DV Cable SC-2000 Soft Carrying Case CB-2LWE... -
Page 80: Optional Accessories
Use of genuine Canon accessories is recommended. This product is designed to achieve excellent performance when used with genuine Canon accessories. Canon shall not be liable for any damage to this product and/or accidents such as fire, etc., caused by the malfunction of non-genuine Canon accessories (e.g., a leakage and/or explosion of a battery pack). - Page 81 SC-2000 Soft Carrying Case A handy camcorder bag with padded compartments and plenty of space for accessories. This mark identifies genuine Canon video accessories. When you use Canon video equipment, we recommend Canon-brand accessories or products bearing the same mark.
-
Page 82: Specifications
Specifications MV920/MV901/MV900/MV890 System Video Recording System Audio Recording System Television System Image Sensor Tape Format Tape Speed Maximum Recording Time (80 min. cassette) Fast Forward/Rewind Time LCD Screen Viewfinder Microphone Lens Lens Configuration AF System Minimum Focusing Distance White Balance... -
Page 83: Ca-570 Compact Power Adapter
Power/Others Power supply (rated) Power consumption (AF on) Operating temperature Dimensions (W x H x D) Weight (camcorder body only) CA-570 Compact Power Adapter Power supply Power consumption Rated output Operating temperature Dimensions Weight BP-2L5 Battery Pack Battery type Rated voltage Operating temperature Battery capacity Dimensions... -
Page 84: Index
Index 16:9 (Widescreen) ....54 6-second auto date ....56 Abroad, using the camcorder ..75 Accessories . - Page 85 Record review ....20 Record search ....20 Recording .
- Page 86 P.O. Box 2262, 1180 EG Amstelveen, The Netherlands Canon UK Ltd. CCI Service Centre, Unit 130 Centennial Park, Borehamwood, Hertfordshire, WD6 3SE, England Telephone 0870-241-2161 Canon Australia Pty. Ltd. Info-Line: 131383 www.canon.com.au Canon New Zealand Ltd. Customer Care: (09) 489 0470 www.canon.co.nz...
Need help?
Do you have a question about the MV900 and is the answer not in the manual?
Questions and answers