TFA 98.1030 Instructions Manual
Radio controlled alarm clock with indoor temperature
Hide thumbs
Also See for 98.1030:
- Operating instructions manual (28 pages) ,
- Operating instructions manual (28 pages) ,
- Instruction manual (28 pages)
Advertisement
Available languages
Available languages
Quick Links
Achtung: Bitte entsorgen Sie Altgeräte und leere Batterien nicht über den Hausmüll. Geben Sie diese bitte zur umweltge-
rechten Entsorgung beim Handel oder entsprechenden Sammelstellen gemäß nationaler oder lokaler Bestimmungen ab.
Attention: Please do not dispose of old electronic devices and empty batteries in household waste. To protect the environ-
ment, take them to your retail store or to appropriate collection sites according to national or local regulations.
Attention: Les vieux appareils électroniques et piles usagées ne doivent pas être jetées avec les ordures ménagères. Dans
le souci de protéger l'environnement veuillez les emmener dans un site approprié de récupération ou chez votre reven-
deur selon les spécifications nationales et locales.
Attenzione: Le batterie scariche e apparecchi elettrici smessi non devono essere smaltiti insieme all'immondizia domes-
tica, bensì dovranno essere riconsegnate al negoziante o ad altri enti preposti per il riciclo in conformità alle vigenti
disposizioni nazionali o locali.
Opgepast: Batterijen en technische apparaten mogen niet met het huisvuil worden weggegooid. Breng ze naar de in-
zamelplaatsen of bij uw detaillist naar de daarvoor bestemde containers volgens de nationale of lokale bepalingen.
Atención: El aparato y las baterías usadas no deben ser depositadas con los residuos normales de la casa.
Por favor deposítelas en el comercio especializado o bien en los centros de recogida y reciclaje previstos
para ello según el reglamento nacional o local.
Bedienungsanleitung
Instrucciones de uso
Istruzioni per l'uso
Mode d'emploi
Handleiding
Instructions
ROHS
Kat. Nr. 98.1030
Advertisement

Related Manuals for TFA 98.1030


Summary of Contents for TFA 98.1030
- Page 1 Atención: El aparato y las baterías usadas no deben ser depositadas con los residuos normales de la casa. ROHS Por favor deposítelas en el comercio especializado o bien en los centros de recogida y reciclaje previstos Kat. Nr. 98.1030 para ello según el reglamento nacional o local.
- Page 2 FIG. 1 FIG. 2...
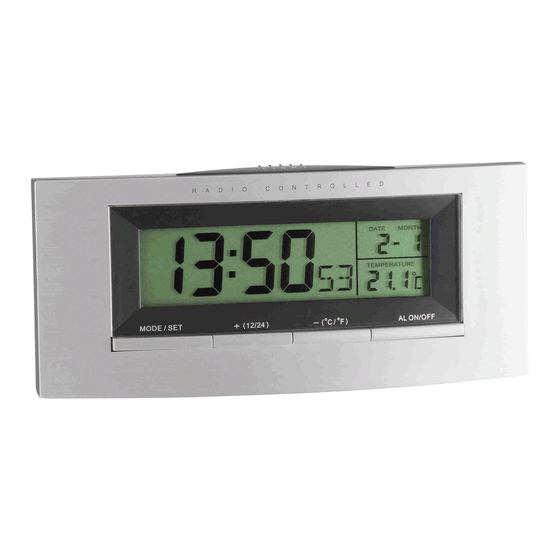
- Page 3 Bestandteile Fig. 1 Bestandteile Fig. 2 Funk-Wecker mit Innentemperatur Teil A- LCD Teil C- Gehäuse A1: DCF-Empfangszeichen C1: Batteriefach A2: Funkuhr A3: Alarmsymbol A4: Datum Funktionen A5: Temperatur • Funkuhr mit höchster Genauigkeit Teil B- Tasten • Sekundenanzeige B1: “SNOOZE/LIGHT” Taste •...
- Page 4 Inbetriebnahme • Drücken Sie noch einmal die “+(12/24)”-Taste und die “-(C/F)“-Taste, ist der Empfang des Funksignals ausgeschaltet (DCF-Empfangszeichen verschwindet). • Öffnen Sie das Batteriefach und legen Sie die Batterien (2 x 1,5 V AA) ein, +/- Pol wie abgebildet. Das Gerät ist jetzt betriebsbereit. •...
- Page 5 Bitte beachten Sie folgende Hinweise: “-(C/F“)-Taste die Stunden einstellen. Mit der “MODE” Taste können Sie nun nacheinan- der Minuten, Zeitzone, Sprache für den Wochentag, Jahr, Monat und Datum einstellen. • Es wird empfohlen, einen Abstand von mindestens 1,5 – 2 Metern zu eventuell störenden •...
- Page 6 • Unsachgemäße Behandlung oder nicht autorisiertes Öffnen des Gerätes führt zum Verlust der Garantie. Beleuchtung • Diese Anleitung oder Auszüge daraus dürfen nur mit Zustimmung von TFA Dostmann ver- • Drücken Sie die “SNOOZE/LIGHT” Taste. Die Displaybeleuchtung erscheint für 5 Sekun- öffentlicht werden.
- Page 7 Elements Fig. 1 Elements Fig. 2 Radio controlled alarm clock with indoor temperature Part A- LCD Part C- Structure A1: Radio Controlled Icon C1: Battery Compartment A2: Radio Controlled Time A3: Alarm Icon A4: Month and Day display Functions A5: Temperature display •...
- Page 8 Start-up • In case the clock cannot detect the DCF-signal (for example due to disturbances, transmit- ting distance, etc.), the time can be set manually. The clock will then work as a normal • Open the battery compartment and insert the batteries (2 x 1,5 V AA), polarity as illu- quartz clock.
- Page 9 • Within ferro-concrete rooms (basements, superstructures), the received signal is naturally • Hours, Minutes, Time Zone, Day-of-week language, Year, Month, Day. weakened. In extreme cases, please place the unit close to a window and/or point its front • The time zone is used for the countries where the DCF signal can be received but the time or back towards the Frankfurt transmitter.
- Page 10 • Improper use or unauthorized opening of housing will mean the loss of warranty. • Press “-(C/F)”- button to change between °C or °F as temperature unit. • No part of this manual may be reproduced without written consent of TFA Dostmann. Backlight •...
- Page 11 Eléments Fig. 1 Eléments Fig. 2 Réveil radio piloté avec température intérieure Part A - Affichage à CL Part C- Boîtier A1: Symbole de réception DCF C1: Logement de batterie A2: Horloge radio pilotée A3: Symbole d'alarme A4: Date Fonctions A5: Température •...
- Page 12 Mise en service • Pour désactiver touchez encore les touche « +(12/24) » et « -(C/F) », le symbole DCF disparaît. • Si votre réveil radio piloté ne peut pas recevoir le signal DCF (p. ex. en raison de la présen- •...
- Page 13 Nous vous prions de respecter les consignes ci-après: En utilisant la touche « MODE » on peut régler successivement les minutes, le fuseau horaire, la langue pour le jour de la semaine, l’ année, mois et date. • Nous vous recommandons de ménager une distance de 1,5 à 2 m entre l’appareil et d’éven- •...
- Page 14 • Avec la touche « -(C/F) » l´affichage de la température peut être ajusté en °C ou en °F. • Ce mode d'emploi ou des extraits de celui-ci peuvent être publiés exclusivement avec l'approbation du TFA Dostmann. Eclairage de fond •...
- Page 15 Componenti Fig. 1 Componenti Fig. 2 Orologio sveglia radio controllato con temperatura interna Parte A- Display LCD Parte C- Cassa A1: Simbolo di ricezione DCF C1: Vano batteria A2: Orologio radio controllato A3: Simbolo di allarme A4: Data Funzione A5: Temperatura •...
- Page 16 Messa in funzione • Per disattivare la funzione, premere i tasti “+(12/24)” e „-(C/F)“per 3 secondi nuovamente (il simbolo di ricezione DCF scompare). • Mettere le batterie (2 x 1,5 V AA) osservando la corretta polarità. Ora l’apparecchio è pronto per il funzionamento. •...
- Page 17 Le norme elencate qui di seguito siano rispettate: “MODE” è possibile modificare uno dopo l'altro le impostazioni per minuti, fuso orario, lingua per il giorno della settimana, anno, mese e data. • La distanza raccomandata da qualsiasi fonte di inerferenza come schermi di computer o di •...
- Page 18 °C (gradi Celsius) o °F (gradi Fahrenheit). • È vietata la pubblicazione delle presenti istruzioni o di parti di esse senza una precedente autorizzazione della TFA Dostmann. Illuminazione • Premere il tasto “SNOOZE/LIGHT”. L'illuminazione del display appaiono per 5 secondi.
- Page 19 Componentes Fig. 1 Componentes Fig. 2 Reloj despertador radio controlado con temperatura interior A: Pantalla LCD C: Cuerpo A1: Señal DCF para la hora C1: Compartimiento de las pilas A2: Reloj radio controlado A3: Símbolo de alarma A4: Fecha Funciones A5: Temperatura •...
- Page 20 Puesta en marcha • Pulse de nuevo la tecla „+(12/24)” y „-(C/F)“, la recepción de la señal de radio está desco- nectada (el símbolo de recepción DCF desaparece). • Inserte las pilas (2 x 1,5 V AA), +/- con la polaridad tal como viene representada. El apara- •...
- Page 21 Siga por favor las indicaciones siguientes: “+(12/24)” y “-(C/F)“. Con la tecla “MODE” puede cambiar sucesivamente al ajuste de los minutos, la zona horaria, el idioma para el día de la semana, el año, el mes y la fecha. • Es recomendable mantener una distancia de como mínimo 1,5 – 2 metros de posibles •...
- Page 22 • Con la tecla “-(C/F)“ puede seleccionar entre la indicación de temperatura en °C (grados garantía. Celsius) o °F (grados Fahrenheit). • Estas instrucciones o resúmenes de las mismas no pueden ser publicados sin la autoriza- ción de TFA Dostmann. Iluminación • Con la tecla “SNOOZE/LIGHT” puede iluminar la indicación durante 5 seg. Observaciones •...
- Page 23 Afzonderlijke delen Fig. 1 Afzonderlijke delen Fig. 2 Radiografische alarmklok met binnentemperatuur A: LCD-display C: Behuizing A1: DCF-ontvangstteken C1: Batterijvak A2: Tijd (DCF) A3: Alarmsymbool A4: Datum Functies A5: Temperatuur • Radiografische tijd met hoge precisie B: Toetsenbediening • Display voor seconden •...
- Page 24 Inbedrijfstelling • Drukt u nog een keer op “+(12/24)”en “-(C/F)“-toets schakelt u de ontvangst van het radiosignaal uit (DCF ontvangstsymbool verdwijnt). • Plaats de batterijen (2 x 1,5 V AA), +/- pool zoals afgebeeld. Het apparaat is nu bedrijfsge- • Als de radiogestuurde wekker geen DCF-signaal ontvangt (wegens storingen, afstand, reed.
- Page 25 • In ruimten met gewapend beton (kelders, torenflats) wordt het signaal uiteraard ver- maar de tijdzone van de Duitse tijd afwijkt (bijv. +1 = één uur later). zwakt ontvangen. In extreme gevallen het toestel dichter bij het raam zetten met de •...
- Page 26 °F (graden Fahrenheit) kiezen. lies van de garantie tot gevolg. Verlichting • Deze gebruiksaanwijzing of gedeelten eruit mogen alleen met toestemming van TFA • Druk op de “SNOOZE/LIGHT-toets”. De displayverlichting gaat voor 5 seconden aan. Dostmann worden gepubliceerd.
Need help?
Do you have a question about the 98.1030 and is the answer not in the manual?
Questions and answers