
Related Manuals for Trebs Comfortcam CC-128

Summary of Contents for Trebs Comfortcam CC-128
- Page 1 Handleiding Endoscoop met flexibele zwanenhals en ingebouwde waterdichte camera Model CC-128 Versie Nr. 1.0 Lees voor gebruik de handleiding aandachtig door.
- Page 2 Veiligheidsaanwijzingen Leveringsomvang Beschrijving van het toestel Toestelaanzicht Inbedrijfstelling Batterijen inleggen Kabelmontage Installatie van de accessoires Accu laden in de monitor Bedrijf Technische gegevens Milieuvriendelijke verwijdering Conformiteitverklaring...
- Page 3 Lees deze aanwijzingen a.u.b. voor het eerste gebruik zorgvuldig door. Algemene aanwijzingen Plaats het toestel nooit op een onstabiele ondergrond. Door het neervallen kunnen personen verwond raken. Het toestel mag niet in kinderhanden geraken. Het is geen speelgoed. Let ook op de veiligheidsaanwijzingen en de gebruiksaanwijzingen van de overige toestellen, waarop het toestel aangesloten wordt.
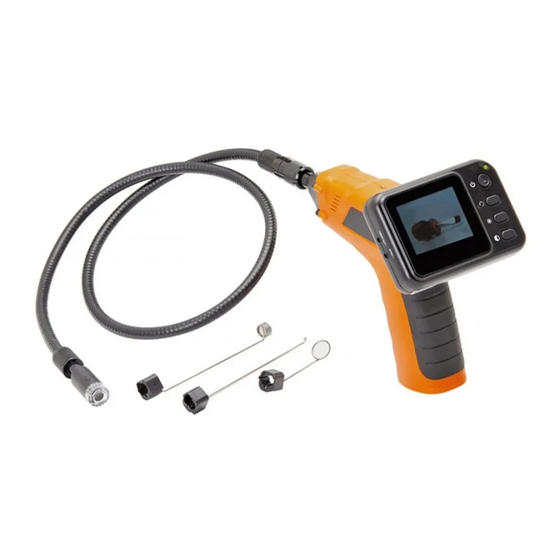
- Page 4 Toestelaanzicht Handtoestel Power-LED Kabel/aansluiting Monitoropname/ Signaaluitgang Kabel Aan-uit/LED- helderheid Minicamera met verlichting Monitor Power-LED Monitor aan-uit Standby aan-uit TFT-display Video-uitgang Beelduitlijning Laadbus/ Helderheid video-ingang Contrast Monitorklem video-ingang...
- Page 5 De meeste elektronische toestellen zoals lampen, computers, telefoons enz. creëren een elektromagnetisch veld. Plaats geen elektronische artikelen naast het toestel om ongewenste storingen en beïnvloedingen te vermijden. Verpakkingsmateriaal - Laat het verpakkingsmateriaal niet achteloos liggen. Plasticfolies/-zakken enz. kunnen voor kinderen gevaarlijk speelgoed worden. Reiniging en verzorging - Bewaar het toestel steeds op een zuivere en droge plaats.
- Page 6 Batterijen inleggen De batterijen worden in een batterijvak in de handgreep gelegd. - Verwijder met een schroevendraaier de schroef op de onderzijde van de handgreep. - Schuif nu het deksel in de pijlrichting. - Verwijder het batterijvak. - Leg nu bij naleving van de juiste polariteit 4 AA batterijen in het batterijvak.
- Page 7 Stift Gleuf Gekartelde knop Installeren van de accessoires De drie accessoires welke zijn bijgevoegd (spiegel, haak en magneetopzetstuk) worden allemaal op dezelfde manier aan de camera bevestigd. De installatie is als volgt: Bevestig de haak in opening Schuif de rubberen ring erover Accu laden in de monitor De monitor beschikt over een ingebouwde li-ion accu.
- Page 8 Controleer het toestel voor elke inzet opmerkzaam op beschadigingen. Vooral de kabel mag geen defecten aan de isolatie hebben. Enerzijds kan binnendringend water de kabel beschadigen en anderzijds kan contact met stroomvoerende delen tot elektrische schokken leiden. Gebruik handtoestel Schakel het handtoestel aan de onderzijde in. Door aan het rad te draaien, wordt de helderheid van de LED's bij de camera verhoogd of verlaagd.
- Page 9 Door telkens op de toets beelduitlijning te drukken kan het beeld 180° gedraaid of in spiegelbeeld weergegeven worden. Als de monitor op het handtoestel bevestigd is, wordt het signaal gezonden via de contacten aan de monitor en het handtoestel. Zodra u de monitor opnieuw van het handtoestel afneemt, gebeurt de overdracht via ether De afstand tussen monitor en handtoestel bedraagt door-...
- Page 10 Technische gegevens CMOS Beeldsensor 704 x 576 (PAL) Pixelaantal Beschouwingshoek 50° Overdrachtfrequentie 2468MHz Min. verlichting 0 Lux Soort modulatie Bandbreedte 18MHz Voeding 4xAA Batterijen 186 x 145 x 41(mm) Afmetingen (zonder flexibele kabel) 530g Gewicht Camera diameter Display 2.4" TFT-LCD 480 x 240 Pixel Videosysteem...
- Page 11 CE-verklaring We, Trebs BV, declare under our sole responsibility that this product is in conformity with the essential requirements and other relevant require ments of the R&TTE Directive (1999/5/EC). The product is compliant with the following standards and/ or other normative documents: EN300 440-2 v1.1.2 (2004-07)
- Page 12 Manual Endoscope avec col-de-cygne flexible et camera étanche intégrée Model CC-128 Version Nr. 1.0 Avant de procéder à une première mise en service, veuillez lire les prescriptions suivantes.
-
Page 13: Table Of Contents
Prescriptions de sécurité Etendue de la livraison Description de l'appareil Vue de l'appareil Mise en service Insertion des piles Montage du câble Installation des accessoires Chargement de l'accu Fonctionnement Caractéristiques techniques Déclaration de conformité Elimination écologique... - Page 14 Avant de procéder à une première mise en service, veuillez lire les prescriptions suivantes. Prescriptions générales Pour éviter un endommagement par l'aimant du haut-parleur intégré, des cartes magnétiques telles que les cartes de crédit ou d'eurochèque ainsi que des montres à balancier doivent être tenues à...
-
Page 15: Etendue De La Livraison
Nettoyage et entretien - Rangez l'appareil à un endroit propre et sec. - Utilisez un chiffon propre et sec pour nettoyer les surfaces de l'appareil. Interférences radio L'appareil travaille sur une fréquence de 2468 MHz. Cette fréquence peut également être utilisée par d'autres appareils transmetteurs de vidéo par radio. -
Page 16: Vue De L'appareil
Vue de l'appareil Appraeil portatif DEL de puissance Câble/Raccordement Enregistrement moniteur/sortie de signal Câble Marche- Arrêt/DEL luminosité Mini caméra avec éclairage Moniteur DEL de puissance Marche/Arrêt moniteur Ecran TFT Marche/Arrêt veille Sortie vidéo Cadrage de I'image Douille de Luninosité chargement/ Entrée vidéo Contrast Support moniteur... -
Page 17: Insertion Des Piles
Insertion des piles Les piles sont insérées dans le compartiment à piles situé dans la poignée. - Otez à l'aide d'un tournevis la vis placée sur la face inférieure de la poignée. - Faites ensuite glisser le couvercle dans la direction de la fl èche. -
Page 18: Installation Des Accessoires
Broche Fente Bouton moleté Installation des accessoires Les accessoires se composent de trois pièces : un miroir, un aimant et un crochet pouvant être fixé de la même manière sur la tête de la caméra. Confirmer le crochet dans l'ouverture Portez l'anneau en caoutchouc Chargement de l'accu du moniteur Le moniteur dispose d'un accu Li-Ion intégré. - Page 19 Avant chaque utilisation, vérifiez soigneusement le bon état de l'appareil qui ne doit pas présenter d'endommagements, en particulier l'isolation des câbles ne doit pas être défectueuse. D'une part, la pénétration de l'eau pourrait conduire à un endommagement, d'autre part le contact avec des éléments sous tension pourrait être source de décharges électriques.
- Page 20 Chaque pression sur la touche Cadrage de l'image fait tourner l'image de 180° ou est reflétée. Si le moniteur est fixé sur l'appareil portatif, la transmission des signaux se fait par les contacts du moniteur et de l'appareil portatif. Dès que vous démontez le moniteur de l'appareil portatif, la transmission se fait par Ondes La portée entre le moniteur et l'appareil portatif est en...
-
Page 21: Caractéristiques Techniques
Caractéristiques techniques Senseur d'image CMOS Nombre de pixels 704 x 576 (PAL) Angle de vision 50° Fréquence de la transmission 2468MHz Eclairage minimum 0 Lux Mode de modulation Bande passante 18MHz 4 piles AA Alimentation en courant 186 x 145 x 41(mm) Dimensions (sans câble flexible) 530g... -
Page 22: Déclaration De Conformité
Déclaration de conformité We, Trebs BV, declare under our sole responsibility that this product is in conformity with the essential requirements and other relevant require ments of the R&TTE Directive (1999/5/EC). The product is compliant with the following standards and/ or other normative documents: EN300 440-2 v1.1.2 (2004-07) - Page 23 Bedienungsanleitung Endoskop mit flexiblem Schwanenhals und integrierter wasserdichter Kamera Model CC-128 Version Nr. 1.0 Bitte lesen Sie dieses Handbuch aufmerksam durch, bevor Sie das Produkt verwenden!
- Page 24 Sicherheitshinweise Lieferumfang Gerätebeschreibung Geräteansicht Inbetriebnahme Batterien einlegen Kabelmontage Installation des Zubehörs Akku laden im Monitor Betrieb Technische Daten Umweltgerechte Entsorgung Konformitätserklärung...
- Page 25 Bitte lesen Sie diese Hinweise vor dem ersten Gebrauch sorgfältig durch. Allgemeine Hinweise Stellen Sie das Gerät niemals auf einen instabilen Untergrund. Durch ein Herabfallen könnten Personen verletzt werden. Das Gerät gehört nicht in Kinderhände. Es ist kein Spielzeug. Beachten Sie auch die Sicherheitshinweise und die Bedienungsanleitungen der übrigen Geräte, an die das Gerät angeschlossen wird.
-
Page 26: Lieferumfang
Verpackungsmaterial Lassen Sie das Verpackungsmaterial nicht achtlos liegen. Plastikfolien/-tüten, etc. Können für Kinder zu einem gefährlichen Spielzeug werden. Reinigung und Pflege Bewahren Sie das Gerät immer an einem sauberen, trockenen Platz auf. Verwenden Sie zur Reinigung der Außenflächen ein trockenes, weiches Tuch. Störung durch Funk Das Gerät arbeitet auf einer Frequenz von 2468 MHz. -
Page 27: Geräteansicht
Geräteansicht Handgerät Power-LED Kabel/Anschluss Monitoraufnahme/ Signalausgang Kabel Ein-Aus/ LED-Helligkeit Mini-Kamera mit Beleuchtung Monitor Power-LED Monitor Ein-Aus Standby Ein-Aus TFT-Display Video-Ausgang Bildausrichtung Ladebuchse/ Helligkeit Video-Eingang Kontrast Monitorhalterung/ Videoeingang... -
Page 28: Batterien Einlegen
Batterien einlegen Die Batterien werden in ein Batteriefach im Handgriff eingelegt. - Entfernen Sie mit einem Schraubendreher die Schraube auf der Unterseite des Handgriffs. - Schieben Sie nun den Deckel in Pfeilrichtung. - Entnehmen Sie das Batteriefach. Legen Sie nun unter Beachtung der richtigen Polarität 4 AA Batterien in das Batteriefach ein. -
Page 29: Installation Des Zubehörs
Stift Schlitz Rändelknopf Installation des Zubehörs Das Zubehör besteht aus 3 Teilen, einem Spiegel, einem Magneten und einem Haken, die in gleicher Weise am Kamerakopf befestigt werden: Schieb das Gummi Ring über Klamm der Haken im den Öffnung der Kamera Beachten Sie unbedingt die Reihenfolge in der der Monitor an die Stromversorgung angeschlossen werden muß. - Page 30 Kontrollieren Sie aufmerksam vor jedem Einsatz das Gerät auf Beschädigungen. Vor allem das Kabel darf keine Defekte an der Isolierung haben. Zum einen kann eindrin- gendes Wasser das Kabel beschädigen, zum anderen kann es beim Kontakt mit stromführenden Teilen zu Stromsch- lägen kommen.
- Page 31 Das Bild kann mit jedem Druck auf die Taste die Bildausrichtung um 180° gedreht bzw. gespiegelt werden. Wenn der Monitor auf dem Handgerät befestigt ist, erfolgt die Signalübertragung über die Kontakte am Monitor und Handgerät. Sobald Sie den Monitor vom Handgerät wieder abnehmen, geschieht die Übertragung über Äther Die Reichweite zwischen Monitor und Handgerät beträgt...
-
Page 32: Technische Daten
Technische Daten CMOS Bildsensor 704 x 576 (PAL) Anzahl der Pixel Betrachtungswinkel 50° Übertragungsfrequenz 2468MHz min. Beleuchtung 0 Lux Modulationsart Bandbreite 18MHz Stromversorgung 4xAA Batterien 186 x 145 x 41(mm) Abmessungen (ohne flexibles Kabel) 530g Gewicht Kameradurchmesser Display 2.4" TFT-LCD 480 x 240 Pixel Videosystem... -
Page 33: Umweltgerechte Entsorgung
CE Erklärung We, Trebs BV, declare under our sole responsibility that this product is in conformity with the essential requirements and other relevant require- ments of the R&TTE Directive (1999/5/EC). The product is compliant with the following standards and/ or other normative documents: EN300 440-2 v1.1.2 (2004-07) - Page 34 Manual Endoscope with a flexible u-trap and an integrated waterproof camera Model CC-128 Version Nr. 1.0 Please read this manual carefully before use the product.
- Page 35 Security instructions delivery content Appliance description Appliance description Getting started Insert batteries Installing imager head cable Installing the accessories Charging the battery in the monitor Operation Technical specification Disposal of electrical and electronic equipment Declaration of Conformity...
- Page 36 Please read this information carefully before you use the product. General instructions - Don't place the unit on unstable location, if it falls down, people may be injured. - The unit is not a toy, please beware of small children. - If you connect the unit to other electronic devices, please study also the security instruction of this device.
-
Page 37: Delivery Content
Maintenance - Please remove the battery in case you don't use the product for a longer period of time. Leaking batteries can damage the product. Store the product at a clean and dry place. - For cleaning use dry and soft cloth. Interference by radio - The apparatus operates on a frequency, which is also used by other devices, that transmit video by radio. -
Page 38: Appliance Description
Appliance description Hand grip Power-LED Tube connector Monitor adaptor/ Video output Tube On-Off/LED brightness mini camera with light Monitor Power LED Monitor On-Off TFT Display Standby On-Off Video output Image Orientation Charging/ Brightness Video Input Contrast Monitor mount Video input... -
Page 39: Insert Batteries
Insert Batteries The batteries are inserted into a battery box in the grip. - Remove the screw using a screwdriver on the lower side of the grip. - Slide the cover in the direction of the arrow. - Remove the battery compartment. - Insert four new batteries(included) into the slots of the battery compartment. -
Page 40: Charging The Battery In The Monitor
Key Slot Knurled knob To Install Accessory The three included accessories,(mirror,hook and magnet)all attached to the camera by the same way. To install as following: Wear the rubber ring Hook the hole Charging battery in the monitor The monitor has a built-in Li-Ion battery. A full charged battery is enough for approx. - Page 41 Inspect the inspection camera before use and correct any problems to reduce the risk of serious injury from electric chock and other causes and prevent tool damage. How to use the hand grip Turn on the power at the bottom side of the hand grip. The power indicator lights.
- Page 42 If the Image Orientation button is pressed, the picture orien- tation turns 180 ° or is mirrored. The signal transmission from hand grip to monitor uses the connector if the monitor is mounted on the hand grip. If not the transmission is wireless via ether The range between monitor and hand grip is up to about...
-
Page 43: Operation
Technical specifications Image sensor CMOS Total pixel 704 x 576 (PAL) View angle 50° Transmission frequency 2468MHz min. illumination 0 Lux Modulation type Bandwidth 18MHz Power Supply 4xAA batteries 186 x 145 x 41(mm) Dimensions (without flexible U-trap) 530g Weight Camera diameter Display 2.4"... -
Page 44: Disposal Of Electrical And Electronic Equipment
Declaration of conformity We, Trebs BV, declare under our sole responsibility that this product is in conformity with the essential requirements and other relevant require- ments of the R&TTE Directive (1999/5/EC). The product is compliant with the following standards and/ or other normative documents: EN300 440-2 v1.1.2 (2004-07)
Need help?
Do you have a question about the Comfortcam CC-128 and is the answer not in the manual?
Questions and answers