Table of Contents
Advertisement
Advertisement
Table of Contents

Related Manuals for 3M PELTOR SCU-300

Summary of Contents for 3M PELTOR SCU-300
- Page 1 System Control Unit, SCU-300 Remote Control Unit, RCU-300...
- Page 2 3M™ PELTOR™ SCU-300, RCU-300 1-12 13-24 25-36...
-
Page 3: Intended Use
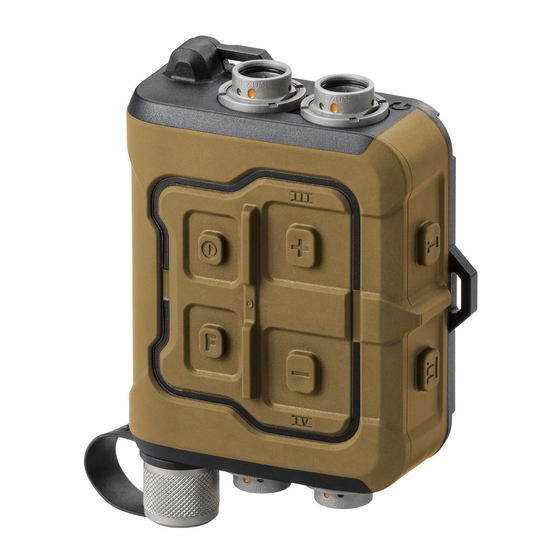
1.1. INTENDED USE This 3M™ PELTOR™ System Control Unit (SCU-300) connects and controls the individual components of the 3M™ PELTOR™ Tactical Modular Audio System. The SCU-300 also supports multiple, external communication device connections and serves as a single-source communications control device. The SCU-300 can be operated with the included Remote Control Unit (RCU-300). - Page 4 OVERVIEW SCU-300 A Intercom socket G + button B Headset socket H - button C Radio 1 socket I On/Off/Menu button D Radio 2 socket J Function button E PTT I button K Battery compartment cap F PTT II button L Metal clip RCU-300 M Locking bracket...
-
Page 5: Explanation Of Symbols
EXPLANATION OF SYMBOLS ON ~ 3 sec ~ 2 sec Recycling Symbol. Recycle this product at a recycling station for electrical and electronic equipment. NOTE: Other symbols/decals may occur on the product due to certification requirements for some commercial areas. 3. - Page 6 • 2 short beeping sounds indicate that the hearing Note: The RCU-300 will go into sleep mode after 120 minutes protection is connected to the SCU-300. after lost connection with SCU-300. There is no need to manually power off the RCU-300. •...
- Page 7 IMPORTANT! Make sure that the SCU-300 is placed in upright position and as high as possible within the chest area. 9. While pressing the buttons on the RCU-300, hold the RCU-300 against the SCU-300 to pair. 10. An audio message will indicate Primary/Secondary RCU connected.
- Page 8 6.8. TO FIT THE RCU-300 1. Pull and lift the locking bracket of the RCU-300 outwards and upwards. IMPORTANT! Make sure that the RCU-300 is placed within arm-length from the SCU-300. 5. Connect the cable with the SCU-300 and turn the cable clockwise to lock into place.
- Page 9 Note: When connected to an intercom system, this method of changing ambient (environmental) headset volume will not be available. In that case, it is necessary to enter the menu and select Ambient Listening Volume to change the volume of those devices. 7.3.
- Page 10 To answer a call • Press the Function button on the SCU-300 or PTT II button on the RCU-300 to answer a call from your mobile device. A short beep will be heard in the hearing protection before you hear the incoming call. To hang up a call •...
- Page 11 7.6.1. SCU-300 MENU 8.4. ADVANCED SETTINGS For more information about the menu, refer to “8. Menu 8.4.1. BATTERY STATUS functions SCU-300” Performs a battery status check on SCU-300, RCU, TEP-300 and/or ComTac™ VII. • Radio volume 8.4.2. RADIO SILENCE • Ambient (Environmental) listening volume Silences NIB, NFMI and Bluetooth signals emitted from the •...
-
Page 12: Troubleshooting
8.4.14. BATTERY TYPE Set the type of battery used on the SCU-300. Battery type is used for battery life estimations. • Alkaline - Sets the battery mode to alkaline battery. • Rechargeable - Sets the battery mode to rechargeable battery. 8.4.15. - Page 13 “3M™ PELTOR™ Tactical Modular Audio System”. Make sure the products in the 3M™ PELTOR™ Tactical Modular Audio System have been started in the correct order. Refer to the manual for “3M™ PELTOR™ Tactical Modular Audio System”. Press and hold the menu button on the SCU-300 for at least 10 seconds or until 2 short beeps indicates a successful pairing.
-
Page 14: Maintenance
New Zealand. Consumers should rely on their statutory rights. 13.1. WARRANTY In the event any 3M Personal Safety Division product is found to be defective in material, workmanship, or not in conformity with any express warranty for a specific purpose, 3M’s only obligation and your exclusive remedy shall be at 3M’s option,... -
Page 15: Uso Previsto
• Para reducir los riesgos de incendio y explosión, no usar este producto en atmósferas potencialmente explosivas. 2.2. ¡PRECAUCIÓN! • Usar siempre repuestos 3M específicos del producto. El uso de repuestos no autorizados puede reducir la protección que proporciona este producto. - Page 16 SINOPSIS SCU-300 G Botón + A Conector de intercomunicador H Botón - B Conector de orejera I Botón On/Off/Menu (encender/apagar/menú) C Conector de radio 1 J Botón de función D Conector de radio 2 K Tapa de compartimento de baterías E Botón de pulsar para hablar PTT I L Broche metálico F Botón de pulsar para hablar PTT II...
-
Page 17: Explicación De Símbolos
EXPLICACIÓN DE SÍMBOLOS 2. Mantener presionado el botón On/Off/Menu del SCU-300 durante ~3 segundos. Símbolo de reciclado. Reciclar ON ~ 3 sec este producto en un centro de reciclado de equipos eléctricos ~ 2 sec y electrónicos. NOTA: En el producto puede haber otros símbolos y calcomanías, debido a requisitos de certificación para algunas áreas comerciales.
Need help?
Do you have a question about the PELTOR SCU-300 and is the answer not in the manual?
Questions and answers