
Subscribe to Our Youtube Channel
Related Manuals for Pro's Kit SS-979


Summary of Contents for Pro's Kit SS-979
- Page 1 SS-979 2 In 1 SMD Hot Air Rework Station User’s Manual Edition 2020 ©2020 Copyright by Prokit’s Industries Co., Ltd.
- Page 2 SAFETY INSTRUCTIONS WARNING Warnings and cautions are placed at critical points in this manual to direct the operator’s attention to significant items. They are defined as follows: WARNING Failure to comply with a WARNING may result in serious injury or death. CAUTION Failure to comply with a CAUTION may result in injury to the operator, or damage to the items involved.
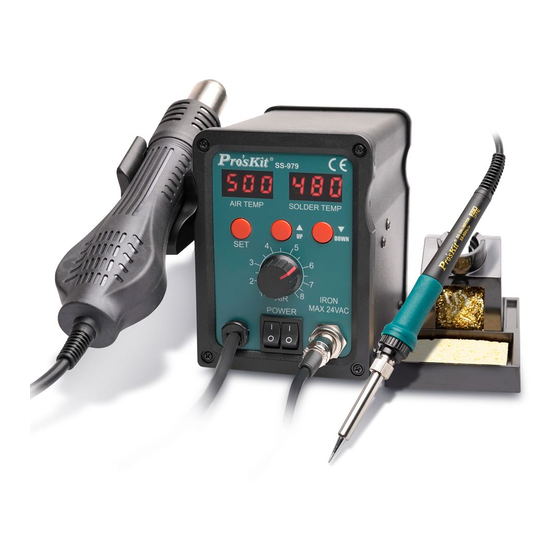
- Page 3 Cleaning sponge 6-2 Soldering iron power switch Soldering iron socket Packing List: SS-979 2 In 1 SMD Hot Air Rework Station (include bracket) x1 Heat gun x1 Air nozzle x 3 Soldering iron x1 Iron stand(with cleaning sponge, copper cleaner)x1 Power cord x1 User’s manual x1...
- Page 4 Handle with sensor design, switching work & sleep mode for real-time operation convenience. Auto cool-off process to prolong the life of heating element Comes with brushless motor provides long service life, quiet in operation Soldering iron conforms to CE, ESD safety regulations. ...
- Page 5 Replacement Soldering Iron: Replacement heater 9SS-900N-HT Replacement hand piece 9SS-900N-SI Replacement Tips: Application 1. Suitable for desoldering multiple components. 2. Ideal for heating shrink, viscidity removal, lacquer removal, preheating and more. 3. Electronic maintenance and device welding operation. Operation Instruction 1.
- Page 6 lower than 100℃, the station switching to standby mode. 9. Cut the power off and unplug the power cord if there is no operation for a long time. Attention Please set up the temperature as lower as possible in high airflow volume as to prolong heating element service life and better IC chips protection.
- Page 7 1. The air outlet and its surrounding area may be very hot. Be cautious of scald. 2. The heat gun shall not be put on the working table or other place except its bracket. 3. Please keep the air outlet unblocked. 4.
- Page 8 Problem 2: The temperature of the SMD station is not rising. Description: Display lights up but the temperature of heat gun is relative low and not heating up. Solution: Heat gun cord or heating element may be damaged, please replace a new heat gun.
- Page 9 Heating element broken Disassembling the Unit 1. Turn the nut 1 counterclockwise and remove the tip enclosure 2, the tip 3 . 2. Turn the nipple 4 counterclockwise and remove it from the iron. 3. Pull both the heating element 6 and the cord assembly 11 out of the handle 12. (Toward the tip of the iron.) 4.
- Page 10 Replace the heating element. 1. De-solder the damaged heating element leads and remove it. 2. Replace a new one and solders to PC board properly. Solder the two leads of heater to the other side of PC board, bend the leads at right triangle when soldering to prevent short-circuit After heating element replaced: 1.
- Page 11 SS-979 二合一 SMD 柔风吹焊烙铁组 操作说明书...
- Page 12 @2020 宝工实业版权所有,请勿翻印使用. 2020001 警告! 为降低伤害风险,用户必须阅读 使用手册。 注意事项 警告 本说明书之注意事项,区分为如下的”警告”及”注意”二者加以表示。请充分理解其 内容后再阅读本文。 警告:滥用将可能导致使用者发生严重伤害。 注意:可能导致用户受伤或对涉及物体造成实质破坏,为了使用者的安全着想,请 严格遵守”注意事项” 。 为了您的安全,请务必遵守下面的”警告”及”注意”事项。 警告 建议不要变更或拆解任何与本产品相关的部件。这样的行为可能会损坏本产品。 当需要更换保险丝时,请关闭电源后再作业。 正常使用时,确保不要突然关闭开关,关闭电源。应该放置于热风枪挂架,正常冷...
- Page 13 其却。否则会对本产品造成损坏。 注意 当电源为开启的状态,热风枪喷嘴的温度范围约在 100 to 500℃ (212 to 932℉), 温控烙铁温度范围 200-480ºC(392-896℉) 。为了避免伤害用户或是损坏使用区域 对象,请注意下列事项: 1. 热风不可以对着人吹,不可以碰触接近喷嘴的金属部份以免烫伤。 2. 不可以在有可燃气体或可燃材料附近使用本产品。 3. 在高温工作区域应该注意潜在的危险性。 4. 当长时间不使用或是附近没人的时侯,请将本产品的电源关闭。 5. 切勿触及烙铁头附近的金属部份。 6. 切勿在易燃物体附近使用电焊台。 7. 烙铁头极为灼热,可能引发危险事故,休息时或完工后应关掉电源。 8. 更换部件或装配烙铁头时,应关闭电源,并待烙铁头冷却至室温。 为预防意外的发生,请遵守下列注意事项: **手握持的装置不要敲打坚硬的地方,否则会造成主体的震动而损坏。...
- Page 14 **请确认产品接地的组件有链接电源的接地插座。 **不要拆开产品。 **不要任意修改任何原件。 **请使用本公司所提供的替换组件。 **不要弄湿产品或是用湿的手去使用产品。 **拔掉电源线时请拉拔插头,不要直接拉电线。 **请确认工作的区域通风良好。 **本产品请妥善放置在小孩拿取不到的地方。 ** 焊接时溶锡会冒烟,现场应有良好通风设备 ** 使用电焊台时不作任何可能伤害身体或损坏物体的举动 **如果电源软线损坏,为了避免危险,必须由制造商、其维修部或类似部门的专业 人员更换 一、各部件名称及包装清单 A. 各部件名称...
- Page 15 热风枪 6-2 烙铁开关 热风枪挂架 电源插头及开关 向上▲调节键 温度显示器 向下▼调节键 10 烙铁架 设置按键 11 海绵 风量调节旋钮 12 烙铁连接插口 6-1 热风枪开关 B. 包装清单: SS-979 二合一 SMD 柔风吹焊烙铁组主机 (含热风枪挂架) x1 热风枪 x1 烙铁 x1 烙铁座(包含清洁海绵、清洁钢丝)x1 热嘴配件 x 3...
- Page 16 电源线 x1 使用说明书 x 1 二、特点 1. 传感器闭合回路,微电脑过零触发控温,LED 显示,功率大,升温迅速,温度精 确稳定,不受出风量影响,真正实现无铅拆焊。 2. 气流量可调,风量平稳且出风柔和,温度调节方便,可以适应多种用途。 3. 手柄装有感应开关,只要手握手柄,系统即可迅速进入工作模式;手柄放回手 柄架,系统便会进入待机状态,实时操作方便。 4. 系统设有自动冷却功能,可延长发热体寿命及保护热风枪。 5. 采用无刷风机寿命极长,噪音极小。 6. 烙铁符合 CE、ESD 安全规范。 7. 烙铁手柄隔热效果佳,符合人体工学操作舒适。 8. 烙铁采用陶瓷发热体,功率稳定升温速度快。...
- Page 17 三、规格 型号 SS-979B SS-979H 输入电压 220V-240V ~50Hz 电源功率 760W 烙铁功率 烙铁温度范围 200-480℃ 热风温度范围 100-500℃ 烙铁工作电压 24V~ 热风工作电压 220V-240V~ 温度显示 烙铁发热芯 氧化铝陶瓷加热器 热风发热芯 金属发热芯 风量 120L/min(Max) 噪音 <45dB 插头形状 保险丝规格 250V / 5A 证书 CE, RoHS, ESD 重量(含烙铁) 2.5Kg 尺寸(mm) 170x170x140 (含支架) 四、选购配件:...
- Page 18 选购发热体 9SS-900N-HT 选购烙铁 9SS-900N-SI...
- Page 19 选购烙铁头: 五、用途 适合多种组件的拆焊。 用于热收缩、烘干、除漆、除粘、解冻、预热、胶焊接等。 电子维修及器件焊接作业等。 六、操作说明 将拆焊台摆放好,手柄搁置在手柄架上。 连接好电源。 装置所需风嘴。...
- Page 20 打开拆焊台电源开关,显示窗口显示出厂或最后一次使用设定温度,之后显示 “SLP” , 此时拆焊台为待机状态。 按“▲”或“▼”键设置工作温度。 旋转风量调节旋钮,设置所需工作风量。 拿起拆焊台手柄,拆焊台正常加热工作。调节风量旋钮使风量合适,待温度稳 定后便能正常工作。 工作完毕,必须把手柄放置手柄架,此时焊台自动切断加热电流,进入送冷风 冷却发热体模式,当温度低于 100℃拆焊台进入待机状态,显示屏显示“SLP” 。 长期不操作,须关闭电源开关。 注意︰ 在能完成作业的情况下,尽量使用低的温度和大的风量,这样有助于拆焊台发热体 的寿命及拆焊台内 IC 芯片安全。 七、设置温度 1. 在通电状态下,轻按 “SET”键选择调风温与烙铁温度间转换 2. 按“▲”或“▼”键调温度,默认为风枪温度状态,温度显示窗口会显示设置的温度。 3. 按一次“▲”键,则设定温度上升 1℃,显示窗口显示设置温度:按一次“▼”键,则...
- Page 21 设定温度下降 1℃;若按住“▲”或“▼”键不放,则温度迅速上升或下降。释放按键 后,显示窗口显示设置温度。 若不使用,热风枪风温低于 100℃则显示“SLP” , 处于待机状态。 4. 同时按“▲”▼开机,恢复出厂设置。 5. 按 SET 开机℃与℉选择。 八、温度校准: 1. 同时按“SET”和“▲”键校准风枪温度,此时输入测量实际温度值 2. 同时按“SET”和▼键校准烙铁温度,此时输入测量实际温度值 3. 按“SET”选择调节位置及退出,按“▲”▼ 调节数字 注:热风测温位置在装好风嘴内约 3mm 中间点 显示符号说明: 显示: “SLP”,表示出风口温度低于 100℃,拆焊台进入待机状态。一般手柄搁 置在手柄架上时。 显示“S—E” , 表示开机后热风枪(烙铁)尚未连接至拆焊台,或热风枪(烙铁) 的传感器有问题,若为传感器问题则需要更换新热风枪(烙铁) 。 九、拆焊台使用须知...
- Page 22 1. 热风拆焊台出风口及周边可能有极高温度,应小心谨慎,谨防烫伤。 2. 加热手柄必须放置在手柄架上,决不能放置工作台面或其他地方。 3. 请保持出风口通畅,不能有阻塞物。 4. 工作完毕, 必须把加热手柄防止在手柄架上, 让机器自动冷却至 100℃以下 (进 入待机状态)才能关闭电源开关。 5. 使用时出风口与对象之距离最少是 2 毫米,以出风口计算。 6. 根据工作需求,选用合适的风嘴,不同的风嘴,温度可能略有差别。 7. 烙铁不使用时,请放置于烙铁架。 8. 温度过高会降低烙铁头寿命,因此应选择适合工作温度。 9. 定期使用清洁海绵清理烙铁头。 10. 长时间连续使用烙铁时,应每周一次拆开烙铁头清除氧化物 11. 使用后应抹净烙铁头,镀上新锡层,以防止烙铁头引起氧化。 12. 不同款型烙铁头的温度可能有所不同,调节的最理想方法是使用测量烙铁头之 专用温度计。 (参照"温度校准") 十、更换保险丝 当有误用的状况而造成保险丝烧断时,可以自行更换新的保险丝,以一字起子拆下...
- Page 23 电源座下方保险丝座后,装上新的保险丝再装回保险丝座即可。 十一、基本故障排除说明 警告 为避免用户受伤及产品损坏,在进行检查前请先移除插头. 问题 1: 产品没有电源或温度显示器无法显示 1. 请检查产品是否有打开电源。 2. 请检查保险丝,若保险丝烧坏请更换新保险丝。 3. 请检查电源线连接是否正常。 4. 确定产品电源线是正确的插在插座。 5. 请检查当地电压是否符合产品指针。 问题 2: 热风枪温度无法上升 现象:温度显示器有显示温度,但热风枪温度未达设定相对温度或并未加热. 解决方法:热风枪电线或发热芯可能毁损,请更换新热风枪。 问题 3: 热风枪温度显示不正常...
- Page 24 现象:无法控制温度上升或下降。当工作时,显示温度小于 50℃,并不再升温。 解决方法: ** 热风枪电线或发热芯可能毁损,请更换新热风枪。 问题 4: 烙铁头温度无法上升 现象:温度显示器有显示温度,但热风枪温度未达设定相对温度或并未加热当工作 时,显示温度小于 50℃,并不再升温,或烙铁头断断续续升温时。 解决方法: **烙铁电线是否破损? 请更换烙铁手柄 **发热芯可能毁损,请更换新发热芯 请参阅"发热组件和电线破损检查法"。 问题 5: 烙铁头温度或热风温度太低或太高 现象:温度显示器和头部温度偏差较大 解决方法: **烙铁头老化是否严重? 请更换或清洁烙铁头 **是否正确校准? 请重新校准 如何检查发热组件和电线破损 如果插头引脚之间的电阻值与右表电阻值有差异, 则需将烙铁拆开后, 确认印刷...
- Page 25 电路板电阻值是否正常, 检测方式请参考替换发热组件。 2. 如印刷电路板(PCB)上测量电阻值正常,而插头引脚之间的电阻值有差异, 表示烙铁电线破损,请参考烙铁电线破损之测试方法。 3. 如果插头第 3 脚与烙铁头之间电阻值大于上表电阻值,则要用砂纸或钢绒轻轻 擦除右图所示部位的氧化层。 拔出插头,测试连接插头的脚与脚之间的电阻值如下: 如何拆装烙铁︰ ≈50Ω 第 1 脚与第 5 脚之间 (传感器) 第 2 脚与第 4 脚之间 (发热组件) ≈4Ω 第 3 脚与烙铁头之间 2Ω以下 1.向反时针方向扭开螺帽 1 ,取出烙铁头护套 2 和烙铁头 3 。 2.向反时针方向扭开套头 4 ,从烙铁中拉出套头。 3.从手柄...
- Page 26 测量方法︰ 注意:当烙铁回复到室温时测量 发热组件电阻值(两条红线之间的阻值): ≈4Ω 传感器电阻值(两条蓝线间的阻值): ≈50Ω 如果电阻值反常,更换发热组件。 替换发热组件 1. 将不良的发热组件进行解焊拆除。 2. 替换新的发热组件,点焊于PCB上。 注意︰发热组件及传感器无正负之分, 但发热组件与传感器接线混淆可能导致其他 组件的损坏。 更换烙铁发热组件后,请进行以下事项︰...
- Page 27 1. 测量烙铁插头第3脚和第4脚之间, 第3脚和第5脚之间, 第4和第5脚之间电阻值。 如果不是∞, 则可能是发热组件或传感器, 接地外壳之间有接触, 必须排除。 否 则这将会损坏印刷电路板。 2. 测量各线间电阻值是否符合, 确定引线未被扭曲,而接地弹簧也连接妥当。 烙铁电线破损 测试烙铁电线破损方法: 插头 引线示意图 测试烙铁插头脚和终端板电线之间的电阻值。 脚1-细黑色 脚2-粗红色 脚3白色 脚4-粗黑色 脚5-细红色,电阻值应<2奥姆,若大过2 奥姆或∞,应更换烙铁。 注意︰ 实际接线方式以线路图为准,变更引线外皮颜色时,恕不另告知。...
- Page 29 中国地区产品保固卡 店章 购买日期 公司名称 联络电话 电子邮箱 联络地址 SS-979H 产品型号 ※ 在正常使用情况下, 自原购买日起主机保修一年, 发热芯保修三个月(不含配件、 易耗品)。 ※ 产品保固卡需盖上店章、日期章并填写产品序号,其保固效力始生效。 ※ 本卡请妥善保存,如需维修服务时,请同时出示本保固卡,如无法出示,视为 自动放弃。 ※ 我司产品实行计算机编码,它将作为我司产品保固的依据,每抬产品均有独立 的编码,为了您能得到最好的服务,请勿损坏撕毁该编 ※ 保固期满后,如需维修之性质,则酌收检修工时费用。若有零件需更换,则零 件费另计。 保修说明 一、 保固期限内, 如发生下列情况, 本公司需依实际状况酌收材料成本或修理费(由 本公司维修人员判定): • 产品表面的损伤,包括外壳的破裂或刮痕 • 因误用、疏忽、不当安装或测试,未经授权私自打开产品修理,修改产品 或者任何其它超出预期使用范围的原因所造成的损害 • 因意外因素或人为因素(包括搬运、挤压、碰撞、高温、输入不合适电压、 腐蚀等不可抗力因素)导致的故障或损坏。 • 因使用非宝工导致的故障及损坏。 二、非服务保证内容...
- Page 30 销售/生产商 :上海宝工工具有限公司 原产地 :中国.上海 地址 :上海市浦东新区康桥东路 1365 弄 服务热线 :021-68183050 25 号...
- Page 31 ©2020 Prokit’s Industries Co., LTD. All rights reserved 2020001(C)
Need help?
Do you have a question about the SS-979 and is the answer not in the manual?
Questions and answers