Table of Contents
Advertisement
Quick Links
Advertisement
Table of Contents

Related Manuals for Three Sixty Kirra KIR100 Series


Summary of Contents for Three Sixty Kirra KIR100 Series
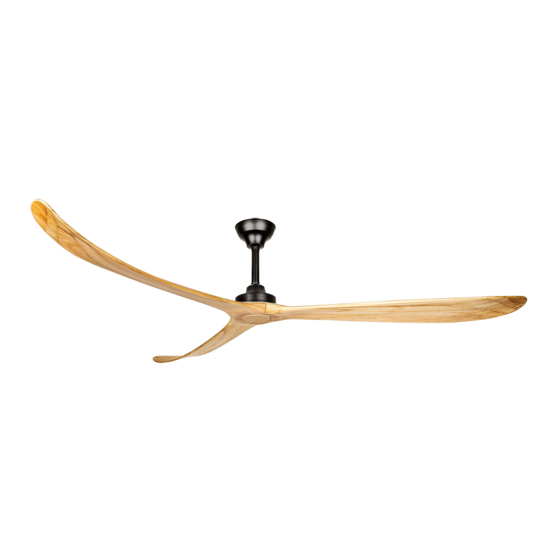
- Page 1 The Kirra 100” / 254cm DC Ceiling Fan Net Weight: 10.7 kg Gross Weight: 12.1 kg Model No. KIR100** Owner’s Manual Please read and keep these instructions as they contain assembly, warranty, maintenance and service information. Version: Date: August 2020...
- Page 2 ThreeSixty Ceiling Fans Fan Technology That’s Innovative and Reliable ThreeSixty Ceiling Fans is proud of its range of ceiling ceiling fans, accessories and lighting products. We believe these are the leading products in their category, reflecting over 40 years collective Australian experience in design, development, manufacturing and distribution of electronics and electrical equipment.
-
Page 3: Important Safety Instructions
Important Safety Instructions WARNING: To avoid fire, shock and serious personal injury, follow these instructions. Read your owner’s manual and safety information before installing your new fan. Review the accompanying assembly diagrams. 2. Before servicing or cleaning unit, switch power off at fuse box / circuit breaker and lock box (disconnecting means to prevent power from being switched on accidentally). -
Page 4: Supplied Parts
Supplied parts • One fan DC motor assembly • One hanger bracket fitted with terminal block • One top canopy • One set of blades and blade cover • One screw pack • One installation booklet • One remote control with preset remote receiver Tools and materials required •... - Page 5 Exploded Fan View & Parts CEILING HANGER BRACKET WOOD SCREW RECEIVER HANGER BALL CANOPY SET SCREWS BLADE SCREWS BLADE HOLDER PLATE REMOTE CONTROL WITH WALL BRACKET, 2X AAA BATTERIES BLADE COVER BLADES...
-
Page 6: Installing The Fan
Installing the fan All electrical work should only be undertaken by a licensed electrician and after disconnection of the power by removing fuses or turning off the circuit breaker to ensure all poles isolation of the electrical supply. The following steps will guide you to a successful installation: 1. - Page 7 3. Remote control installation and wiring WIRING INSTRUCTIONS: Ensure power is safely isolated before attempting any wiring. Your fan is supplied with a radio frequency remote control unit and the fan can only be controlled by remote control. IMPORTANT - This appliance must be earthed. EXPLODED WIRING DIAGRAM: Provided for clarity and to help identify the correct...
- Page 8 4. Install ceiling fan blades Install the ceiling fan blades using two (2) blade screws and one (1) blade holder per blade. Do not fully tighten the screws until all three blades have been securely mounted. Once all three blades are installed, firmly tighten all screws to securely lock in the blades.
- Page 9 Operating the handset (transmitter) Fan On/Off button Fan Speed: Press and release immediately to turn on and set fan speeds. Number 6 is the highest speed and Number 1 is the lowest. Natural Wind mode: Fan speed changes automatically within its range creating a gentle sea-breeze effect. Reverse button: Press and release immediately to set fan direction.
- Page 10 ThreeSixty Fans - Plain English Warranty Terms SHOULD THERE BE ANY INSTALLATION ISSUES OR DEFECTS PLEASE IMMEDIATELY CALL OUR SUPPORT HELP LINE ON 1300 469 326 FOR ASSISTANCE AND ADVICE. DO NOT ATTEMPT TO UNINSTALL OR REMOVE THE PRODUCT FROM THE CEILING UNLESS SPECIFICALLY ADVISED TO BY THREESIXTY FANS AS THIS WILL CAUSE DELAYS DIAGNOSING AND RESOLVING THE ISSUE.
- Page 11 ThreeSixty Fans - Plain English Warranty Terms Commencement The warranty period begins from date of purchase and in-home warranty service is available only at the site of original installation. If the product is installed as part of a project or development the warranty period commences when the product was delivered to the site.
Need help?
Do you have a question about the Kirra KIR100 Series and is the answer not in the manual?
Questions and answers