Table of Contents
Advertisement
Quick Links
Advertisement
Table of Contents

Related Manuals for Oursson JM8002


Summary of Contents for Oursson JM8002
- Page 1 Instruction manual & warranty card Cold press juice maker JM8002...
- Page 3 Congratulations on purchasing your new juice maker!
-
Page 5: Table Of Contents
CONTENTS Chapter 1: Introduction Safety instructions Recommendations Special features Getting started Product set Parts of the structure Chapter 2: Operation Assembly instructions (for juice) Cooking steps Cleaning and maintenance Assembly instructions (for puree) Reminder for user Chapter 3: Troubleshooting Chapter 4: Other Specifications Servicing... -
Page 6: Chapter 1: Introduction
OURSSON. • To protect against risk of electrical shock do not put the cord in water or other liquid. • When moved from a cool to a warm place... - Page 7 • If the power cord is damaged, it must be the device from the power grid. replaced by a specialist from the authorized • Keep the device from bumps, falls, vibration service center ( ASC ) OURSSON AG and other mechanical influences. to avoid danger.
- Page 8 • If the mesh filter is damaged, stop using the OFF position after each use. Before device and contact the authorized service disassembling the device, also make sure center (ASC) OURSSON AG. that the motor has stopped completely. • Do not put your fingers or any other foreign NOTE! The operation of this device objects into the hopper during operation.
-
Page 9: Recommendations
INTRODUCTION RECOMMENDATIONS GETTING STARTED • Please read the instruction manual before Before using the cold press juice maker for the using the device. Keep the manual after first time, please carefully wash it as described in instructions. Your press juice maker is now reading for further use. -
Page 10: Product Set
INTRODUCTION PRODUCT SET Juice bowl cover........................1 pc. Puree bowl cover........................1 pc. Pressure screw......................... 1 pc. Three-tier mesh filter........................ 1 pc. Rotating brush.......................... 1 pc. Juice bowl..........................1 pc. Puree bowl..........................1 pc. Motor base..........................1 pc. Pusher............................1 pc. Cleaning brush......................... -
Page 11: Parts Of The Structure
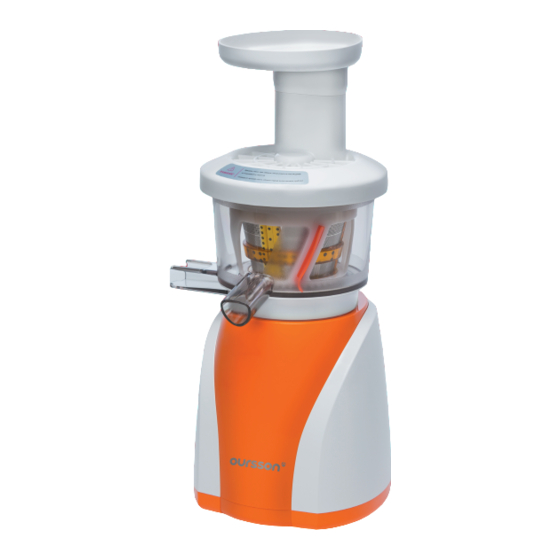
INTRODUCTION PARTS OF THE STRUCTURE Feeding chute Juice bowl cover Pressure screw Three-tier mesh filter Rotating brush Juice bowl Spout for pulp Spout for juice Motor base Puree bowl cover Puree bowl Pusher Cleaning brush Juice pitcher Pulp container NOTE! If the bowl is not installed correctly on the motor base, a protective mechanism is triggered and the device does... -
Page 12: Chapter 2: Operation
OPERATION ASSEMBL Y INSTRUCTIONS (FOR JUICE) Pressure screw Juice bowl Mesh filter Protection mechanism Motor base Motor base 1. Install the juice bowl on motor base. 3. Insert the pressure screw in the center Slowly rotate the bowl clockwise until of three-tier mesh filter as shown in Fig.3. it stops (Fig.1). - Page 13 OPERATION Bowl cover Marks on the Marks on the bowl cover bowl cover Pulp Marks on the Marks container bowl handle on the bowl Juice Marks on the pitcher bowl handle 5. To install the silicone baffle for spout, place 6.
-
Page 14: Cooking Steps
OPERATION COOKING STEPS 1. Assemble the device as described in the previous NOTE! If your products were kept in chapter, check whether it is correctly assembled. the refrigerator, place them Note! The device will not work, if the bowl is in clean water for at least 10 installed improperly. - Page 15 OPERATION NOTE! Remove in advance large NOTE! To avoid motor overheating, do seeds from such fruit as not use the device more than plums, apricots and peaches, 30 minutes nonstop. Every 30 as seeds can damage some minutes, make a 5-minute break details of the device and cause and let the device cool down.
-
Page 16: Cleaning And Maintenance
OPERATION CLEANING AND MAINTENANCE 3. Disassemble the device in reverse order of assembling it (Fig. 2): NOTE! For easier cleaning, rinse the 1) Remove the bowl by turning it details of the device by adding counterclockwise; in advance 1 cup of water 2) Remove the pressure screw;... - Page 17 OPERATION 5. Do not immerse the motor base in water. 6. After cleaning, dry thoroughly all the parts of Clean it with a damp soft cloth. the device. Store in a clean, dry place. NOTE! For easy cleaning, clean the device immediately after use.
-
Page 18: Assembly Instructions (For Puree)
OPERATION ASSEMBLY INSTRUCTIONS (FOR PUREE) 1. Install the puree bowl on motor base. Then, slowly turn the bowl cover clockwise Slowly rotate the bowl clockwise until until the mark on the cover coincides it stops (Fig. 1). with the mark on the handle, as shown in Fig. -
Page 19: Reminder For User
OPERATION REMINDER FOR USER 1. To assemble-disassemble the device: screw makes only 47 rotations per minute, considering that the products Assembly order are cut into small enough pieces). For juice: install the juice bowl on motor When juicing finishes, you can switch base. Slowly rotate the bowl clockwise the device on REV (reverse) mode for until it stops. - Page 20 OPERATION Pretreating fruit. Wash, peel and remove large seeds, if necessary. Cut into pieces that fit into the feeding chute. Pretreating beans, nuts and grains. Hard grains and beans should be soaked in advance in order to prevent motor overload and malfunction.
- Page 21 • Check whether the device is assembled correctly. If not, disassemble and reassemble according to the instructions. • If the problem persists, contact an authorized service center OURSSON. Decreased juice rate, pulp • Check whether the device is assembled correctly. contains too much liquid If not, disassemble and reassemble according to the instructions.
-
Page 22: Chapter 3: Troubleshooting
TROUBLESHOOTING Problem Items to check Extraneous noises heard • Some sounds may appear as a result during operation of interaction of ingredients. Bowl cover does not open • When juicing finishes, switch the device properly on REV (reverse) mode for 2-5 seconds for easier disassembly and use more power to rotate the cover counterclockwise. -
Page 23: Chapter 4: Other
Dimensions of the device, mm 540х210х280 Weight, kg 6,45 Note! Only a qualified specialist of an authorized service center OURSSON AG can repair the juice maker. Housing color: RD - Red, GA - Green Apple, OR - Orange, DC - dark cherry. -
Page 24: Servicing
We have done everything possible so that this meets your needs, and the quality corresponds 1. Warranty obligations OURSSON AG, to the best world standards. If your OURSSON provided ASC OURSSON AG, apply only branded product will need maintenance, please... - Page 25 OTHER 3. OURSSON AG sets for its products the • If the defect was a result of careless following terms of use and warranty handling, use for other purpose, violations periods: of conditions and rules of operation set forth in the instruction manual, including...
- Page 26 (cleaning and lubricating the moving parts, replacement of consumables and supplies, etc.) are made on a paid basis. 7. OURSSON AG is not responsible for any damage directly or indirectly caused by their products to people, pets, property, if it occurred as a result of non-observance...
- Page 27 Using the product when after the terms Product Recycling and Disposal of use (lifetime): After the expiration of the lifetime, 1. Lifetime set by OURSSON AG for this the product cannot be disposed with product applies only when the product is another household waste. Instead, it used exclusively for personal, family or...
- Page 28 OTHER Date of manufacture Each product has a unique serial number in Note! To avoid misunderstandings, the form of alphanumeric row and is duplicated we highly recommend you to with a barcode that contains the following read carefully the instruction information: name of the product group, date manual and the warranty of manufacture, serial number of the product.
- Page 29 OURSSON AG hotline provides complete information about the company’s activity in Russia, CIS and Baltic countries. Professional operators quickly answer to any question. You can contact the unified center for service support, for recommendations about the setup and connection, to get information about local sales, with questions about the promotions and yearly drawings conducted by the company, as well as with any other questions about the company's activities on the territory of Russia, CIS and Baltic countries.
- Page 30 Warranty card Filled by the selling company WARRANTY DEVICE MODEL SERIAL NUMBER DATE OF SALE SELLING COMPANY ADDRESS OF SELLING COMPANY PHONE OF SELLING COMPANY I HAVE READ THE TERMS OF WARRANTY service center stamp BUYER’S SIGNATURE Please ask the seller to fill completely the warranty card and the warranty Note! tickets.
- Page 32 Hotline OURSSON AG (free calls from landline phones): 8 800 100 8 708...
Need help?
Do you have a question about the JM8002 and is the answer not in the manual?
Questions and answers