
Related Manuals for Leader Half Pint

Summary of Contents for Leader Half Pint
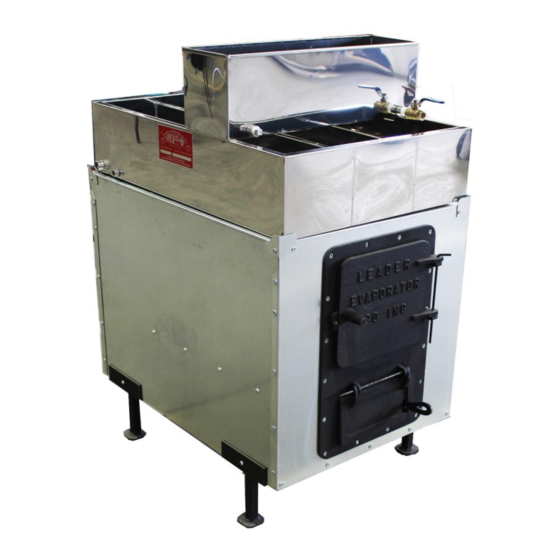
- Page 1 Leader Half Pint Evaporator Leader Evaporator Co., Inc. 49 Jonergin Drive Swanton, Vermont 05488 (802) 868-5444 www.leaderevaporator.com...
-
Page 2: Table Of Contents
BRICKING ..................................8 SETTING THE PANS ................................11 INSTALLING THE DRAW OFF VALVES ..........................11 First Boil .................................... 12 OPERATION OF THE HALF PINT EVAPORATOR........................13 THEORY OF OPERATION ..............................13 GRADIENT ..................................13 MAKING SYRUP ................................. 15 FLOW REVERSAL ................................15 HYDROMETER FUNCTION .............................. -
Page 3: Introduction
– where the liquid is hottest. Over time the pan can scorch where there is a buildup of sand. The reverse flow capability of the half pint allows you to change the direction of sap flow allowing the evaporator to “wash”... -
Page 4: Checklist / Parts List
LEADER HALF PINT EVAPORATOR CHECKLIST / PARTS LIST PART QUANTITY DESCRIPTION/PHOTO PART QUANTITY DESCRIPTION/PHOTO IDENTIFICATION IDENTIFICATION Back Front Left Right G (Grate Rail) Bottom Draft Latch Bolt and Nut 10-24X Draft Latch 1 ½” I (Corner J (Corner Bracket) Bracket) -
Page 5: Optional Setup Parts And Supplies
ORDER # The following section lists the parts for the Half Pint Startup Kit. The Half Pint Startup kit contains all the parts needed to complete the setup of the Half Pint Evaporator. The following parts can be ordered as a kit (Order #: 302435) of individually as listed. -
Page 6: Setup
LEADER HALF PINT EVAPORATOR SETUP ASSEMBLY NOTE: Assemble the arch close to the location where it will be used. The following pictures were taken of an already fully assembly ½ pint arch and are used for illustration purposes. - Page 7 LEADER HALF PINT EVAPORATOR 6. Mount back panel with ¼”-20X ½” bolts and matching nuts with the bolt heads on the outside of the arch. Finger tighten the bolts. a. Back panel flanges go outside the left and right side panels b.
-
Page 8: Positioning And Insulating
2. Place the boiling pan on the arch so it rests between the corner brackets (dividers run front to back) and recheck the level. 3. Install the elbow and stack. The half pint evaporator requires a 6” 90° elbow and 6” smoke stack. Install at least 3 three foot lengths of stack. - Page 9 LEADER HALF PINT EVAPORATOR BACK 1. You will need 13 half bricks 2. Cut bricks for the locations as labeled a. B1 – 4” X 6.5” b. B2 – 3.5” X 6.5” 3. Apply a coat of cement to the back panel.
- Page 10 LEADER HALF PINT EVAPORATOR 3. Cut one half brick in half (result is 2 pcs 4 ½” x 4 ½”) (HHB). Use the extra ½ brick on the opposite side. 4. Apply a coat of cement to the side to be bricked.
-
Page 11: Setting The Pans
INSTALLING THE DRAW OFF VALVES It is recommended two ½” stainless steel ball valves (LEADER Order # 60100) and 2 ½” stainless steel close nipples (LEADER Order # 72101) be installed. Other options are available. Contact LEADER Customer Service or your local dealer. -
Page 12: First Boil
LEADER HALF PINT EVAPORATOR 2. Wrap Teflon tape around each end of the stainless steel close nipples. 3. Thread a stainless steel nipple into each of the couplers on the boiling pan. 4. Thread a stainless steel ball valve onto each of the installed nipples. -
Page 13: Operation Of The Half Pint Evaporator
FORMING THE GRADIENT When the half pint is first filled, the boiling pan and reservoir pan will have the same concentration of sugar in the sap. As you boil the sap, the sugar concentration will increase (volume of water will decrease). To maintain the liquid level in the boiling pan you will add less concentrated liquid from the reservoir pan to the first channel of the boiling pan. - Page 14 LEADER HALF PINT EVAPORATOR MAINTAINING THE GRADIENT The important factors to remember in maintaining the gradient area as follows: Firing Defoamer Minimize the effects of flow reversal Firing You are seeking to maintain a constant boil. A constant boil will keep the liquid “push” in the boiling pan. If the boil is not consistent the liquid will flow in reverse and the gradient will be reduced or lost.
-
Page 15: Making Syrup
4. Build a small wood fire in the arch. Keep the firing consistent with good wood (see The Wood To Use in the Firing Section) in order to keep a consistent boil. With a properly fed fire and insulated arch - half pint users are able to boil from 5 to 8 gallons of sap an hour. - Page 16 LEADER HALF PINT EVAPORATOR To do the reversal: 1. Leave the liquid in the boiling pan. 2. Empty the reservoir pan into a container. 3. Turn the reservoir pan 180° and move to 6” from the rear of the boiling pan.
-
Page 17: Hydrometer Function
NOTE: Hydrometers from Leader Evaporator by law are calibrated by the State of Vermont. . The HOT and COLD test lines should be considered guidelines. Hydrometers should only be used by reading temperature and Brix/Baume readings. - Page 18 NOTE: To correctly determine the Brix/Baume, you need to read from the line of the syrup. LEADER EVAPORATOR Hydrometers: Hydrometers from LEADER EVAPORATOR are calibrated by the State of Vermont at two temperatures; 60°F Cold Test (66.9°Brix/36°Baume) and 211°F Hot Test (59.1°Brix/32.1°Baume). After numerous measurements it was determined 211°F is the average temperature of...
- Page 19 LEADER HALF PINT EVAPORATOR 35.5 65.9 35.75 66.4 7. Refer to the chart to determine if your syrup is “light” or 36.0 66.9 “heavy”. If the reading is higher than the number on the table your syrup is “heavy” and will need to be diluted. If the number is lower than the number in 36.25...
-
Page 20: Maintenance
END OF SEASON 1. Clean the pans with a pan cleaner such as LEADER Order #63006 (1 quart size). The directions are as follows: a. Add water to the boiling pan until the coating to be removed is covered with water.
Need help?
Do you have a question about the Half Pint and is the answer not in the manual?
Questions and answers