Table of Contents
Troubleshooting

Related Manuals for Slinger Slingshot T-One Launcher


Summary of Contents for Slinger Slingshot T-One Launcher
- Page 1 Slinger® Slingshot T-One Launcher & Oscillator USER MANUAL ® Designed and Developed by Slinger®. Patent Pending. Covered by International Patent Applications 2709 N. Rolling Road Suite 138 Windsor Mill 21244 MD USA UPDATED 23 AUGUST 2021...
- Page 2 Tennis in the past 12 months, 34% did so due to the lack of a partner to play with. Slinger® helps to solve this problem. Re-Inventing Tennis, making it accessible to all. Following thousands of hours of design, prototyping and both on and off court testing, we have taken Joe’s idea and transformed Slinger®...
-
Page 3: Limited Warranty Registration
User Suggestion: When not in use attach the remote securely to one of the zipper pulls on the Slinger Bag. It is easy to remove for use and is easily replaced at the end of use. Slinger Launcher User Guide... - Page 4 • Insert any foreign objects of any kind into the ball hopper while the power is “ON” • Use the Launcher in wet conditions or when rain is on courts or where water has collected. PLEASE READ ALL USER INSTRUCTIONS BEFORE USE Slinger Launcher User Guide 8/21...
- Page 5 Please be aware that the launching wheel continues to spin at high speed for several minutes after the launcher is switched off and can cause injury or burns if coming in contact with your hands. Slinger Launcher User Guide 8/21...
- Page 6 GLOBAL COMPLIANCE & CERTIFICATION Slinger Launcher User Guide 8/21...
- Page 7 Slinger Launcher User Guide 8/21...
-
Page 8: European Compliance
In accordance with Directive 2009/125/EC this device is equipped with a power switch. The following energy consumption figures apply (measured with a watt meter at the outlet): Switch in OFF position = 0.0 watts Switch in ON position = 120 watts Slinger Launcher User Guide 8/21... - Page 9 Balls. Please avoid using either old or soft tennis balls as this will reduce performance of the Launcher. We recommend only standard sized tennis balls. The SLINGSHOT T-ONE LAUNCHER is designed for use by tennis players of all ages and abilities.
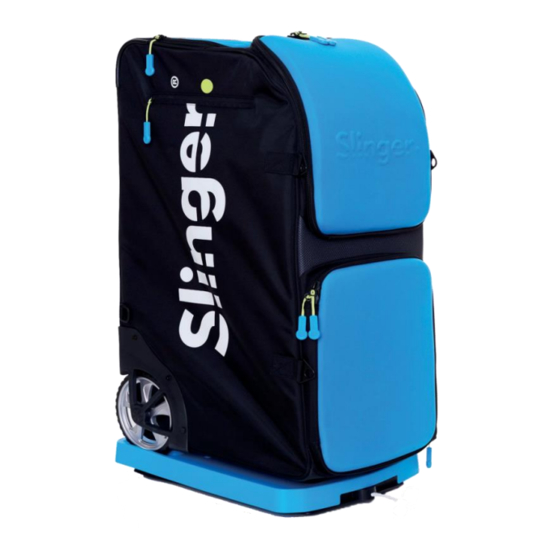
- Page 10 SLINGSHOT T-ONE LAUNCHER AT A GLANCE 15 16 7 & 8 10 9 Slinger Launcher User Guide 8/21...
- Page 11 SLINGSHOT T-ONE LAUNCHER AT A GLANCE 1. EXTENDABLE 2. CLIP ON CAMERA 3. TELESCOPIC BALL 4. USB PHONE CHARGING PORT TROLLEY HANDLE HOLDER PICK-UP TUBE HOLDER CLIP* (LOCATED INSIDE POCKET) 5. SIDE POCKET 8. LAUNCHER SERIAL 6. REMOVABLE SIDE 7. BALL ELEVATION...
-
Page 12: Getting Started
GETTING STARTED The Slinger® Slingshot T-One Launcher lithium battery is shipped to you at a maximum 30% charge in accordance with federal requirements for shipment of Lithium Batteries. ASSEMBLING THE CHARGER CABLE The following are actions will ensure optimum battery life and performance: •... -
Page 13: Lithium Battery
• Do not store the battery for more than 30 days without recharging it to a minimum 30% level. • Do not store the Slinger Bag Launcher in a closed car trunk or other location where the internal temperature can reach 100ºF or 40º Centigrade. -
Page 14: Battery Charging Instructions
BATTERY CHARGING INSTRUCTIONS Follow these steps to charge the battery using the ‘smart’ cable charger. • USER NOTE: It is advised to first remove the battery from the Slinger Bag Launcher and charge it outside of the Slinger Bag. •... - Page 15 REMOVING YOUR BATTERY PACK FOR AN INSTRUCTIONAL VIDEO WWW.SLINGERBAG.COM/SUPPORT WARNING: Switch Off Slinger T-One Launcher Right Pocket first. Left Pocket Battery Drawer Step 2: Step 1: To avoid losing the screws, please screw them back Unscrew 4 screws into their holes or store 4 screws at left/ right pockets that fix battery drawer of bag.
- Page 16 When battery is fully charged (GREEN LED) disconnect the charger cable. Open the cover of launcher connector. Unscrew 4 screws from battery drawer by hand. Place battery drawer into launcher structure slightly and connect battery cable and screw the connector tight. Slinger Launcher User Guide 8/21...
- Page 17 TIGHTENING THE SCREW NUT Screw Nut Screw Nut Secure Not Secure Secure Not Secure Battery Drawer Step 8: Place battery drawer back into the battery housing structure. Screw in the 4 battery drawer screws and tighten by hand. Slinger Launcher User Guide 8/21...
- Page 18 3. Adjust the desired angle 4. Rotate the knob clockwise to lock the bar USER NOTE: Please ensure that you LOCK the elevation bar tightly in order to avoid vibration and noise 2 & 3 Slinger Launcher User Guide 8/21...
- Page 19 BALL SPEED DIAL: Controls the speed of the balls being fired. The launcher speed ranges from the Ball Boy lowest speed of 10mph/16kmph to an advanced player speed of 45mph / 73kmph with the ball firing with a tournament level of topspin. Slinger Launcher User Guide 8/21...
- Page 20 OSCILLATOR* LED: Indicates when the Oscillator is ‘On’ after pressing the Oscillator remote button OSCILLATOR* CONNECTOR: Magnetic Plug to connect to the Oscillator cable. USER NOTE: * Oscillator is either sold separately or is included as part of a Slinger product bundle. Slinger Launcher User Guide...
- Page 21 CONTROLS Slinger Launcher User Guide 8/21...
- Page 22 Slingshot T-One Launcher ready to be used on court. Please follow these quick start operating guidelines: 1. Position Slingshot T-One Launcher on the court in your desired launching position. See our suggested positions based on level of play (see pages 26 & 27).
- Page 23 USER NOTE: You will hear a single “beep” to signal that the launcher wheel has started. After 10 seconds you will hear a second “beep” signalling that the feeder plate is rotating and the balls are about to commence launching. 8. START PLAYING! Slinger Launcher User Guide 8/21...
- Page 24 (see pages 26 & 27). 2. Make sure that the Slinger® logo on the top of the Oscillator is facing forwards to the net and the wheel location slots are positioned at the rear.
- Page 25 USER NOTE: You will hear a single “beep” to signal that the launcher wheel has started. After 10 seconds you will hear a second “beep” signalling that the feeder plate is rotating and the balls are about to commence launching. 12. START PLAYING! Slinger Launcher User Guide 8/21...
-
Page 26: Remote Control Instructions
REMOTE CONTROL INSTRUCTIONS IMPORTANT: Your Slingshot T-One Launcher cannot operate without the remote control for safety reasons. Please DO NOT misplace the remote. The remote has 2 buttons: UPPER BUTTON To turn the Launcher On/Off LOWER BUTTON To turn the Oscillator* On/Off... - Page 27 RED, YELLOW, GREEN, GREEN all together indicates FULL power OSCILLATOR L.E.D. The Oscillator LED INDICATOR is GREEN to indicate that the Oscillator is connected and switched on after pressing the Oscillator “ON / OFF” button (lower button) on the remote control. Slinger Launcher User Guide 8/21...
- Page 28 RESE Battery L.E.D.’s Indicator Oscillato r L.E.D. ® Slinger Launcher User Guide 8/21...
- Page 29 / practice. A. BALL BOY (Used to practice serving) Court Placement: Place Slingshot T-One Launcher near a side line on the same side of the court as the player. Elevation Angle: Place the elevation bar to the 40 degree elevation mark.
- Page 30 Slinger Launcher User Guide 8/21...
- Page 31 Slinger Launcher User Guide 8/21...
-
Page 32: Troubleshooting And Maintenance
As a result, there may be some residual ball fuzz either inside or on the front of your Slinger Bag Launcher and/or possibly other marks left as a result of this QC testing. This is perfectly normal. -
Page 33: Troubleshooting
Standing to the front and side of turn No battery power the Launcher, press top button on remote once to start feeder plate rotation. Feeding plate does not If above fails to activate Return for warranty turn the feeder Slinger Launcher User Guide 8/21... - Page 34 Oscillator not If the above have been Return for warranty operating checked and still no operation Ball Tube Known issue Email support@slingerbag.com issues: Ball for a replacement tube stuck inside Blue end cap damaged Slinger Launcher User Guide 8/21...
Need help?
Do you have a question about the Slingshot T-One Launcher and is the answer not in the manual?
Questions and answers