
Related Manuals for Spectrum Quad Plex


Summary of Contents for Spectrum Quad Plex
- Page 1 QuadPlex™ HD Multi-Display Processor User Guide April, 2020 RGB Spectrum 950 Marina Village Parkway Alameda, CA 94501...
- Page 2 © 2020 RGB Spectrum, Inc. All rights reserved. This guide is for use with the RGB Spectrum QuadPlex. Use for any other purpose is not permitted. This guide was prepared for viewing on a PC; a copy may be printed as required.
- Page 3 (510) 814-7000. IMPORTANT SAFETY INSTRUCTIONS Thank you for your purchase of this quality RGB Spectrum product! To reduct the risk of fire, electric shock or product damage, please note the following: Read these instructions. ...
- Page 4 Do not expose this apparatus to rain or moisture. Do not place liquid-filled objects, such as vases, on the apparatus. Do not block any of the ventilation openings. Do not install near any heat sources such as radiators, heat registers, stoves, or other ...
-
Page 5: Table Of Contents
TABLE OF CONTENTS CHAPTER 1 INTRODUCTION - - - - - - - - - - - - - - - - - - - - - - - - - - 1 Features and Benefits ............2 1.1.1 System Features ..........2 1.1.2 Inputs .............. - Page 6 Powering On ..............19 2.4.1 Standalone Unit ..........19 2.4.2 PCIe Card ............19 Configuration ..............20 Installing the QuadPlex Application ........20 2.6.1 System Requirements ........20 2.6.2 Installation ............21 CHAPTER 3 OPERATION - - - - - - - - - - - - - - - - - - - - - - - - - - - - 23 Using the Buttons ..............
- Page 7 LIST OF FIGURES Figure 1-1 Front Panel Controls and Indicators ............3 Figure 1-2 Rear Panel Connectors ................5 Figure 1-3 Connectors and Indicators - PCIe Card ..........6 Figure 2-1 Rack Mounting Shelf ................11 Figure 2-2 75 or 100 mm VESA Mount ..............13 Figure 2-3 200 mm VESA Mount ................
- Page 8 This page intentionally left blank. viii QuadPlex User Guide 350-12336-01 – updated April, 2020...
- Page 9 LIST OF TABLES Table 1-1 QuadPlex Front Panel Controls and Indicators - Standalone ....3 Table 1-2 QuadPlex Rear Panel Controls and Indicators - Standalone ....6 Table 1-4 QuadPlex Specifications - Standalone ............ 7 Table 1-3 QuadPlex Connectors and Indicators - PCIe .......... 7 Table 1-5 QuadPlex Specifications - PCIe Card .............
- Page 10 This page intentionally left blank. QuadPlex User Guide 350-12336-01 – updated April, 2020...
-
Page 11: Introduction
DisplayPort or HDMI video source on up to four HDMI displays. QuadPlex is available as either: A standalone unit (QPX DIN or QPX HIN). A PCIe card (QPX HIN-C or QPX DIN-C) installed in an RGB Spectrum Galileo or Zio W4000 video wall processor. -
Page 12: Features And Benefits
C H A P T E R 1 I n t r o d u c t i o n Features and Benefits QuadPlex provides these key features and functions: 1.1.1 System Features Drives up to four (4) displays simultaneously from a single source up to 4Kp60 resolution. ... -
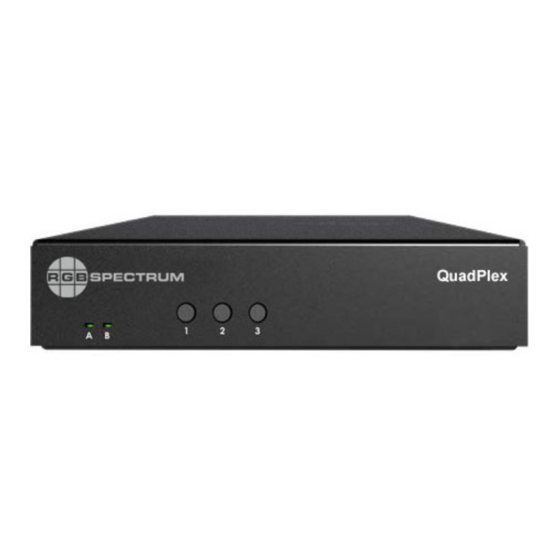
Page 13: Controls, Indicators, And Connectors (Standalone)
C H A P T E R 1 I n t r o d u c t i o n System Control The Ethernet port provides system control for QuadPlex by connecting to either: A network. Directly to a PC. ... - Page 14 If LED A and LED B both illuminate red, this indicates a fatal unit error. Try powering the QuadPlex unit off and on. If the LEDs are still red, then contact RBG Spectrum for support. See “Technical Support” on page Source Selection Selects the input source.
-
Page 15: Rear Panel Controls And Indicators
C H A P T E R 1 I n t r o d u c t i o n Table 1-1 QuadPlex Front Panel Controls and Indicators - Standalone (Continued) Name Description Device Information Shows the device information such as: ... -
Page 16: Connectors (Pcie Card)
C H A P T E R 1 I n t r o d u c t i o n Table 1-2 QuadPlex Rear Panel Controls and Indicators - Standalone Name Description Video input This will be either: HDMI 2.0 (QPX HIN) ... -
Page 17: Specifications
C H A P T E R 1 I n t r o d u c t i o n Table 1-3 QuadPlex Connectors and Indicators - PCIe Name Description Video input This will be either: Mini HDMI 2.0 (QPX HIN-C) ... -
Page 18: Table
C H A P T E R 1 I n t r o d u c t i o n Table 1-4 QuadPlex Specifications - Standalone (Continued) Parameter Description Supported Resolutions 1920 × 1080 @ 30Hz 1920 × 1080 @ 60Hz 1920 ×... -
Page 19: Pcie Card
C H A P T E R 1 I n t r o d u c t i o n Table 1-4 QuadPlex Specifications - Standalone (Continued) Parameter Description Dimensions 5.50” x 1.25” x 7.13” (13.97 cm x 3.18 cm x 18.11 cm) Regulatory Compliance Class A: RCM, CE, FCC, KC Specifications are subject to change without notice. - Page 20 C H A P T E R 1 I n t r o d u c t i o n Table 1-5 QuadPlex Specifications - PCIe Card (Continued) Parameter Description Power Power Consumption 15 Watts (maximum) Environmental Temperature Operating (nominal): 32 ºF to 113 ºF (0 ºC to 45 ºC) ...
-
Page 21: Installation
C H A P T E R 2 I n s t a l l a t i o n CHAPTER INSTALLATION This chapter describes the QuadPlex installation process in the following sections: “Mounting a QuadPlex Standalone Unit” on page ... -
Page 22: Horizontal
C H A P T E R 2 I n s t a l l a t i o n When rack-mounting one or more QuadPlex units: Never stack anything directly over the unit(s). I m p o r t a n t Make sure that all cables are properly secured and that no tension is applied to them. -
Page 23: Vesa Mount
C H A P T E R 2 I n s t a l l a t i o n Connect the input, output, network, and power cables to the mounted unit(s), as described in “Connections (Standalone Unit)” on page 2.1.2 VESA Mount You can mount QuadPlex units on standard 75 mm, 100 mm, or 200 mm VESA mounts, or on the... -
Page 24: Connections (Standalone Unit)
C H A P T E R 2 I n s t a l l a t i o n Connections (Standalone Unit) “Connections (PCIe Card)” on page 17 for instructions on connecting a QuadPlex N o t e PCIe card. If needed, you may use Mini DisplayPort to DisplayPort adapters (p/n 520 12178;... -
Page 25: Connecting Displays
C H A P T E R 2 I n s t a l l a t i o n 2.2.2 Connecting Displays To connect displays to the QuadPlex unit, connect up to four (4) 2K/HD displays to the HDMI OUT ports. Figure 2-6 HDMI Outputs - Standalone The overmold (or boot) of each... -
Page 26: Connecting To A Network
C H A P T E R 2 I n s t a l l a t i o n 2.2.4 Connecting to a Network Use a standard Cat 5, 5e, 6, or 7 network cable with an RJ-45 plug to connect a control PC, network hub, router, or gateway to the LAN port on the QuadPlex unit. -
Page 27: Connecting The Source
C H A P T E R 2 I n s t a l l a t i o n Connections (PCIe Card) “Connections (Standalone Unit)” on page 14 for instructions on connecting a N o t e standalone QuadPlex unit. If needed, you may use Mini DisplayPort to DisplayPort adapters (p/n 520 12178;... -
Page 28: Connecting Displays
C H A P T E R 2 I n s t a l l a t i o n 2.3.2 Connecting Displays Connect up to four (4) 2K/HD mini HDMI displays to the HDMI OUT ports. Figure 2-13 HDMI Outputs - PCIe Card The overmold (or boot) of each HDMI connector must be no more N o t e... -
Page 29: Connecting To A Network
C H A P T E R 2 I n s t a l l a t i o n 2.3.4 Connecting to a Network Use a standard Cat 5, 5e, 6, or 7 network cable with an RJ-45 plug to connect a control PC, network hub, router, or gateway to the LAN port on the QuadPlex PCIe card. -
Page 30: Configuration
C H A P T E R 2 I n s t a l l a t i o n Configuration All QuadPlex devices are configured as follows: Standalone unit: Receives power from the external power supply. Is controlled by the QuadPlex application that is installed on a remote PC. ... -
Page 31: Installation
C H A P T E R 2 I n s t a l l a t i o n 2.6.2 Installation To install the QuadPlex application on the remote PC: Connect and power on your QuadPlex devices, and then verify that all devices have been discovered by the network. - Page 32 C H A P T E R 2 I n s t a l l a t i o n This page intentionally left blank. QuadPlex User Guide 350-12336-01 – updated April, 2020...
-
Page 33: Operation
C H A P T E R 3 O p e r a t i o n CHAPTER OPERATION This chapter describes how to control your standalone and/or PCIe QuadPlex device(s) by: “Using the Buttons” on page “Using the QuadPlex Application” on page ... -
Page 34: Using The Quadplex Application
C H A P T E R 3 O p e r a t i o n Using the QuadPlex Application The QuadPlex application simplifies configuring and creating wall designs for QuadPlex devices. This application works in offline mode to customize configurations of any type and size without needing an active connection to the QuadPlex device(s), including: Independently rotating each output in 90-degree increments (90, 180, and 270) for artistic ... -
Page 35: Overview
C H A P T E R 3 O p e r a t i o n Edit: Rename or delete a design. See “Renaming the Current Design” on page 27 “Deleting a Design” on page Help: Accesses online documentation for the QuadPlex application and provides ... -
Page 36: Exiting The Quadplex Application
C H A P T E R 3 O p e r a t i o n Configure each QuadPlex device using the Network settings and Device management tabs. See both of the following: “Network Settings Tab” on page 33 ... -
Page 37: Closing A Design
C H A P T E R 3 O p e r a t i o n A window opens with a list of all existing designs. Click the desired design to open it. You may now continue working on the selected design from where you previously left off. C L O S I N G A D E S I G N Closing a design closes the current design and returns you to the previous design. -
Page 38: Adding A New Virtual Device
C H A P T E R 3 O p e r a t i o n A D D I N G A N E W V I R T U A L D E V I C E To add a new virtual QuadPlex device, click the Add Device button. -
Page 39: Creating A New Layout
C H A P T E R 3 O p e r a t i o n C R E AT I N G A N E W L AY O U T To create a new layout, click the Add Layout button. A new Layout tab appears with a generic name (such as 17). -
Page 40: Output Settings Tab
C H A P T E R 3 O p e r a t i o n O U T P U T S E T T I N G S TA B The Output settings tab is where you configure the number of outputs to assign to a virtual QuadPlex device. - Page 41 C H A P T E R 3 O p e r a t i o n Display mode: Use this pull-down menu to select the resolution (in pixels) and refresh rate (in Hz) of your output. Selecting a different size (width and height) and/or aspect ratio (width/ height) of the source rectangle from the size and aspect ratio of the selected resolution will cause scaling to occur.
-
Page 42: Input Settings Tab
C H A P T E R 3 O p e r a t i o n I N P U T S E T T I N G S TA B The Input settings tab is where you configure the input signal settings on the DisplayPort IN or HDMI IN connector of the selected QuadPlex device. -
Page 43: Network Settings Tab
C H A P T E R 3 O p e r a t i o n N E T W O R K S E T T I N G S TA B The Network settings tab is where you configure the network parameters for a virtual QuadPlex device. -
Page 44: Device Data Transfer Tab
C H A P T E R 3 O p e r a t i o n D E V I C E D ATA T R A N S F E R TA B The Device data transfer tab is where you upload and download configurations to and from physical QuadPlex devices. -
Page 45: Device Management Tab
C H A P T E R 3 O p e r a t i o n Firmware version: Version of the firmware package installed on that QuadPlex device. D E V I C E M A N A G E M E N T TA B The Device managent tab is where you view the status and manage the settings of the physical QuadPlex devices on the subnet. -
Page 46: Cloning The Input
C H A P T E R 3 O p e r a t i o n 3.2.8 Cloning the Input In the Output Settings tab (see “Output Settings Tab” on page 30), selecting Clone Landscape or Clone Portrait in the Layout menu clones the input display to the output displays, meaning that the entire content of the input display appears on each of the output displays, as shown in Figure 3-2. - Page 47 QuadPlex layouts. If you need to create a layout that is N o t e not in this list, then contact RGB Spectrum Technical Support for assistance. See “Technical Support” on page...
-
Page 48: Quadplex Layouts
C H A P T E R 3 O p e r a t i o n Table 3-1 QuadPlex Layouts Layout Input QuadPlex # Outputs Layout 5 x 2 7860 x 1080 Unit 1 7860 x 1080 Unit 2 1920 x 2160 Unit 3 5 x 2... - Page 49 C H A P T E R 3 O p e r a t i o n Table 3-1 QuadPlex Layouts Layout Input QuadPlex # Outputs Layout 5 x 3 7860 x 1080 Unit 1 7860 x 1080 Unit 2 7860 x 1080 Unit 3 1920 x 3240...
- Page 50 C H A P T E R 3 O p e r a t i o n Table 3-1 QuadPlex Layouts Layout Input QuadPlex # Outputs Layout 2 x 4 3840 x 2160 Unit 1 3840 x 2160 Unit 2 3 x 4 1920 x 4320 Unit 1...
- Page 51 C H A P T E R 3 O p e r a t i o n Table 3-1 QuadPlex Layouts Layout Input QuadPlex # Outputs Layout 6 x 4 1920 x 4320 Unit 1 1920 x 4320 Unit 2 1920 x 4320 Unit 3 1920 x 4320...
- Page 52 C H A P T E R 3 O p e r a t i o n Table 3-1 QuadPlex Layouts Layout Input QuadPlex # Outputs Layout 2 x 5 1920 x 4320 Unit 1 1920 x 4320 Unit 2 3840 x 1080 Unit 3 3 x 5...
- Page 53 C H A P T E R 3 O p e r a t i o n Table 3-1 QuadPlex Layouts Layout Input QuadPlex # Outputs Layout 5 x 5 7680 x 1080 Unit 1 7680 x 1080 Unit 2 7680 x 1080 Unit 3 7680 x 1080...
- Page 54 C H A P T E R 3 O p e r a t i o n Table 3-1 QuadPlex Layouts Layout Input QuadPlex # Outputs Layout 2 x 6 3840 x 2160 Unit 1 3840 x 2160 Unit 2 3840 x 2160 Unit 3 2 x 6...
- Page 55 C H A P T E R 3 O p e r a t i o n Table 3-1 QuadPlex Layouts Layout Input QuadPlex # Outputs Layout 5 x 6 1920 x 3240 Unit 1 1920 x 3240 Unit 2 1920 x 3240 Unit 3 1920 x 3240...
-
Page 56: Calculating A Custom Layout
C H A P T E R 3 O p e r a t i o n 3.3.1 Calculating a Custom Layout The following formula will help you calculate the numberof QuadPlex devices needed for any given layout: (# of displays ¸ 4 outputs/device) + remainder if any For example, a 2x7 video wall has 14 displays. -
Page 57: Firmware Updates
F i r m w a r e U p d a t e s CHAPTER FIRMWARE UPDATES RGB Spectrum periodically updates product firmware to add new features or improve product performance. To check for firmware updates for your RGB Spectrum product: Visit the Partner Portal section of our web site at http://www.rgb.com/partners/. Either: Click the Login button to access the portal with an existing username and password. -
Page 58: Updating The Firmware
C H A P T E R 4 F i r m w a r e U p d a t e s Before Updating the Firmware Before updating your QuadPlex firmware: The firmware update process requires the QuadPlex device to reboot at least once. Make sure ... - Page 59 C H A P T E R 4 F i r m w a r e U p d a t e s Click Search to begin searching for devices, either automatically or using the IP address(es) you supplied in Step 2. If needed, you can pause the search by clicking Stop.
- Page 60 C H A P T E R 4 F i r m w a r e U p d a t e s This page intentionally left blank. QuadPlex User Guide 350-12336-01 – updated April, 2020...
-
Page 61: Contact Information
C H A P T E R 5 C o n t a c t I n f o r m a t i o n CHAPTER CONTACT INFORMATION Corporate Headquarters RGB Spectrum 950 Marina Village Parkway Alameda, CA 94501 Phone: +1-510-814-7000 Fax: +1-510-814-7026 Web: rgb.com... - Page 62 QuadPlex™ 4K multi-display processor User Guide April, 2020 RGB Spectrum 950 Marina Village Parkway Alameda, CA 94501...
Need help?
Do you have a question about the Quad Plex and is the answer not in the manual?
Questions and answers