
Related Manuals for Erbauer EAPS600


Summary of Contents for Erbauer EAPS600
- Page 1 EAPS600 EAN: 5059340043371 ORIGINAL INSTRUCTIONS V11020 BX220IM MNL_Erbauer_GB_EAPS600_600W Airless Paint Sprayer_V1_201029.indd 1 10/29/20 3:31 PM...
- Page 2 Product description Safety instructions Assembly Care & maintenance Guarantee Declaration of conformity MNL_Erbauer_GB_EAPS600_600W Airless Paint Sprayer_V1_201029.indd 2 10/29/20 3:31 PM...
- Page 3 This appliance can be used by children aged from 8 years and above and persons with reduced physical, sensory or mental capabilities or lack of experience and knowledge if they have been given supervision or instruction concerning use of the appliance in a safe way and understand the hazards involved.
- Page 4 WARNING! Please read all safety warnings carefully and be sure that they are fully understood before handling the tool. 17# 17# 19# 19# 27# MNL_Erbauer_GB_EAPS600_600W Airless Paint Sprayer_V1_201029.indd 3 10/29/20 3:31 PM...
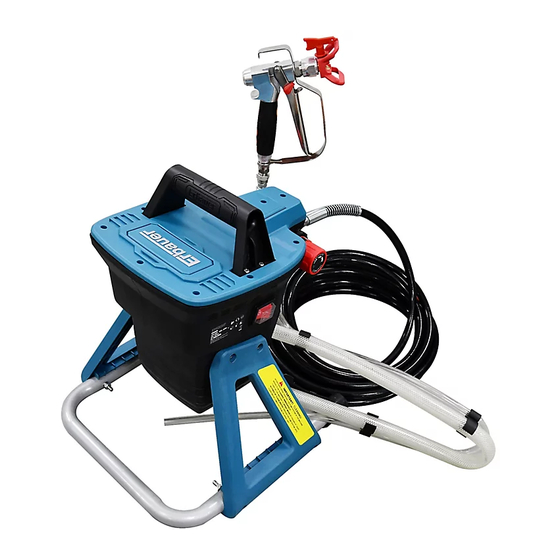
- Page 5 Product description MNL_Erbauer_GB_EAPS600_600W Airless Paint Sprayer_V1_201029.indd 4 10/29/20 3:31 PM...
- Page 6 MNL_Erbauer_GB_EAPS600_600W Airless Paint Sprayer_V1_201029.indd 5 10/29/20 3:31 PM...
- Page 7 Prime Spray Arrow forward for spraying use. Arrow Horizontal Vertical backward for cleaning use. Lock the trigger Unlock the trigger Lock the spray MNL_Erbauer_GB_EAPS600_600W Airless Paint Sprayer_V1_201029.indd 6 10/29/20 3:31 PM...
- Page 8 Prime Spray MNL_Erbauer_GB_EAPS600_600W Airless Paint Sprayer_V1_201029.indd 7 10/29/20 3:31 PM...
- Page 9 Prime For cleaning Spray For spraying Prime MNL_Erbauer_GB_EAPS600_600W Airless Paint Sprayer_V1_201029.indd 8 10/29/20 3:31 PM...
- Page 10 MNL_Erbauer_GB_EAPS600_600W Airless Paint Sprayer_V1_201029.indd 9 10/29/20 3:31 PM...
- Page 11 Spray Prime MNL_Erbauer_GB_EAPS600_600W Airless Paint Sprayer_V1_201029.indd 10 10/29/20 3:31 PM...
- Page 12 Safety instructions GENERAL POWER TOOL SAFETY WARNINGS WARNING! Read safety warnings, instructions, illustrations and specifications provided with this power tool. Failure to follow all instructions listed below may result in electric shock, fire and/or serious injury. Save all warnings and instructions for future reference.
- Page 13 b) Avoid body contact with earthed or grounded surfaces, such as pipes, radiators, ranges and refrigerators. There is an increased risk of electric shock if your body is earthed or grounded. c) Do not expose power tools to rain or wet conditions. Water entering a power tool will increase the risk of electric shock.
- Page 14 d) Remove any adjusting key or wrench before turning the power tool on. A wrench or a key left attached to a rotating part of the power tool may result in personal injury. e) Do not overreach. Keep proper footing and balance at all times.
- Page 15 d) Store idle power tools out of the reach of children and do not allow persons unfamiliar with the power tool or these instructions to operate the power tool. Power tools are dangerous in the hands of untrained users. e) Maintain power tools and accessories. Check for misalignment or binding of moving parts, breakage of parts and any other condition that may affect the power tool’s operation.
- Page 16 c) Do not spray any material where the hazard is not known. Unknown materials can create hazardous conditions. d) Use appropriate personal protective equipment, such as dust masks or respirators, safety goggles, protective gloves and ear protection when spraying or handling chemicals. Wearing protective equipment for the appropriate conditions reduces the exposure to hazardous substances.
- Page 17 n) Never manipulate the product and always use the safety and/or protective guards on the product to avoid risks. o) Risk of injury: Do not direct the product towards people or animals. p) Never smoke during the paint process. q) Always ensure sufficient circulation of fresh air. r) Never use paint containing lead.
- Page 18 WARNING! The EAPS600 airless paint sprayer operates at very high pressure. For safe operation the following must be observed at all times: • Do not point the spray gun at yourself or any other person. Injury from penetration to the skin and paint solvents being injected into the body can result.
- Page 19 VIBRATION The European Physical Agents (Vibration) Directive has been brought in to help reduce hand arm vibration syndrome injuries to power tool users. The directive requires power tool manufacturers and suppliers to provide indicative vibration test results to enable users to make informed decisions as to the period of time a power tool can be used safely on a daily basis and the choice of tool.
- Page 20 WARNING! The vibration emission during actual use of the power tool can differ from the declared total value depending on the ways in which the tool is used: • How the materials are grinded, cut or drilled. • If the tool is in good condition and well maintained. •...
- Page 21 WARNING! Identify safety measures to protect the operator that are based on an estimation of exposure in the actual conditions of use (taking account of all parts of the operating cycle such as the times when the tool is switched off and when it is running idle in addition to the trigger time).
- Page 22 b) Ensure that the product is in good condition and well maintained. c) Use correct attachments for the product and ensure they are in good condition. d) Keep tight grip on the handles/grip surface. e) Maintain this product in accordance with these instructions and keep it well lubricated (where appropriate).
- Page 23 Measures to take in the event of contact with chemicals Injection Seek medical attention immediately. Injection Injury of paints or solvents into the body can cause serious injury. Skin clean with plenty of water and soap, consult a contact: doctor if necessary Eye contact: rinse with plenty of water, consult a doctor Swallowing: do not vomit, consult a doctor Inhalation:...
- Page 24 Part index The index below refers to Fig. 1 on page 4. 15. Trigger 1. Carry handle 16. Trigger guard with 2. Power cord with plug hanging hook 3. Prime/Spray lever 17. Foot support 4. Paint outlet 18. Foot assembly set (x4) 5.
- Page 25 Symbols On the product, the rating label and within these instructions you will find among others the following symbols and abbreviations. Familiarise yourself with them to reduce hazards like personal injuries and damage to property. Volt, (alternating voltage) Millimetre Hertz Kilogram Ampere Millilitre...
- Page 26 Open flames in the work area, around the product and in the vicinity of flammable materials are prohibited! Do not smoke in the work area, around the product and in the vicinity of flammable materials! Always ensure that other people and pets remain at a safe distance from the product when it is in operation.
- Page 27 Proper measures include among others regular maintenance and care of the product and accessories, keeping hands warm, periodical breaks and proper planning of work processes. Rating label explanation EAPS600 = Model number E = Erbauer APS = Airless Paint Sprayer 600 = Rated input (W)
- Page 28 WARNING! The product must be fully assembled before operation! Do not use a product that is only partly assembled or assembled with damaged parts! Do not connect the product to power supply before it is completely assembled! WARNING! The product and the packaging are not children’s toys! Keep plastics bags, sheets and small parts away from children.
- Page 29 Suction tube / Prime tube connection 1. Align and insert the prime tube (6) and the suction tube (7) separately to the corresponding attachment ports (Fig. B, step 1). Ensure that the tubes (6 / 7) are pushed fully on to the attachment ports. 2.
- Page 30 3. Roughen smooth surfaces to improve paint adhesion and then remove the sanding dust before painting. Paint 1. Strain the paint through filter or a paint strainer. 2. Thoroughly mix the paint in accordance with the paint manufacturer's instructions. The correct viscosity of the paint will greatly influence the paint results. 3.
- Page 31 Intended use This airless paint sprayer is ideal for a wide variety of uses. The intended uses include the mechanical spraying of liquid, such as paints containing solvents or water-based paints on components, surfaces, etc. For safety reasons it is essential to read the entire instruction manual before first operation and to observe all the instructions therein.
- Page 32 Pressure control knob (Fig. F) 1. Turn the pressure control knob (22) in a clockwise direction to increase the pressure and in an anticlockwise direction to decrease the pressure. Different thickness of materials will require different pressures to achieve a good result. 2.
- Page 33 DANGER! Injection Hazard. Engage trigger lock (13) before removing. 3. Observe the warning statement on the spray tip. Ensure that the trigger lock (13) is engaged, the tool is set to the "Prime" mode and the tool is switched off before removing or adjusting.
- Page 34 WARNING! Don’t hit the valve clearance button (5a) with a hard object, otherwise it will be damaged. Operation 1. Check the product, its power cord and plug as well as accessories for damage before each use. Do not use the product if it is damaged or shows wear. 2.
- Page 35 WARNING! When using mineral spirits, ground gun by holding it against an earthed metal container while flushing. Failure to do so can result in static electrical discharge, which can cause a fire. 1. Separate the prime tube (6) from the pipe clips (9) (Step 1). 2.
- Page 36 Priming the Sprayer 1. Lower the suction tube (7) with the prime tube (6) attached into the paint container. 2. Press the valve clearance button (5a) to ensure that the inlet valve (5) is free to operate. 3. Turn the Prime/Spray lever (3) to the prime position. 4.
- Page 37 2. Make a few strokes on a cardboard test area to test the consistency of the material being applied. If material still appears too thick, add a small amount of thinner. Do not exceed paint manufacturer’s thinning recommendations. 3. Keep the spray nozzle (14f) about 10 to 30 cm from the work surface. Move the spray gun keeping perpendicular with spraying area (Fig.
- Page 38 1. Release the spray gun trigger (15) and lock it. 2. Relieve the pressure using the “Pressure Release Procedure”. 3. Rotate the reversible nozzle through 180 degrees so that the arrow is pointing toward the rear of the gun and secure it in place. 4.
- Page 39 Care & maintenance WARNING! Always switch the product off, lock the trigger (15), disconnect the product from the power supply and let the product cool down before performing inspection, maintenance and cleaning work! Clean 1. Clean the product with a dry cloth. Use a brush for areas that are hard to reach. 2.
- Page 40 Cleaning of spray hose (10) (Fig. P) 1. After fluid in the prime tube (6) is clear, turn the Prime/Spray lever (3) to the spray mode (Step 1). 2. Rotate the spray tip (14d) 180 in clockwise direction to make the spray nozzle (14f) in the cleaning position (step 2).
- Page 41 WARNING! Hold the trigger guard (16) to avoid the hurt by its bouncing. 4. Take off filter (12a) carefully for further cleaning (Step 4). 5. Remove the seal (14c) from the union part (14b) if necessary. 6. Clean all the paint passages with a slightly damp cloth and a little soap after each use.
- Page 42 1. Remove the spray hose (10) from paint outlet (4) if it has not already removed. 2. Turn the airless paint sprayer upside down and loosen the clamps (6a/7a) from both tubes (6/7), then disconnect tubes (6/7) from the pump of airless paint sprayer (step 1).
- Page 43 AMP fuse Connect approved to Blue to BS 1362 N(Neutral) Brown L(Live) Outer sleeve Cable grip firmly clamped WARNING! Never connect live or neutral wires to the earth terminal of the plug, which is marked with E. Only fit an approved Amp BS 1363 or BS 1363/A plug and the correctly rated fuse.
- Page 44 6. Secure the product to prevent it from slipping or falling over, damage and injury. Storage 1. Switch the product off and disconnect it from the power supply. 2. Perform the pressure release procedure and follow the cleaning procedure for long term storage.
- Page 45 Problem Possible cause Solution 1. Product does 1.1 Not connected to power 1.1 Connect to power supply not start supply 1.2 Power cord or plug is 1.2 Check by a specialist defective electrician 1.3 Switch is not turned on 1.3 Turn on the switch 1.4 Pressure control setting is 1.4 Turn the pressure control to too low...
- Page 46 Problem Possible cause Solution 4. Material 4.1 Spray nozzle (14f) loose 4.1 Tighten the retaining nut leaking (14a) to lock it 4.2 Spray nozzle (14f) worn 4.2 Replace spray nozzle (14f) 4.3 Nozzle seal (14c) worn 4.3 Replace seal (14c) 4.4 Material build-up on the 4.4 Clean the paint passage of paint passage of spray gun...
- Page 47 Problem Possible cause Solution 8. Blotchy 8.1 Paint dries too slowly. 8.1 Use less thinner or add a surface drier. (blushing) 8.2 Uneven paint application. 8.2 Start each stroke off the or uneven work material and overlap colour. each stroke consistently. 8.3 Work material absorbs paint 8.3 Use a conditioner or sealer unevenly.
- Page 48 Guarantee we take special care to select high quality materials and use manufacturing techniques that allow us to create ranges of products incorporating design and durability. We carry out stringent testing procedures on all our tools and are confident that they can provide regular, sustained daily use during the period covered. That’s why we offer a 3 year guarantee against manufacturing defects on our power tool products.
- Page 49 (PT) DECLARAÇÃO DE CONFORMIDADE UE 600W paint sprayer/ 600W Pistolet de pulverization/600W Pistolet natryskowy /600W Pulverizator pentru vopsire /600W Rociador de pintura/600W Pulverizador de tinta EAPS600 Serial number: from 000001 to 999999 MNL_Erbauer_GB_EAPS600_600W Airless Paint Sprayer_V1_201029.indd 48 10/29/20 3:31 PM...
- Page 50 Product/Produit/Produkt/ Model/Modèle/ Produsul/ Producto/ Produto Model/Modelul/ Modelo/ Modelo 600W paint sprayer/ 600W EAPS600 5059340043371 Pistolet de pulverization/ 5059340043388 600W Pistolet natryskowy / 600W Pulverizator pentru vopsire /600W Rociador de pintura/600W Pulverizador de tinta 2014/35/EU Directive Electrical Safety: Low-voltage electrical equipment...
- Page 51 2014/30 / UE telle que modifiée Directive Compatibilité électromagnétique Directive 2011/65 / UE telle que modifiée Limitation de l'utilisation de certaines substances dangereuses dans les équipements électriques et électroniques 2014/35/EU Dyrektywa Bezpieczeństwo elektryczne: sprzęt elektryczny niskiego napięcia 2014/30 / UE ze zmianami Dyrektywa Kompatybilność elektromagnetyczna 2011/65 / UE&...
- Page 52 fechas de las normas, o referencias a las otras especificaciones técnicas, incluidas las fechas de las especificaciones, respecto a las cuales se declara la conformidad: data da norma, ou às outras especificações técnicas, incluindo a data da especificação, em relação às quais é declarada a conformidade: EN 60335-1:2012+A11:2014+A13:2017+A1:2019+A2:2019+A14:2019 EN 62233:2008 EN 55014-1: 2017...
- Page 53 Manufacturer,Fabricant,Producent, Produc ător,Fabricante: UK Manufacturer: Kingfisher International Products Limited 3 Sheldon Square London W2 6PX United Kingdom EU Manufacturer: Kingfisher International Products B.V. Rapenburgerstraat 175E 1011 VM Amsterdam www.diy.com www.screwfix.com To view instruction manuals online, visit www.kingfisher.com/products MNL_ERBAUER_GB_Heat gun_EHG2000_V1_201022.indd 39 10/22/20 9:36 AM...
Need help?
Do you have a question about the EAPS600 and is the answer not in the manual?
Questions and answers