Table of Contents

Subscribe to Our Youtube Channel
Related Manuals for PAW HeatBloC MC45 DN 25

Summary of Contents for PAW HeatBloC MC45 DN 25
- Page 1 PAW GmbH & Co. KG Böcklerstr. 11, D-31789 Hameln, Germany Phone: +49-5151-9856-0, Fax: +49-5151-9856-98 E-mail: info@paw.eu, Web: www.paw.eu Installation and Operation Instructions HeatBloC MC45 - DN 25 2017/02 994536093x-mub-en – V01...
- Page 2 Translation of the original instructions PAW GmbH & Co. KG We reserve the right to make technical changes without notice! Böcklerstr. 11 Printed in Germany – Copyright by PAW GmbH & Co. KG D-31789 Hameln, Germany 994536093x-mub-en – V01 2017/02...
-
Page 3: Table Of Contents
1 General Information Contents General Information ......................4 Scope of these instructions ..................4 Designated use ......................4 Safety instructions ......................5 Product description ......................6 Equipment ........................6 Function ........................7 3-temperature mixing valve [specialist] ................. 8 Pump [specialist] ......................9 3.5.1 Pump settings ....................... -
Page 4: General Information
These instructions describe the installation, commissioning, function and the operation of the mixed HeatBloC MC45 DN 25. For other components of the installation, such as the pump, the controller or the modular distribution manifold, please observe the instructions of the corresponding manufacturer. -
Page 5: Safety Instructions
2 Safety instructions 2 Safety instructions The installation and commissioning as well as the connection of electrical components require technical knowledge commensurate with a recognised vocational qualification as a fitter for plumbing, heating and air conditioning technology, or a profession requiring a comparable level of knowledge [specialist]. -
Page 6: Product Description
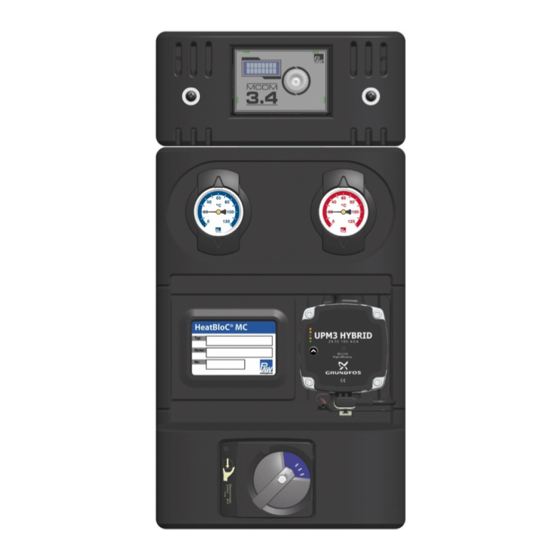
The PAW HeatBloC must be either installed on a PAW modular distribution manifold or a PAW wall bracket. For the function of a MC system, one connection set (wall power supply, item no. 1398700) is necessary. -
Page 7: Function
3 Product description 3.2 Function MC45 - 3-temperature mixing valve with additional connection for a second flow temperature The 3-temperature mixing valve is used in combination with a buffer tank, which can be heated by either a solar thermal installation, a solid fuel boiler or a conventional boiler. -
Page 8: 3-Temperature Mixing Valve [Specialist]
3 Product description 3.4 3-temperature mixing valve [specialist] The 3-temperature mixing valve driven by an electric motor adjusts the flow temperature of the consumer circuit to the desired value in combination with a flow sensor and the controller. The 3-temperature mixing valve is equipped with a second flow connection (C-3) on the back side. -
Page 9: Pump [Specialist]
3 Product description 3.5 Pump [specialist] Isolation of the pump The pump can be completely isolated. It can be replaced and maintained without draining the HeatBloC. 1. Close the ball valves in the flow and the return (A-2, F-2). 2. Remove the actuator from the mixing valve. 3. -
Page 10: Pump Settings Wilo-Yonos Para Rstg
3 Product description 3.5.3 Pump settings Wilo-Yonos PARA RSTG The rotary knob of the pump must be set to the following symbol. The LED ring is illuminated in orange. Please observe the separate instructions of the pump! 3.6 Check valve The HeatBloC is equipped with a check valve (D) in the return pipe and with a non-return valve (D-1) in the mixing valve. -
Page 11: Actuator
3 Product description 3.7 Actuator For mixing valves with flow on the left, the scale must be turned by 180°. Fig. 1 Fig. 2 blue blue for mixing valve with flow on the left for mixing valve with flow on the right Assembly of the actuator for mixing blue valves with flow on the right:... -
Page 12: Change Of The Flow Line [Specialist]
4 Change of the flow line [specialist] 4 Change of the flow line [specialist] 1. Dismount the temperature sensors of the ball valves (A-2 and F-2). 2. Unscrew both nuts of the sensor (G). 3. Unscrew the nuts above and beneath the pump or the return pipe. -
Page 13: Conversion Of The Mixing Valve
4 Change of the flow line [specialist] 4.1 Conversion of the mixing valve 1. Loosen the screw (1). 2. Take off the rotary knob (2) from the cock rod. 3. Loosen the screws (3). 4. Remove the cover plate (4). 5. - Page 14 Mixing valve with flow on the right Mixing valve with flow on the left 16. Turn the cover plate (4) such that the marking PAW is at the bottom and that the scale is positioned as shown on the figure above.
-
Page 15: Assembly And Installation [Specialist]
5 Assembly and installation [specialist] 5 Assembly and installation [specialist] The PAW HeatBloC must be either installed on a PAW modular distribution manifold or a PAW wall bracket. Please observe the separate instructions! NOTICE Damage to property! The location of installation must be dry, load-carrying, frost-proof and protected against ultraviolet radiation in order to prevent material damage of the installation. - Page 16 5 Assembly and installation [specialist] NOTICE Verify if the grounding cable holds securely in place at the differential pressure sensor! The ground lug points in the direction of the banderole. Carry out the following mounting instructions in parallel at each heating circuit of the system.
- Page 17 5 Assembly and installation [specialist] 9. Put the sealing rings on the sealing Sealing ring surfaces. 10. Put the HeatBloC onto the two sealing rings. 11. Tighten the nuts. Make sure that the nuts do not get jammed and that the sealing rings do not slip.
-
Page 18: Cabling
5 Assembly and installation [specialist] 20. Mount the insulating front elements. 21. Mount the insulating front and back shell of the distribution manifold. Note: Cut the insulating back shell in the pipe axis of the connection on the back of the mixing valve (C-3). - Page 19 5 Assembly and installation [specialist] X6.1 X6.2 not used Temperature sensor T , flow, red marking PWM signal of the pump Differential pressure sensor Temperature sensor T , return, X6.1 Supply voltage or bus line blue marking (connected in parallel and therefore X6.2 interchangeable) 7.
- Page 20 5 Assembly and installation [specialist] 10. Mount the optional communication set now. Please observe the separate instructions of the communication set! 11. Carry out the electrical commissioning of the controllers (see controller instructions). 12. Carry out the electrical commissioning of the communication set (see instructions of communication set).
-
Page 21: Accessories
The internal mini PC is equipped with a power supply unit to assure the power supply and establishes its own local WLAN network. With a smartphone and the corresponding PAW MCom app, you can establish a connection with your installation via this WLAN and set parameters or read out current values. -
Page 22: Wall Bracket Set For Wall Assembly (Not Included In The Scope Of Delivery)
5 Assembly and installation [specialist] 5.3.4 Wall bracket set for wall assembly (not included in the scope of delivery) Description Item no. Wall bracket set DN 25 3422SET Wall bracket set DN 32 3722SET 5.3.5 Pipe sets for MC45 (not included in the scope of delivery) Description Item no. -
Page 23: Scope Of Delivery [Specialist]
6 Scope of delivery [specialist] 6 Scope of delivery [specialist] NOTICE Complaints and requests/orders of spare parts will only be processed with information on the serial number! The serial number is placed on the return pipe of the heating circuit. 6.1 Insulation and controller 2017/02 994536093x-mub-en –... -
Page 24: Hydraulics
Sealing set for mixing valve MC45 37013 Pump Grundfos UPM3 Hybrid 25-70 E1212465F < 0.20 Wilo-Yonos PARA RSTG 25/1-7.5 E1236247 < 0.21 Mixing valve 4-way mixing valve (3-temperature mixing valve) B340616 Actuator PAW actuator SR5 - 5 Nm, 230 V 705001 994536093x-mub-en – V01 2017/02... -
Page 25: Technical Data
7 Technical data 7 Technical data DN 25 (1") Dimensions Centre distance 125 mm Width insulation 250 mm Height insulation 500 mm Installation length 340 mm Connections Connection generator 1½" external threads, flat-sealing Connection consumer 1" internal thread Technical data Opening pressure check valve 200 mm wc, can be opened Materials... -
Page 26: Dimensional Drawing Dn 25
7 Technical data 7.1 Dimensional drawing DN 25 7.2 Pressure drop and pump characteristic curves Flow rate [l/h] 100% return, Kvs value = 5.1 100% low-temperature flow, Kvs value = 4.1 100% high-temperature flow, Kvs value = 4.7 994536093x-mub-en – V01 2017/02... - Page 27 7 Technical data 2017/02 994536093x-mub-en – V01...
- Page 28 PAW GmbH & Co. KG www.paw.eu Böcklerstraße 11 Phone: +49 (0) 5151 9856 - 0 D-31789 Hameln, Germany Fax: +49 (0) 5151 9856 - 98 994536093x-mub-en – V01 2017/02...
Need help?
Do you have a question about the HeatBloC MC45 DN 25 and is the answer not in the manual?
Questions and answers