
Subscribe to Our Youtube Channel
Related Manuals for Kasco CertiSafe


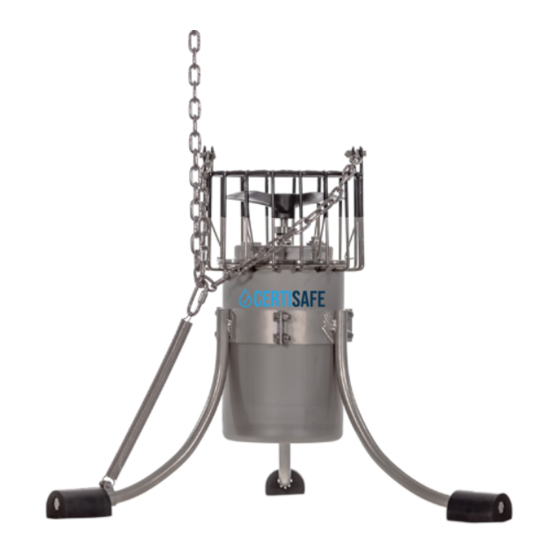
Summary of Contents for Kasco CertiSafe
- Page 1 CertiSafe Suspended Mount ™ Assembly & Installation Manual 800 Deere Rd. Prescott, WI 54021 • 715-262-4488 • sales@kascomarine.com • www.kascomarine.com Document number 852112...
-
Page 2: Table Of Contents
Tank Penetration for Cable Support and Cord Grip ..........7 Stretcher Assembly ...................9 Suspension Chains and Power Cable ............10 Cable Support ....................11 CertiSafe™ Tank Mixer Maintenance Recommendations ......12 CertiSafe™ Tank Mixer Warranty ..............13 Non-Warranty Repairs ..................14 Repair Contact Form ..................15... -
Page 3: Safety First
Use all Personal Protective Equipment necessary for safe ingress, installation, and egress from the work site. • Refer to applicable national and local laws and standards to facilitate the safe installation of a CertiSafe Tank Mixer. These may include but are not limited to OSHA, CCOHS, and other regulations related to: •... -
Page 4: Product And Installation Overview
Featuring durable stainless steel, Kasco’s SM-100 Suspended Mount positions CertiSafe™ Tank Mixers securely within the tank for effective water movement. This manual will provide instructions for mounting a CertiSafe™ unit using the SM-100 and installing the entire assembly within the tank. -
Page 5: Parts Included
Back to Contents SM-100 CERTISAFE™ SUSPENDED MOUNT MANUAL PARTS INCLUDED Assembly Item Description Quantity Part number Mount Stretcher bar - 60 in. 997310 Jaw slide 997206 1/4”-20 x 1/2” shoulder screw 451112 1/4”-20 x 3/4” shoulder screw 451110 1/4”-20 nylon locknut 566212 1/4”... - Page 6 Back to Contents SM-100 CERTISAFE™ SUSPENDED MOUNT MANUAL Cord grip (O) 5/16” nylon locknut (K) 5/16” flat washer (L) Steel tank roof 5/16” sealing washer (M) Cord grip nut (P) 5/16” flat washer (L) Steel tank roof 5/16” eye bolt (J)
-
Page 7: Tank Penetration For Cable Support And Cord Grip
Back to Contents SM-100 CERTISAFE™ SUSPENDED MOUNT MANUAL TANK PENETRATION FOR CABLE SUPPORT AND CORD GRIP Note: • The maximum tank roof thickness accommodated by the tank penetration parts included is 1/8”. • Suggested measurements are based on a 24” square access hatch. - Page 8 Back to Contents SM-100 CERTISAFE™ SUSPENDED MOUNT MANUAL 8. Fit a flat washer (L) and then the sealing washer (M) onto 10. From the tank exterior, fit a second flat washer (L) onto the eye the eye bolt (J). bolt.
-
Page 9: Stretcher Assembly
Back to Contents SM-100 CERTISAFE™ SUSPENDED MOUNT MANUAL STRETCHER ASSEMBLY 1. Insert the end link of a short chain (H) between the mixer cage loops on one side of the cage. 2. Secure the chain (H) with a 1/4”-20 x 3/4” shoulder screw (D), two 1/4” washers (F), and 1/4”-20 locknut (E). -
Page 10: Suspension Chains And Power Cable
Back to Contents SM-100 CERTISAFE™ SUSPENDED MOUNT MANUAL SUSPENSION CHAINS AND POWER CABLE 1. Insert one end link of a long chain (G) into an outer jaw slide (B) placed at the end of the stretcher bar. 2. Secure with a 1/4”-20 X 1/2” shoulder screw (C) and 1/4”-20 locknut (E). -
Page 11: Cable Support
Back to Contents SM-100 CERTISAFE™ SUSPENDED MOUNT MANUAL CABLE SUPPORT 3. Feed power cable through the cable support (Q). 1. Attach the cable support (Q) to the connecting link (N). 2. Close and tighten the connecting link. Fig. 17 Fig. 16 4. -
Page 12: Certisafe™ Tank Mixer Maintenance Recommendations
GFCI upon installation, after each re-installation, send the mixer to Kasco’s factory for service and repair. and regularly thereafter to ensure consistent operation. If you experience repeat interruptions, disconnect and remove Cleaning the equipment. -
Page 13: Certisafe™ Tank Mixer Warranty
Note: Kasco only accepts complete assemblies for warranty repair. We must receive the power cord and all other components with the motor as originally assembled. Kasco will bill the customer to replace any missing parts necessary for repair. It is not necessary to return the control panel, mount, or other parts with the motor assembly, unless specifically requested by a Kasco representative. -
Page 14: Non-Warranty Repairs
SM-100 CERTISAFE™ SUSPENDED MOUNT MANUAL NON-WARRANTY REPAIRS Kasco will recycle any unit we receive for estimate but which You can often repair failed equipment at a lower cost than re- placement. Kasco Marine estimates repairs at the request of the the customer declines to repair, unless the customer specifies otherwise. -
Page 15: Repair Contact Form
A fee of $60 per hour will be assessed for cleaning excessively dirty units. • Refer to the CertiSafe™ Tank Mixer Operation & Maintenance Manual for easy-to-follow troubleshooting tips to rule out site issues. Note: Contact Information should be that of the person or company to contact for repair information.
Need help?
Do you have a question about the CertiSafe and is the answer not in the manual?
Questions and answers