Table of Contents
Advertisement
Quick Links
Assembly and Operating Instructions
Temporary anchor device conforming to EN 795-class E
ISO 14567 class E and BS 7883-class E
The Weightanka system has been CE Certified to PPE Directive by
The notified body ensuring conformance for EC marking is:
Kee Safety Ltd
1 Boulton Road
Reading
Berkshire
RG2 0NH
Tel.:
+44 (0) 118 9311022
Fax:
+44 (0) 118 9756763
E-Mail:
sales@keesafety.com
Internet:
www.keesafety.com
Copyright © 2008 Kee Safety Ltd. All rights reserved.
You'll Never be Better Protected
The
Weightanka
System
National Engineering Laboratory,
East Kilbride, Glasgow. G75 0QU.
United Kingdom.
Notified Body Number 0320
Inspec International Limited,
Salford M6 6AJ, United Kingdom.
Notified body number 0194.
WA03
Issue 8
Advertisement
Table of Contents

Related Manuals for Kee safety Weightanka

Summary of Contents for Kee safety Weightanka
- Page 1 Assembly and Operating Instructions Temporary anchor device conforming to EN 795-class E ISO 14567 class E and BS 7883-class E The Weightanka system has been CE Certified to PPE Directive by National Engineering Laboratory, East Kilbride, Glasgow. G75 0QU. United Kingdom.
-
Page 2: Table Of Contents
Operator's Duty of Care Personnel Requirements For Your Safety Summary Symbols Basic Safety Instructions ® Using The Kee Anchor Weightanka System Summary ® Transporting and Storing The Kee Anchor Weightanka system Checking the Component Parts Selecting the Installation Site 2-10 ®... -
Page 3: Chapter Subject Page
List of Contents Chapter Subject Page Index Index 1 Annex Inspection Book Sample Page Declaration of Conformity Contents II... -
Page 4: Introduction
Chapter 0 Introduction Summary Summary This chapter is split into the following subjects: Subject Page General Use in Accordance With Regulations and Incorrect Use Operator's Duty of Care Personnel Requirements Introduction 0-1 of 8... - Page 5 Applicability These operating instructions apply to the following product: Type: The Weightanka® Anchor System Serial Number: Compatibility The Weightanka system can be used with PPE according to; EN 354: 2002 (fixed lanyards), EN 355: 2002(energy absorbing device) ...
- Page 6 Date of Issue Storage and Components These assembly and operating instructions form a component part of The Weightanka system. They must accompany the system and be followed for assembly. At no time must any pages be removed from these instructions. If the instructions are lost in their entirety or in part, the instructions or the missing parts must be replaced immediately.
- Page 7 Modifications to The Weightanka system If you undertake modifications to the Weightanka system, you will negate all certification that comes with this product! As a result, the declaration of conformity that you have received with The Weightanka system will be deemed as null and void.
-
Page 8: Use In Accordance With Regulations And Incorrect Use
Weightanka system must at all times be in accordance with the table at section 2.5 page 2-11. No part of The Weightanka system is to be placed closer than 2.5 metres from the edge of a roof or open void or any other fall hazard. - Page 9 (A purpose made freestanding guardrail solution “Kee Dome” is available for this purpose. Use of The Weightanka system in any of the above conditions is forbidden. If the system is used incorrectly, a fatal fall or severe injuries may occur.
-
Page 10: Operator's Duty Of Care
Weightanka system are set out below. Safety of The Weightanka system The operator or trained personnel must ensure that The Weightanka system: is used only in accordance with Health and Safety regulations, is made available for use only in a proper, functional state. -
Page 11: Personnel Requirements
Personnel Requirements Contents The requirements the manufacturer places on the users of The Weightanka system are as follows: Duties of the User The user must fulfil the following duties: Assemble The Weightanka system strictly in accordance with these instructions and check that it is functioning correctly and safely. -
Page 12: For Your Safety
Chapter 1 For Your Safety 1.1 Summary Important Information! The following safety information is to be understood as being in addition to any existing Health and Safety Regulations and laws already in force. Existing accident prevention regulations and laws must be observed in all cases. ... -
Page 13: Symbols
This symbol indicates that there is a threat of damage to goods or to the environment. Advice! This symbol identifies information that contributes to the better understanding of the Weightanka system. For Your Safety 1-2 of 4... -
Page 14: Basic Safety Instructions
1.3 Basic Safety Instructions Contents Basic safety instructions for the safe handling of the Weightanka system can be found here. Danger! It is imperative that you follow these safety instructions to avoid endangering your life and safety: ... -
Page 15: Weightanka System
Danger to Life! Before use, check Weightanka for damage. Danger of the user falling as a result of Damaged parts must be replaced before defective or inadequate maintenance. use in all cases. Only after this may the Weightanka system be used! ... -
Page 16: Checking The Component Parts
Chapter 2 Using the Weightanka system Summary This chapter is split into the following subjects: Subject Page Transporting and Storing the Weightanka system Checking the Component parts Selecting the Installation Site 2-11 Assembling and Dismantling the Weightanka system 2-13 Using the Weightanka system... - Page 17 Contents Instructions for the safe transportation of the Weightanka system. Danger! Pack, store and transport Weightanka so that the rubber bases and the eye for connecting the safety harness cannot be damaged. Packing We recommend the component parts are packed in a wooden crate or shrunk wrapped onto a pallet for transportation.
- Page 18 Checking the component parts Contents The following is a review of all parts needed for the correct assembly of the Weightanka system Danger! If all the parts shown in Illustration 1 are not present or if parts are damaged, they must be replaced by original parts.
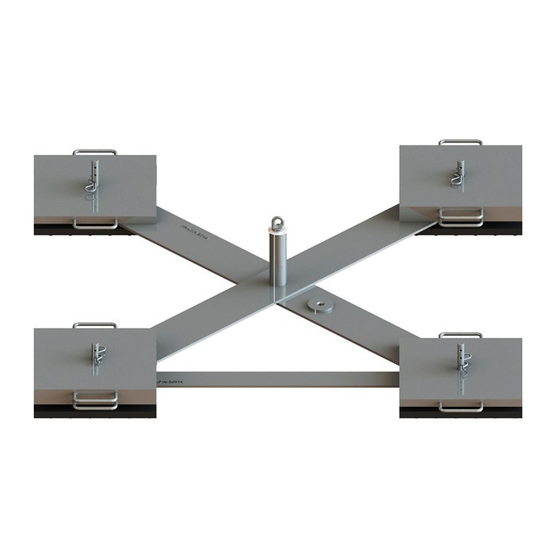
- Page 19 Names and Functions of the Necessary Component Parts Figure 1 Using Weightanka 2‐4 of 28 ...
- Page 20 Each rubber coated base weight has a central tapped hole to accept the weight Locating Pin Total weight of 4 Rubber Coated Base Weights = 68 Kg Using Weightanka 2‐5 of 28 ...
- Page 21 The bottom cross arm has a second tapped hole and spreader plate which is only utilised when the Weightanka is used in conjunction with Kee Anchor Accessanka(R) The weight of the bottom cross arm is 16 kg Threaded Spreader Plate ...
- Page 22 The upper end of the pedestal has an M12 tapped hole to accept the class A1 eyebolt used as the attachment point. Weight of central pedestal = 2.5 Using Weightanka 2‐7 of 28 ...
- Page 23 Weight locating pin Either six, eight or twelve standard weights are required to assemble a Weightanka (R) system, depending on the type of roof surface. It is IMPERATIVE that the correct number of standard weights is employed.
- Page 24 NEVER use the tommy bar with the eyebolt positioned at one end as this would result in too much force being applied which could damage the eyebolt. Weight of 1 tommy bar = 0.35 Using Weightanka 2‐9 of 28 ...
- Page 25 DW1014010 Stabiliser Arm 1 piece To attach the base weights Length = 1,100 mm; Placed on top of adjacent rubber coated base weights prior to fitting top and bottom cross arms. Continued on next page Using Weightanka 2‐10 of 28 ...
- Page 26 Requirements of the installation site. Danger! The installation site can affect the safe functioning of the Weightanka system. If the requirements of the installation site are not met, do not use the system If you are unsure of the load-bearing capacity of the roof contact a structural engineer before installing the system.
- Page 27 The roof must be free from snow and ice. If, during use, there is a risk of freezing conditions or if it starts to snow, the Weightanka system may not be used. The Weightanka system may not be used in conditions of high winds.
- Page 28 Selected a suitable installation site. Number of weights Weightanka is supplied as standard with four rubber-coated base weights and either six, eight or twelve galvanised standard weights according to the type of roof surface. In the table below, the number of weights referred to is in addition to the four rubber-coated base weights.
- Page 29 WARNING! Establish that the roof surface is of an appropriate type (see section 2.5 Page 11). Select a suitable position on the (flat) roof for assembly of Weightanka. No part of the WeightAnka may be less than 2.5 metres from the roof edge or other opening. At no time should an installer work within 2m of such an edge or opening unless he / she is protected by a suitable fall protection system.
- Page 30 Establishing fall arrest clearance distance. Where : A = Max length of line from Weightanka to harness attachment. B = Distance from line attachment on Weightanka to outer edge of parapet. C = Maximum potential movement of Weightanka (1m). D = A - B + C E = Maximum extension length of energy absorber (whether integral with the lanyard or not), consult relevant manufacturer.
- Page 31 WARNING! If the roof surface is stone chippings, ensure that all loose chippings are removed from the area where the WeightAnka will sit, and the area across which it could travel in the event of a fall arrest incurring high forces. This may be achieved by sweeping the area with a hard broom. (See section 2.4...
- Page 32 Using Weightanka 2‐17 of 28 ...
- Page 33 Assembling the cross arms and pedestal assembly a) Weightanka is supplied with two cross arms. One of the cross arms has a spreader plate (positioned centrally) welded to one side of it and back and front plates (located to one side of the centre hole).
- Page 34 Dismantling the Weightanka system When you wish to dismantle the Weightanka system reverse the sequence. Should the system need to be moved the base weights must be removed beforehand. Under no circumstances should the system be moved with the base weights attached ...
- Page 35 How to use the system correctly. Danger! Do not use the Weightanka system if defects are identified during the checks described below or doubts exist over the integrity of the system. Defects can endanger life! Users of the system should be free from any disability that may affect them working at height in accordance with all relevant Health and Safety Regulations.
- Page 36 Weightanka system. Exclusion zone It is first necessary to establish an exclusion zone between WeightAnka and the roof edge, into which no one should be allowed unless connected to WeightAnka (or other appropriate anchor, if one exists).
- Page 37 The Weightanka combination is intended for single person use for fall arrest purposes. In the case of use for restraint, it will accommodate two persons plus equipment, provided that the combination of the position of the Weightanka and the provision of a fixed le ngth lanyard precludes either person from approaching within 0.5 metres of the roo...
- Page 38 Maintenance, Inspection and Disposal Contents Information on the care and regular inspection of the Weightanka system, to be carried out by a competent person who is familiar with the product. Re-Selling...
- Page 39 Special attention should be paid to the following: (a) that no part of WeightAnka is positioned less than 2.5m from the roof edge or other opening and that no change has occurred to the available clear fall distance.
- Page 40 (g) that a PPE warning disc has been fitted between the eyebolt and the pedestal. (h) that two instruction labels are attached to the upper cross arm of Weightanka, and that they are legible. Replacements are available from your Weightanka supplier.
- Page 41 Instructions for periodic examination General In the UK, the Weightanka is subject to the Personal Protective Equipment at Work Regulations 1992 and amendments and employers should be knowledgeable of this. What to look for during, inspections and thorough examination The lists below are not exclusive.
- Page 42 Instructions for repair; following a fall or any other possibly damaging event. If an operative suffers a fall from a height while using the Weightanka, or if it becomes damaged in any way, the manufacturer should be contacted and arrangements made to return it to them for inspection and any necessary repair.
- Page 43 Markings on the products and their meaning Various markings can be found on WeightAnka, these are located on the top cross arm and on the galvanised weights. These markings are as follows, any queries about their interpretation should be addressed to the manufacturer.
- Page 44 WEIGHTANKA is a deadweight anchor device to EN795:1997 – class ‘E’ ‘WEIGHTANKA’ should never be used during periods when there is frost, ice or snow on the roof. ‘WEIGHTANKA’ should not be used to support horizontal lines or for abseiling – special products ‘WIREANKA’...
- Page 45 ISSUE AMMENDMENTS MADE DATE MODIFIED First Issue 2008 Front Cover changed – Class E instead of Class B Sept 2008 Page 13 – Chapter 2 – Removal of uphill version on steel cladding. 2008 Page 28 – Chapter 2 – As above for label 2 Page 14 –...
- Page 46 The following standards have been applied: EN 795 :1996 / Amendment A1 :December 2000 BS 7883 Part E ISO 14567 Done at: Cradley Heath, Kee Safety Ltd 4th June 2008 _______________________________ Signed on behalf of Kee Safety Ltd Declaration Page 1 of 1...
- Page 47 Inspection and Result of the Regular Obligatory Inspection of Weightanka Date Inspector Inspection Result Subsequent Result of the Signature Next Name / Inspection in the Subsequent Inspection of the Inspection Qualification Case of Inspector Deficiency (Date)
Need help?
Do you have a question about the Weightanka and is the answer not in the manual?
Questions and answers