Advertisement
Advertisement

Related Manuals for LuxaFlex PowerView Motorisation

Summary of Contents for LuxaFlex PowerView Motorisation
- Page 1 PowerView Motorisation ™ by LUXAFLEX WINDOW FASHIONS ® REMOTE CONTROL GUIDE...
- Page 2 Your new PowerView™ Pebble Remote and ® Surface Remote combine fashion with function for precise control of your LUXAFLEX Window ® Coverings. Artfully designed, PowerView remotes allow you to control natural light throughout your home with the press of a button.
-
Page 3: Table Of Contents
Table of Contents Key Components ....Getting Started ..... Programming ....... Basic Operation ....Battery Replacement ..Troubleshooting .... -
Page 4: Key Components
Key Components... - Page 5 POWERVIEW™ PEBBLE REMOTE ® Ergonomically designed, the PowerView Pebble hand-held remote is available in seven on-trend colours to complement your home décor.
- Page 6 POWERVIEW SURFACE REMOTE The sleek PowerView Surface is wall-mounted so you know your remote is always right where you left it.
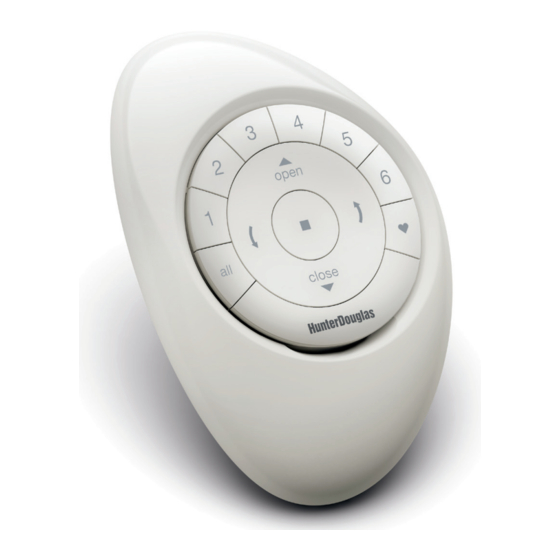
- Page 7 REMOTE MODULE FRONT GROUP 3 GROUP 4 GROUP 5 GROUP 2 OPEN GROUP 1 GROUP 6 STOP Press and hold for program mode. Favourite Shade position LEFT ARROW RIGHT ARROW Function varies Function varies with shade type. with shade type. CLOSE...
- Page 8 REMOTE MODULE (BACK COVER REMOVED) RESET BUTTON BATTERY BATTERY COMPARTMENT COMPARTMENT 3V CR 2032 3V CR 2032...
-
Page 9: Getting Started
Getting Started... - Page 10 Important: The PowerView Remote will not operate a window covering until the window covering has been added to a GROUP. Getting started First, activate the remote by pulling both plastic tabs from the back battery compartment. Inserting the remote module into the PowerView Pebble ®...
- Page 11 Mounting the PowerView Surface: 1. Choose a location to mount the Surface. 2. Orient the Surface mounting plate so that the Hunter Douglas logo is horizontal and level. Mark screw holes. 3. If you are mounting the Surface onto drywall, use a 6mm drill bit to drill pilot holes.
-
Page 12: Programming
Programming... - Page 13 IMPORTANT: Is this your first remote? If so, continue reading for programming steps. If you have already installed a PowerView Hub or additional remotes, refer to page 17 for more information. A GROUP can be a single window covering or multiple window coverings.
- Page 14 Remove a window covering from a GROUP 1. Press and hold STOP for 4 seconds to put the remote in program mode. The backlit buttons on the remote will flash to indicate it is in program mode. 2. Press the desired GROUP number (1– 6) on the remote. The backlit GROUP number will flash to show it is selected.
- Page 15 Set a FAVOURITE position Each window covering has one FAVOURITE position, which is set at 50% open by default. Setting a new FAVOURITE position overwrites any previous setting. 1. Open or close the window covering to the desired position. 2. Press and hold STOP for 4 seconds to put the remote in program mode.
- Page 16 Pairing additional remote(s) to the PowerView Shade Network Follow these steps to copy the PowerView Shade Network I.D. from the original remote to additional remotes. All remotes in a home should be added to the same PowerView Shade Network. This allows for easy installation of additional control options, such as the PowerView Hub and PowerView Repeaters.
- Page 17 Pairing PowerView Repeaters to a remote created PowerView Shade Network. Repeaters extend the range of the radio frequency (RF) signal emitted by the PowerView Pebble Remote, the ® PowerView Surface, or the PowerView Hub when used with the PowerView App. 1.
- Page 18 Pairing remote(s) to a PowerView Hub created PowerView Shade Network. A Hub previously paired to an existing remote created PowerView Shade Network or that had created its own network during setup, can have additional Pebble or Surface ® remotes paired to it, even if the remotes are introduced after the initial Hub setup.
- Page 19 Creating a Duplicate Remote A duplicate remote will operate the same set of window coverings and GROUPS as the original remote. 1. Remove the back cover from the new remote. 2. Press and hold the recessed Reset button for 6 seconds, until the GROUP buttons flash twice.
- Page 20 Resetting window covering programming This reset erases all programming stored in the window covering, including GROUP assignments, preventing any input device from operating the window covering. Its primary use is during installation to correct GROUP and Network assignments. This reset does not affect travel limits. 1.
-
Page 21: Basic Operation
Basic Operation... - Page 22 Once the window coverings have been joined to a GROUP or multiple GROUPS, the remote is ready to operate the window covering(s). Multiple window coverings can be operated at the same time. Basic Operation 1. To wake up the remote, simply pick it up or press STOP.
- Page 23 5. For window covering(s) with vanes or a middle rail*, press the RIGHT ARROW to close the window covering and open the vanes, rotate the vanes to the right, or fully raise the middle rail. 6. For window covering(s) with vanes or a middle rail, press the LEFT ARROW to close the vanes, rotate the vanes to the left, or fully lower the middle rail.
-
Page 24: Battery Replacement
Battery Replacement... - Page 25 Replacing batteries in the remote Replacing the batteries in the remote module will not cause the loss of any window covering programming, including GROUPS and Favourite. The remote uses two CR 2032 batteries. 1. For the Pebble Remote, slide your thumb in the ®...
- Page 26 2. Rotate the back cover of the remote module clockwise to unlock. 3. Remove the back cover from the remote module. 4. Using a finger or small screwdriver, gently lift and remove the old batteries.
- Page 27 5. Insert new batteries, making sure each is snug. 6. Align and replace the back cover onto the backside of the remote module. 7. Rotate the back cover counter-clockwise to lock the back cover in place. 8. Align the ribs on the remote module with the grooves on the Pebble or the Surface.
-
Page 28: Troubleshooting
Troubleshooting... - Page 29 Troubleshooting 1. None of the backlit buttons illuminate on my remote when I press the buttons. • C heck to make sure the batteries are inserted properly and are new. • J oin an existing PowerView Shade Network with the remote. 2. I programmed my window covering to work from two different remotes.
- Page 30 4. My window covering does not respond when I press OPEN or CLOSE. • Make sure that there is power to the window covering and that the window covering functions properly by pressing the manual control button on the window covering. • Make sure the correct GROUP number or ALL has been selected before pressing OPEN or CLOSE.
- Page 31 338 Victoria Rd Rydalmere, NSW, 2116, Australia PowerView has been certified as complying with ACMA'S regulatory requirements. © Copyright 2016 Hunter Douglas Limited [ABN 98 009 675 709] ® Luxaflex, PowerView and Pebble are registered Trade Marks of Hunter Douglas •03/2016 •18.016.008...
Need help?
Do you have a question about the PowerView Motorisation and is the answer not in the manual?
Questions and answers