Table of Contents
Advertisement
Advertisement
Table of Contents
Troubleshooting

Subscribe to Our Youtube Channel
Related Manuals for HydroLogic HYDROID

Summary of Contents for HydroLogic HYDROID
- Page 1 Reverse Osmosis User Manual 888-426-5644 info@hydrologicsystems.com...
- Page 2 This page intentionally left blank Hydroid – Series User Manual 04/19...
-
Page 3: Table Of Contents
RO Start Delay ............................30 Pressure Fault ............................30 PF Auto Reset/PF Retry ......................... 31 Tank Full ..............................31 Pre-treat Lockout ............................ 31 Water Quality Display ..........................31 Membrane Flush ............................. 32 Water Quality Setpoint ..........................32 Hydroid – Series User Manual 04/19... - Page 4 TROUBLESHOOTING ..........................33 System Inoperative ..........................33 Inlet valve will not operate ........................33 RO Pump Will Not Operated ........................33 HYDROID FLOW DIAGRAM ..........................34 ELECTRICAL SCHEMATIC ..........................35 SYSTEM WARRANTY ............................. 36 Hydroid – Series User Manual 04/19...
-
Page 5: Introduction
The Hydroid system features a robust, innovative design that requires no adjustments in the event of feed water quality or temperature variations. Your Hydroid system is a durable piece of equipment which, with proper care, will last for many years. Standard... -
Page 6: Safety
DO NOT PERMIT CHLORINE TO BE PRESENT IN THE FEED WATER. DO NOT SHUT DOWN THE SYSTEM FOR EXTENDED PERIODS. IT IS BEST TO RUN THE SYSTEM AS MUCH AS POSSIBLE ON A CONTINUOUS BASIS. Hydroid – Series User Manual 04/19... -
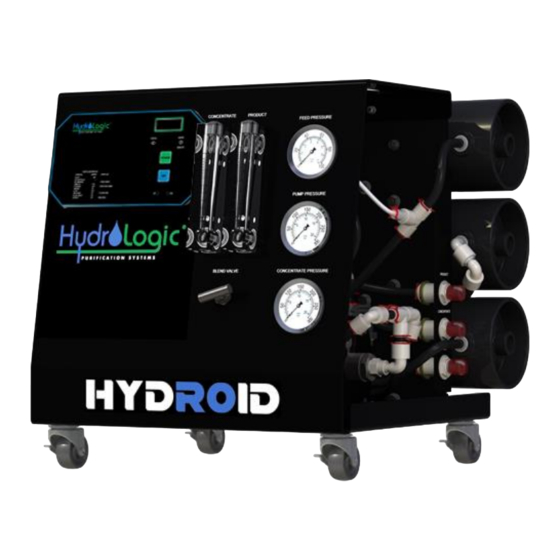
Page 7: Component Identification And Description
UNION, BULK HEAD, 1/2" QC X 1/2" QC, JG CONCENTRATE (DRAIN) UNION, BULK HEAD, 1/2" QC X 1/2" QC, JG (FEED) MEMBRANE, PVC, 1/2"P X 1/2"C, QC, ENCAPSULATED, HYDROLOGIC, HL 11590 CARTRIDGE, CARBON, GACC, 1/2” QC, ENCAPSULATED, HYDROLOGIC, HL 11591 Hydroid –... - Page 8 VALVE, SOLENOID, 2-WAY, COMPOSITE, 120V, N/C, 1/2" FNPT, ASCO PUMP, CM1-6, 1HP, 115/230V 60HZ 1PH, 10.6 AMPS 304SS, 98125766, GRUNDFOS CONNECTOR, FLOW CONTROL, 1/2"QC (RECYCLE FLOW RESTRICTOR) CONNECTOR, FLOW CONTROL, 3/8"QC (CONCENTRATE (DRAIN) FLOW RESTRICTOR) Hydroid – Series User Manual 04/19...
-
Page 9: Controller
CONTROLLER The Hydroid system comes standard with an S-100 Controller. The S-100 series controller is a state-of-the-art, microprocessor-controlled system for commercial and industrial reverse osmosis systems. The S-100 includes numerous standard features such as pressure switch control, motor contactor, TDS/conductivity monitor with adjustable limit, pre-treatment lock out, tank level switch controls, and flush valve control. -
Page 10: Pump Pressure Gauge
The pump pressure gauge measures the pressure of the water as it enters the first membrane in the system. MEMBRANES The Hydroid system comes standard with Encapsulated Membrane Elements. Membranes separate impurities from water through the reverse osmosis process. See Membrane Information and Handling section of this manual for additional information. -
Page 11: System Installation
Do not install system in direct sunlight, high intensity lights or subject the system to temperature extremes (see operating limits chart) and or excess humidity. The Hydroid system should be secured in compliance with state and local regulations. -
Page 12: Concentrate (Drain) Connection
SOURCE TANK Hydroid systems may be connected to a bladder tank or a storage tank with a float valve. The float valve shuts off the system when the tank is full, and opens when the water level in the tank drops. Bladder tanks and storage tanks with float valves can be obtained by your local dealer or distributor. -
Page 13: Feed Water And Operation Specifications
CAUSE DAMAGE OR FAILURE OF THE SYSTEM COMPONENTS AND MEMBRANES. DAMAGE TO THE SYSTEM DUE TO OPERATION OUTSIDE OF THE SPECIFICATIONS OUTLINED IN THIS MANUAL WILL VOID THE MANUFACTURER’S WARRANTY. CHECK YOUR FEED WATER CHEMISTRY AND, IF NECESSARY, CONSULT WITH HYDROLOGIC BEFORE START-UP OF THE SYSTEM. OPERATING LIMITS* Design Temperature, °F... -
Page 14: Design Basis And Design Notes
†††† PRODUCT (purified water) flow and maximum recovery rates are based on feedwater conditions as stated above. Do not exceed recommended PRODUCT (purified water) flow. Hydroid – Series User Manual 04/19... -
Page 15: System Purging/Initial Start-Up
Flush tubing (B) and then push system tubing (C) into carbon pre-filter port. Replace the red clip to lock system tubing to carbon pre-filter, shown in the picture below. IMPORTANT: Keep black Flush tubing for future carbon pre-filter flush procedures. Hydroid – Series User Manual 04/19... - Page 16 6. Let the system purge until no bubbles appear in CONCENTRATE (drain water - black tubing) flow meter (approx. 3-5 min). 7. When the Hydroid system has been purged of air, press the power button momentarily to turn off the purge feature. The inlet valve will now turn off.
-
Page 17: Operating Do's And Don'ts
EXAMPLE: IF TUBING NEEDS TO BE INSTALLED 10FT HORIZONTAL LENGTH. OFF THE GROUND, TOTAL HORIZONTAL LENGTH MAY NOT EXCEED 30FT. IF LENGTH EXCEEDS SPECIFICATIONS, PLEASE CONTACT HYDROLOGIC 888-426-5644 USING THE REVERSE OSMOSIS SYSTEM OPERATION LOG PROVIDED ON PAGE 24 OF THE USER MANUAL, RECORD YOUR SYSTEM’S READING DAILY FOR A WEEK. -
Page 18: Flushing The System
The system should be flushed regularly to remove sediment from the surface of the membranes. Hydroid systems are pre-programmed to flush for 5 minutes upon tank full shut down. Should your application require another configuration, the S-100 controller provides several flush types, modes, and times to select from. -
Page 19: Membrane Installation, Removal And Replacement
6) To start-up the system, please refer to the System Purging/Initial Start-Up (pages 15- 17) section of this User’s Manual. THE MEMBRANES MUST BE FLUSHED FOR AT LEAST 30 MINUTES. DISCARD ALL OF THE PRODUCT (PURIFIED WATER) THAT IS PRODUCED DURING THE FLUSH PERIOD. Hydroid – Series User Manual 04/19... -
Page 20: Encapsulated Membrane Elements
ENCAPSULATED MEMBRANE ELEMENTS Hydroid Reverse Osmosis Systems are equipped with Hydroid Series Encapsulated Membrane Elements with Ultra Low Energy Membranes. Encapsulated Membrane Element performance characteristics are listed below. ULTRA LOW ENERGY MEMBRANE ▪ Membrane Type: Polyamide Thin – Film Composite ▪... -
Page 21: Rejection, Recovery And Flow Rates
Percent of Recovery = (PRODUCT (purified water) Water Flow Rate / FEED (inlet) water flow rate) x 100 For Example, if the Hydroid makes 2.0 GPM PRODUCT (purified water) and has a FEED (inlet) flow of 2.66 GPM. (2.0 GPM PRODUCT (purified water) flow / 2.66 GPM FEED (inlet) flow) x 100 = 75% ALL FLOW RATES MUST BE EXPRESSED IN THE SAME UNITS, TYPICALLY GALLONS PER MINUTE (GPM). -
Page 22: Temperature Correction Factors For Membranes
Rated PRODUCT (purified water) Flowrate = 2 GPM @ 77°F Actual Water Temperature = 55°F Temperature Correction Factor @ 55°F = 1.541 PRODUCT (purified water) Flowrate @ 55°F = 2 GPM ÷ 1.541 = 1.297 GPM Hydroid – Series User Manual 04/19... - Page 23 Find the temperature correction factor (TCF) from the table below. Divide the rated PRODUCT (purified water) flow at 77°F by the temperature correction factor. The result is the PRODUCT (purified water) flow at the desired temperature. (See example on the next page.) Hydroid – Series User Manual 04/19...
-
Page 24: Operating Log
OPERATING LOG Hydroid – Series User Manual 04/19... -
Page 25: Preparing Unit For Storage Or Shipment
6. Allow the system to draining for a minimum of eight hours or until the opened ports quit dripping. After draining is complete, reconnect all the plumbing. 7. Prepare the system for storage by following all the above instructions. Hydroid – Series User Manual 04/19... -
Page 26: Troubleshooting
Abrasion of membrane by leakage crystalline material TECHNICAL ASSISTANCE If technical assistance is required: ▪ Contact HydroLogic directly, toll-free 888-426-5644 ▪ Prior to making the call, have the following information available: ▪ System installation date ▪ Serial number ▪ Daily log sheets ▪... -
Page 27: S-100 Controller Specifications And Instructions
Relays supply same output voltage as board power (120 or 240 VAC) 20A maximum total load for all outputs. * Based on a service factor of 1.0 Cell: TDS cell with 3-digit display, range: 0-1000PPM. Wetted parts ABS and 316SS, 3/4" NPT, 300 PSI max. Hydroid – Series User Manual 04/19... - Page 28 WATER QUALITY LED - Green if OK, Red if above limit. POWER KEY - Places controller in operating or standby mode. SETPOINT KEY - Places display in mode to display current setpoint SP - Setpoint adjustment screw. CAL - Calibration adjustment screw. Hydroid – Series User Manual 04/19...
-
Page 29: Circuit Board Layout
CIRCUIT BOARD LAYOUT Hydroid – Series User Manual 04/19... -
Page 30: System Operation
If the pressure fault input is active for 2 seconds, a pressure fault condition will occur. This will cause the controller to shut down. PF will show on the water quality display and the status lamp will flash red. To clear the pressure fault, press the power key twice. Hydroid – Series User Manual 04/19... -
Page 31: Pf Auto Reset/Pf Retry
- 999PPM. If the water quality is above 999, the display will show ^ ^ ^. If the water quality is below the setpoint, the water quality lamp will be green. If the water quality is above the setpoint, the water quality lamp will be red. Hydroid – Series User Manual 04/19... -
Page 32: Membrane Flush
To adjust the calibration of the water quality, measure the water with a meter calibrated to a known standard. Using a small screwdriver, adjust the CAL adjustment to get the correct reading on the display. Hydroid – Series User Manual 04/19... -
Page 33: Troubleshooting
NOTE: If controller fuse F1 is blown, none of the outputs will operate. If controller fuse F2 is blown, the controller will be inoperative. Contact Hydrologic for further instructions 888-426-5644. System Inoperative Is the water quality display lit? If no, check fuse F2 located below the transformer. -
Page 34: Hydroid Flow Diagram
HYDROID FLOW DIAGRAM Hydroid – Series User Manual 04/19... -
Page 35: Electrical Schematic
ELECTRICAL SCHEMATIC Hydroid – Series User Manual 04/19... -
Page 36: System Warranty
(3) a Return Goods Authorization Form; (4) a description of the suspected defects; (5) the serial number of the Manufacturer product alleged to be defective; and (6) a description of the type of water and Hydroid – Series User Manual 04/19... - Page 37 CUSTOMERS FOR ANY CONSEQUENTIAL, INCIDENTAL, OR ECONOMIC LOSS OR COMMERCIAL DAMAGE WHATSOEVER. REMEDIES HEREIN PROVIDED ARE EXPRESSLY MADE THE SOLE AND EXCLUSIVE REMEDIES FOR BREACH OF ANY WARRANTY OR OTHER OBLIGATION HEREUNDER EXPRESS OR IMPLIED OR FROM THE OPERATION OF LAW. Hydroid – Series User Manual 04/19...
- Page 38 Hydroid – Series User Manual 04/19...
Need help?
Do you have a question about the HYDROID and is the answer not in the manual?
Questions and answers