
Related Manuals for CRL VE1P

Summary of Contents for CRL VE1P
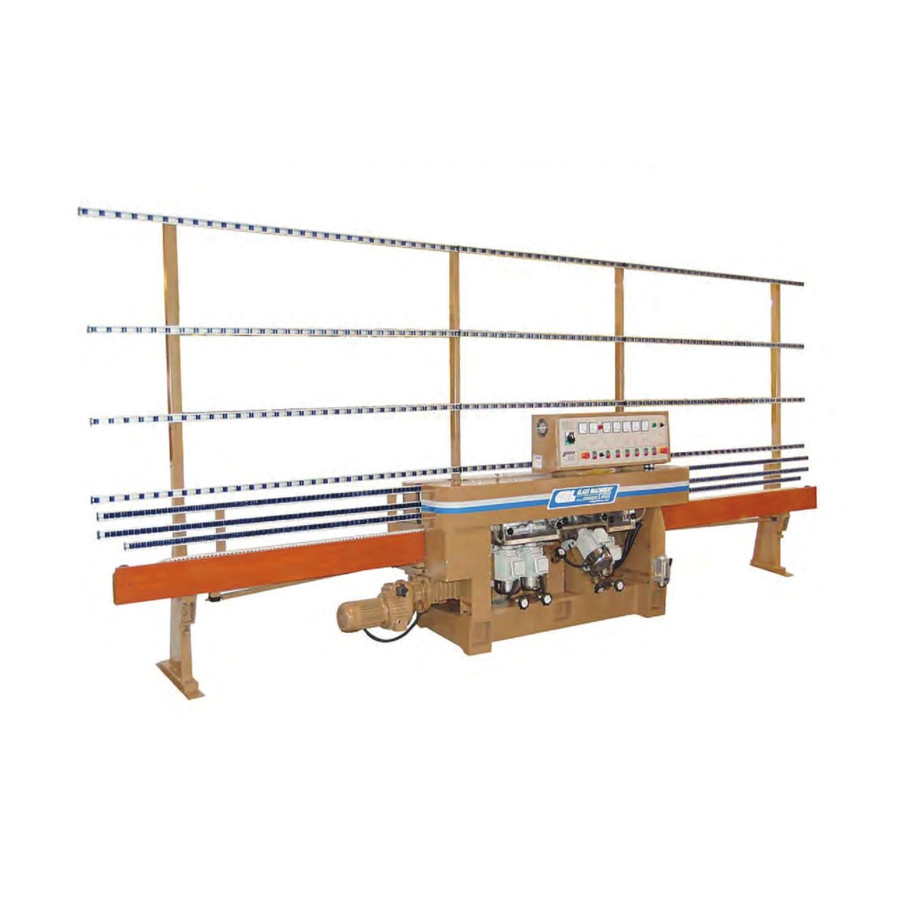
- Page 1 Owner's Manual VE-1P Vertical Edger VE1P VERTICAL EDGER VARIABLE SPEED OPERATION AND MAINTENANCE MANUAL (6/8/2013) CRL GLASS MACHINERY 5501 W. OGDEN AVE. CICERO IL 60804 crlaurence.com (866) 583-1377...
-
Page 2: General Safety Information
Owner's Manual VE-1P Vertical Edger SECTION 1 SAFETY FAILURE TO OBSERVE THE WARNING, CAUTIONS, AND INSTRUCTIONS LISTED IN THIS MANUAL AND ON THE DECALS ATTACHED TO THE VERTICAL EDGER COULD CAUSE SERIOUS INJURY TO PERSONNEL OR DAMAGE TO EQUIPMENT. GENERAL SAFETY INFORMATION Introduction This manual contains installation instructions and operating and maintenance procedures for the VE-1P Vertical Edger. -
Page 3: General Precautions
Owner's Manual VE-1P Vertical Edger SECTION 1 (continued) 2) Cautions The cautions in this manual contain instructions and information concerning operation and maintenance procedures that, if not followed, could cause damage to equipment, parts and facilities. Like notes, cautions are listed just prior to the steps to which they apply. - Page 4 Owner's Manual VE-1P Vertical Edger SECTION 1 (continued) 1) Always operate and maintain the edger in accordance with the instructions and procedures in this manual. 2) Do not exceed the capacity of the edger. 3) Do not open inspection doors while unit is in operation except in special circumstances which are addressed later in this manual.
- Page 5 Owner's Manual VE-1P Vertical Edger SECTION 2 DESCRIPTION The VE-1P Vertical Edger Manual (herein referred to as “the edger”) was designed to fill the need for a compact production machine to edge the most common range of glass thicknesses and sizes. The edger is ruggedly constructed, easy to operate and maintain, and produces quality edges.
-
Page 6: Specifications
Owner's Manual VE-1P Vertical Edger SECTION 2 (continued) SPECIFICATIONS GLASS CAPACITY THICKNESS SINGLE STRENGTH (.090”) TO 1/2” (2.28mm TO 13mm) LENGTH 12” TO 72” MACHINE SUPPORTED (102mm TO 305mm) HEIGHT 72 INCHES (1829mm) MAXIMUM WEIGHT 250 POUNDS (113 kg) MAXIMUM SPINDLE MOTOR 1-HP (.75 kw), 3600-RPM MOTOR WITH 7”... - Page 7 Owner's Manual VE-1P Vertical Edger SECTION 3 RECEIVING UNCRATING Before the edger was crated for shipment, it underwent a successful test operation and was in proper working condition. Therefore, proper uncrating and inspection upon receiving is of the utmost importance to assure that the edger was received in exactly the same condition as it was when shipped from the factory.
- Page 8 Owner's Manual VE-1P Vertical Edger SECTION 3 (continued) 3) Check for crushed corners and edges that could indicate the crate was dropped. 4) Check for broken support straps that position the edger and coolant tank on the mounting skid. REMOVING THE CRATE 1) Remove top and side of crate.
- Page 9 Position the machine in the work area. Remember that the main body of the machine weighs about 700 lbs. (317 kg.). NOTIFICATION Document all damage to the edger and components, if any, and notify the carrier and CRL Glass Machinery. Page 8 of 33...
-
Page 10: Installation
Owner's Manual VE-1P Vertical Edger SECTION 4 INSTALLATION FACILITIES REQUIREMENTS SPACE The required area to operate the edger is 11 feet wide, 6 feet deep and 7 feet high (3.3 x 1.8 x 2.1m). The floor area should be clean and free of oil, grease, and water. - Page 11 Owner's Manual VE-1P Vertical Edger SECTION 4 (continued) INBOARD OUTBOARD FRONT REAR Using the four inboard levelling screws, level the edger from side to side. Once the edger is levelled, turn the four outboard screws until they just touch the levelling pads. Tighten all of the jam nuts on the levelling screws, being careful not to put the machine out of level.
- Page 12 Owner's Manual VE-1P Vertical Edger SECTION 4 (continued) 2) Install the uprights as shown. Each upright is numbered and should be matched with the corresponding number on the ingoing and outgoing conveyor brackets. The uprights bolt on using wedges to keep the bolts straight. Be sure to align the wedge under the lock washer and nut as shown below.
- Page 13 Owner's Manual VE-1P Vertical Edger SECTION 4 (continued) 3) Install the rack supports to the rails by sliding them on. The 4 short lower rails each require 2 supports. Add the plastic extension tubes and slide the supports so that they align with the holes in the vertical posts. Page 12 of 33...
- Page 14 6) If there is not a wheel installed by the factory, see “MOUNTING DIAMOND/POLISHING WHEELS” in section 6. 7) Normally, mix 1 part of CRL diamond wheel coolant, CRL Cat. No. 2651005, or equivalent, to 100 parts water, or as recommended, in the coolant tank.
-
Page 15: Coolant Pump
When the edger is used for a polishing operation, it is mandatory to use a special polishing wheel designed to operate at 3600 RPM or faster. CRL CAT. NO. 39666000 or equivalent is recommended. Three adjustments must be made on the grinding (polishing) wheel prior to starting. - Page 16 Owner's Manual VE-1P Vertical Edger SECTION 4 (continued) The following table gives some typical angles to position the wheel. Each example mentioned will dictate actual angles. All wheels are different and resulting edge profiles are a matter of user preference. GLASS THICKNESS WHEEL PROFILE...
- Page 17 Owner's Manual VE-1P Vertical Edger SECTION 4 (continued) Before proceeding with the following steps, make certain that the conveyor is operating properly. See Section 4, “CONVEYOR”, and perform all steps as outlined before any operation with glass. 4) Insert a piece of glass of a thickness for the wheel size and feed it into the edger.
- Page 18 Owner's Manual VE-1P Vertical Edger SECTION 4 (continued) GLASS ENTERING ROLLER SECTION GLASS BEING GROUND/POLISHED GLASS EXITING ROLLER SECTION Page 17 of 33...
- Page 19 Owner's Manual VE-1P Vertical Edger SECTION 4 (continued) 6) Reverse the conveyor and move the glass out of the edger. 7) Turn the vertical adjustment handwheel clockwise to adjust the height of the grinding wheel to grind off approximately 0.025” (.63mm) of glass. Each clockwise turn of the handwheel moves the spindle up 0.063”...
- Page 20 Owner's Manual VE-1P Vertical Edger SECTION 4 (continued) CONVEYOR The coolant pump will not run unless the conveyor system is on. 1) Place the Forward/Off/Reverse toggle switch in the “FORWARD” position. 2) Verify that the back conveyor belt is moving counterclockwise (when facing the front of the edger).
- Page 21 Owner's Manual VE-1P Vertical Edger SECTION 5 OPERATING INSTRUCTIONS GRINDING INFORMATION It may be necessary to run the glass through the edger more than once. The number of “passes” through the edger for grinding a specific edge is dependent upon four factors: 1) Grit and type of the grinding wheel 2) Depth of grind 3) Smoothness of finished edge...
- Page 22 Owner's Manual VE-1P Vertical Edger SECTION 5 (continued) EDGER START-UP Turn the spindle switch to “ON”. Place the conveyor and coolant pump toggle switch in the “ON” position. Note - the coolant is streaming directly on the wheel. Make sure the conveyor drive toggle switch is in the “Forward” position. Do not run glass unless coolant is flowing to the wheel at the point where the wheel contacts the glass.
- Page 23 Owner's Manual VE-1P Vertical Edger SECTION 5 (continued) Run a piece of glass at least 72 inches long and listen to the cut. If the sound becomes quieter toward the end of the cut, lower the ingoing conveyor (½ turn of the adjustment screw) and raise the outgoing conveyor (½...
-
Page 24: Maintenance Instructions
2) Flush the lines and the coolant pan in the center section below the grinding (polishing) wheel. 3) After cleaning the tank, refill it with a mixture of 1 part of CRL Cat. No. 2651005 coolant, or equivalent and 100 parts of water, or as recommended. - Page 25 3) Turn the diamond wheel motor ON until it reaches full operating speed and then turn it “OFF”. Quickly apply a CRL Cat. No. 46205871 dressing stone or equivalent, soaked in diamond wheel coolant solution or water, to the wheel groove while rocking it back and forth and pressing very hard as the wheel coasts to a stop.
- Page 26 Owner's Manual VE-1P Vertical Edger SECTION 6 (continued) Wheel dressing must be performed with the coolant pump “OFF”, with the dressing stone thoroughly wetted. 4) Repeat Step 3 several times and test the results by running a sample piece of glass. POLISHING WHEEL When the edger is used for polishing the edge of the glass, it is mandatory to use a special polishing wheel designed for a high RPM application.
- Page 27 Owner's Manual VE-1P Vertical Edger SECTION 6 (continued) MOUNTING DIAMOND/POLISHING WHEELS 1) Clean the surface of the grind wheel hub where the wheel makes contact and clean out the drain hole in the slinger. 2) Clean the inside diameter of the wheel and lightly grease it with the lubricant provided (NOTE: the polishing wheel does not require a lubricant).
-
Page 28: Troubleshooting Procedures
Owner's Manual VE-1P Vertical Edger SECTION 7 TROUBLE SHOOTING PROCEDURES PROBLEM POSSIBLE SOLUTION Glass rides up in grinding Check the coolant compartments Dress the diamond wheel Check the infeed & outfeed levelness Check for glass interference with the outfeed rollers Interference of glass with glass racks or rollers Decrease depth of cut Choppy edge... - Page 29 Owner's Manual VE-1P Vertical Edger 2 POSITION WHEEL STOP Mounting two wheels on a spindle motor will make switching from one wheel to the other less time consuming. Once you have set-up the machine to run on the wheel closest to the spindle motor, adjust the clamp collar against the handwheel.
- Page 30 Owner's Manual VE-1P Vertical Edger When the machine is set-up to run the wheel closest to the operator, adjust the clamp collar against the handwheel. These stops will allow you to switch between the wheels with minimal effort. Just turn the handwheel until it bottoms against the proper clamp collar. Always check the edge of the first piece of glass after making an adjustment.
- Page 31 Owner's Manual VE-1P Vertical Edger WHEEL POSITION DIAL INDICATORS This feature allows accurate adjustment of new wheels, dual wheels or wheels of varying thicknesses for fast changeovers. The dial indicators are first zeroed in relation to the spindle adjusting plate for the horizontal plane (Fig. A) and the special indicator plate for the vertical plane (Fig.
- Page 32 Owner's Manual VE-1P Vertical Edger TERMS AND CONDITIONS MACHINERY WARRANTY STATEMENT C.R. LAURENCE CO., INC. (“SELLER”) WARRANTS PRODUCTS OF ITS MANUFACTURE TO BE FREE FROM DEFECTS IN MATERIALS OR WORKMANSHIP IN NORMAL USE FOR (12) MONTHS FROM THE DATE OF SHIPMENT (UNLESS A SHORTER PERIOD IS PROVIDED ELSEWHERE IN THIS DOCUMENT). SELLER’S OBLIGATION AND BUYER’S EXCLUSIVE REMEDY SHALL BE LIMITED TO REPAIR OR REPLACEMENT, AT SELLER’S SOLE OPTION, OF DEFECTIVE PARTS WITHIN THE WARRANTY PERIOD, PROVIDED BUYER GIVES SELLER IMMEDIATE WRITTEN NOTICE OF SUCH ALLEGED DEFECTS, AND, IF...
- Page 33 If it does not rotate, if pump is tripping circuit breakers, or not operating properly after cleaning, call CRL Glass Machinery Parts Department for ordering a replacement pump. DO NOT attempt repairs yourself.
- Page 34 Owner's Manual VE-1P Vertical Edger PUMP ASSEMBLY DIAGRAM DO NOT REMOVE THESE SCREWS Page 33 of 33...
- Page 35 Owner’s Manual VE-1P Vertical Edger Factory Replacement Parts and Accessories for the VE-1P/AU11 Edger Coolant Pump Wheel Position Dial Indicator Dial Indicators allow precise positioning of Grind This is the correct Pump to maintain proper and Polish Wheels. Record settings for quick coolant circulation.
- Page 36 Owner’s Manual VE-1P Vertical Edger Factory Replacement Parts and Accessories for the VE-1P/AU11 Edger CRL EDGER WHEELS CRL EDGER ACCESSORIES AND PARTS Pencil Board Dressing Plates and Sticks Diamond Pencil Edge Wheels 8" x 6" (203 mm x 152 mm) Board Dressing Plates 7"...
Need help?
Do you have a question about the VE1P and is the answer not in the manual?
Questions and answers