
Subscribe to Our Youtube Channel
Related Manuals for Plebani 076

Summary of Contents for Plebani 076
- Page 1 Swing LEGGERE ATTENTAMENTE E CONSERVARE PER FUTURA CONSULTAZIONE! READ CAREFULLY AND KEEP INSTRUCTIONS FOR FUTURE REFERENCE!
-
Page 11: Garanzia Di Qualità
ISTRUZIONI DI MONTAGGIO ED USO LEGGERE ATTENTAMENTE E CONSERVARE PER FUTURA CONSULTAZIONE Per un corretto uso del dondolino, vi consigliamo di dedicare alcuni minuti alla lettura di questo manuale. GARANZIA DI QUALITÀ: - ll nostro dondolino è fabbricato secondo le norme europee EN 16232. - Questo prodotto è... - Page 12 ASSEMBLAGGIO DELLA SEDUTA: 4- Inserire il tubo di sostegno della seduta “H” in entrambi i fori (Fig. 9) bene fino in fondo (CLICK) verificando che entrambe le molle siano uscite dai fori. Far aderire bene il tessuto della seduta al tubo (Fig. 10), chiudere i due bottoni posti sotto lo schienale facendo passare il tessuto attorno al trafilato metallico di sostegno (Fig.
- Page 13 CHIUSURA: 11- Per chiudere il vostro dondolino, premere contemporaneamente i due pulsanti di sblocco posti sui fianchi degli snodi (Fig. 23). Premere i pulsanti e far ruotare le gambe anteriore verso l'interno (Fig. 24 e 25). Ora il prodotto è chiuso e potete riporlo in un piccolo spazio (Fig.
- Page 14 - Verificare che il dondolino non abbia viti allentate o avvitate scorrettamente o altri elementi che potrebbero ferire il bambino. Non utilizzare con parti rotte, difettose o mancanti. - Svolgere le operazioni di montaggio e installazione SENZA alcun bambino nei paraggi. L'assemblaggio di questo prodotto deve essere effettuato da un adulto.
-
Page 15: Pannello Di Controllo
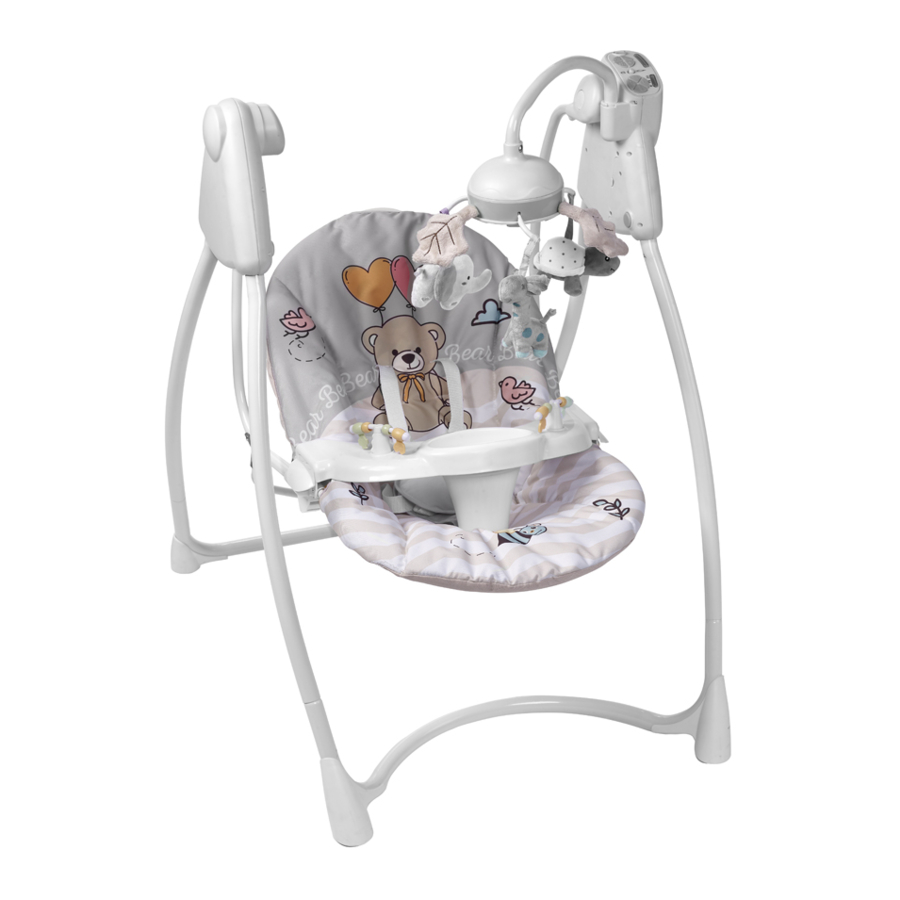
PANNELLO DI CONTROLLO: Per attivare la giostrina e l'oscillazione del dondolo, selezionare il tipo di alimentazione preferito (7) e iniziare a far dondolare la seduta aumentando (4) o diminuendo (5) la velocità controllandola sull'indicatore (6). Per far ascoltare delle dolci musichette al vostro bambino premere l'apposito tasto (2) e selezionate tra i diversi motivi presenti (3), oppure far ascoltare suoni naturali (8 o 10). - Page 16 AVVERTENZE PARTI ELETTRONICHE: - AVVERTENZA: TUTTE le operazioni di accensione, spegnimento, regolazione e selezione del dispositivo e la sostituzione delle batterie, vanno eseguite solo da adulti. - ATTENZIONE: NON lasciare MAI il prodotto esposto alla pioggia, all'acqua o a qualsiasi altro liquido! Potrebbero danneggiare irreparabilmente le parti elettroniche.
-
Page 17: Note Importanti
- Non utilizzare pezzi di ricambio che non siano stati approvati e forniti dal produttore. Usare esclusivamente ricambi Plebani. Il produttore potrà apportare in qualsiasi momento modifiche all'articolo al fine di migliorarlo. Plebani s.r.l. declina ogni responsabilità per danni a cose o persone derivanti da un utilizzo improprio e/o scorretto del prodotto. NOTE IMPORTANTI: - Tenere medicinali, piccoli oggetti e oggetti pericolosi per il bambino lontani dal dondolino. - Page 18 IMPORTANT!: BEFORE USING THIS ARTICLE, READ CAREFULLY THE INSTRUCTIONS AND THE SEQUENCE OF ASSEMBLY TO AVOID UNNECESSARY HAZARDS TO YOUR CHILD. THROW AWAY AND REMOVE ALL POLY BAGS OF PACKING, THEY MIGHT BE RISKS OF SUFFOCATION FOR YOUR BABY! NEVER LEAVE YOUR CHILD UNATTENDED! To assemble our swing chair it's enough to match the letters on pieces one each other (As illustrations from Page 2).
-
Page 19: Electrical Power
Now the seat is assembled. Make sure that all components are securely and correctly assembled and the structure is stable. To fix the seat to the frame, insert the two support side frames inside the holes placed on both sides (Fig. 15) until the complete release of the spring "CLICK". Your swing is now completely assembled and ready for use (Fig. - Page 20 After removing it, insert the 4 batteries making sure to place them in the correct way, with the sense of polarization as shown inside of the battery compartment (positive pole (+) to positive (+) ). After inserting batteries, close the cover with the screws, squeezing well to the end.
- Page 21 - Keep the product far from sources of heat, current-taps, ovens, fires, windows,...and any other type of danger. - When you leave the product exposed to the sun, wait it becomes cooler before using - Do not make any modifications that could damage safety of the swing-chair; it may be dangerous use spare parts not approved by manufacturer.
- Page 22 CONTROLL PANNEL: To turn on toy-bar and the oscillation of the rocking swing, select the type of power indicator (7) and start to swing the seat increasing (4) or decreasing (5) the rate controlling it on the indicator (6). To let your baby listen some tender melodies press the appropriate button (2) and select between several existing song (3), or listen to natural sounds (8 or 10).
- Page 23 ELECTRONIC PARTS WARNINGS: - WARNING: ALL turn on, turn off, adjustment and selection of the device and batteries replacement operations, should be done only by adults. - WARNING: NEVER expose product to rain, to water or any other liquid! They could cause irreparable damage to electronic parts.
-
Page 24: Important Notes
- Keep clean from dust and sand pipes and parts of movements and flows to prevent jamming, friction and malfunctions. - Do not use spare parts not approved and supplied by the manufacturer. Use only Plebani spare parts. The manufacturer may make changes to the article at any time in order to improve it. -
Page 25: Assemblage Du Cadre
IMPORTANT!: AVANT D'UTILISER CE PRODUIT, LIRE ATTENTIVEMENT LES INSTRUCTIONS ET SEQUENCE D'INSTALLATION POUR EVITER DES RISQUES INUTILES A VOTRE ENFANT! ENLEVER ET JETER LE SACS EN PLASTIQUE, PEUT ÊTRE UNE SOURCE DE SUFFOCATION OU D'ETRANGLEMENT POUR VOS ENFANTS! NE JAMAIS LAISSER L'ENFANT SANS SURVEILLANCE! Pour l'installation de notre chaise berçante/balancer assez pour égaler les lettres sur les différentes parties à... - Page 26 Maintenant la siège est montée. Assurez-vous que tous les composants soient correctement et solidement montés et la structure est stable. Pour fixer le siège à la structure, insérer les deux tubes de support latéral dans les sièges placées sur les deux côtés (Fig. 15) jusqu'à la sortie complète des ressorts "CLIC". Votre siège berçante (transat) est si entièrement assemblé...
- Page 27 2- Utilisation de 4 piles de type "D" 1.5 V PAS INCLUS. Placez les piles dans le compartiment placé sur l'articulation avec le jeu. Utilisez un tournevis et dévisser le couvercle (Fig. 29). Après la suppression, insérer les quatre piles en veillant à les placer dans le bon sens, avec le sens de polarisation, comme indiqué...
- Page 28 - AVERTISSEMENT: Ce produit N'ES PAS adapte aux enfants de moins de 3 mois, qui ne sont pas en mesure de s'asseoir seul, faire demi-tour et de se lever en s'appuyant sur les mains et les genoux. - AVERTISSEMENT: Ce produit N'ES PAS adapte aux enfants d'un poids de supérieur à 9 kgs MAXIMUM.
-
Page 29: Panneau De Commande
PANNEAU DE COMMANDE: Pour activer le carrousel et l'oscillation du balancier, sélectionnez le type d'alimentation choisi (7) et commencer à balancer le siège de plus en plus (4) ou de diminuer (5) par l'inspection de l'indicateur de vitesse (6). Pour écouter le tintement doux à votre communiqué... - Page 30 AVERTISSEMENT DE PIÈCES ÉLECTRONIQUES: - ATTENTION: Toutes les opérations sur, au large, ajuster et de sélection de l'appareil et le remplacement des batteries doivent être effectués uniquement par des adultes. - ATTENTION: NE JAMAIS laisser le produit est exposé à la pluie, à l'eau ou tout autre liquide! Pourrait causer des dommages irréparables à...
-
Page 31: Notes Importantes
Utilisez uniquement des pièces de rechange Plebani. Le producteur pourra apporter à tout moment des modifications à l'article afin de l'améliorer. Plebani s.r.l. décline toute responsabilité pour dommages à choses ou personne dus par une utilisation impropre ou incorrecte du produit. NOTES IMPORTANTES: - Tenir médicaments, petits objets et articles dangereux pour le bébé... - Page 32 MONTAŽA I UPUTE ZA KORIŠTENJE PROČITAJTE PAŽLJIVO I DRŽITE SE NAVEDENIH INSTRUKCIJA Radi ispravne upotrebe ljuljačke preporučamo da uzmete par minuta i pročitate upute. GARANCIJA KVALITETE: - Ljuljačka-stolica je proizvedena u skladu sa Europskim sigurnosnim standardom EN 16232. - Proizvod ima garanciju u određenom periodu kao što je navedeno u zakona koji je na snazi.
- Page 33 MONTAŽA SJEDIŠTA: 4- Umetnite potporni okvir sjedišta "H" u obje rupe (slika 9.) sve do kraja dok ne čujete zvuk KLIK i provjerite da li su obje opruge izvan rupa. Tkaninu postavite na sjedište (slika 10.) spojite dva dugmeta nakon što presvučete tkaninu preko naslona za leđa i okolo potpornoga metala (slika 10.), Čvrsto pritegnete sve do trećeg dugmeta (slika 11.).
- Page 34 ELEKTRIČNA ENERGIJA: "Swing" ima šipku sa igračkama, svjetlom i zvukom, prirodnim zvukovima i mogućnostima podešavanja brzine i vremena. Postoje dva načina za snabdijevanjem energijom: 1- Koristeći adapter za energiju uključujući i AC/AD u pakovanju (slika 27.) utikač umetnete u utičnicu (slika 28.) sve do kraja. 2- Korištenje 4 baterije "D"...
- Page 35 - UPOZORENJE: Upotrebljavajte sigurnosni pojas obavezno čim je vaša beba u mogučnosti da sjedi u ljuljački bez ičije pomoći. - Samo odrasla osoba može koristiti i montirati ljuljačku. - Čuvajte ljuljačku daleko od izvora topline, strujnih kablova, pećnica, vatre, prozora...ili bilo kakvog drugog mogućeg oštećenja. - Kada ste ljuljačku ostavili na duži period izloženu suncu, sačekate izvjestan period da se ohladi prije nego je upotrijebite.
-
Page 36: Kontrolna Tabla
KONTROLNA TABLA: Kako bi ste uključili šipku sa igračkama i njihanje odaberite način napajanja (7) pojačate (4) ili smanjite (5) stopu kontrole na indikatoru (6). Kako bi ste uključili neku melodiju pritisnete odgovarajuće dugme (2) i odaberite od nekoliko postojećih pjesama (3) ili nekih prirodnih pjesama (8-10). - Page 37 UPOZORENJA ZA ELEKTRONSKE DIJELOVE: - UPOZORENJE: Sve vrste zamjene na proizvodu ili baterijama treba vršiti odrasla osoba. - UPOZORENJE: NIKADA ne izlažite proizvod na kišu, vodu ili bilo kojoj drugoj tečnosti, to može uzrokovati nepopravljive štete elektronskih dijelova. - Težina djeteta utječe na frekvenciju oscilacije ljuljačke, veća težina, veći otpor na kretnje.
- Page 38 Proizvođač može praviti neke preinake na proizvodu bilo kada u namjeri da poboljša proizvod. Plebani s.r.l. odbacuje bilo kakvu odgovornost za štete na proizvodu ili povrede na licu koje koristi proizvod a rezultat su neispravne ili pogrešne uporabe proizvod Zahvaljujemo se što ste odabrali Plebani proizvod...
- Page 40 Per visitare la nostra collezione completa digita: To see our full items collection, digit: WWW.PLEBANI.IT PLEBANI s.r.l. VIA DELL’ ARTIGIANATO 1 24060 TELGATE (BG) ITALY Tel. +39 035 830314 • Fax +39 035 831350 www.plebani.it • e-mail:info@plebani.it...
Need help?
Do you have a question about the 076 and is the answer not in the manual?
Questions and answers