Table of Contents
Advertisement
Quick Links
Beijing Aeonmed Co, Ltd. (here in called Aeonmed) holds the copyrights to this manual, which
is non-public published, and reserves the rights to keep it as a secure document. Refer to this
manual when operating, maintaining and repairing Aeonmed products only. Anyone other than
Aeonmed may not make it known to others.
Proprietary materials protected by the copyright law are included in this manual. Any section of
it cannot be reproduced, copied, or translated into other languages without any prior written
approval from Aeonmed who reserves the copyright.
Everything written in this manual is considered to be correct. Aeonmed is not legally
responsible for any mistakes printed within and any damages caused by incorrect installation
and operation. Aeonmed does not supply privileges endowed by the patent law to any other
parties. Aeonmed is not legally responsible for the results caused by patent law breaking and
any rights of the third party violating.
Refer to this manual before any Aeonmed product is used. The manual includes operating
procedures which must be performed with cautiously, operations that may result in non-normal
working conditions and the dangers which may damage equipment or cause bodily harm.
Aeonmed is not responsible for the security, reliability and function of the equipments in case
that the dangers, damages and non-normal phenomenon mentioned in this manual happen.
Free repairs for these malfunctions will not be provided by Aeonmed.
Aeonmed have the rights to replace any content in this manual without notice.
Manufacturer Responsibility
Aeonmed is responsible for the security; reliability and function of the equipments when to
following conditions are adhered to:
Installation, adjustments, mending and repairs must be performed by individuals
authorized by Aeonmed;
Necessary electrical equipment and the working environment must be in accordance with
the national standards, professional standards and the requirements listed in this manual;
Equipment must be used as instructed in the operating instructions.
CAUTION:
CAUTION:
a set of effective and approving repairing proposals cannot be submitted by the institution
which is responsible for using this equipment.
The paid theoretical framework diagram will be supplied according to customer requirements
by Aeonmed, plus calibrating method and other information to help the customer, under the
assistance of qualified technicians, repair the equipment parts where can be done by customer
himself based on the stipulation by Aeonmed.
Statement
This equipment is not for family use.
Malfunctioning equipment may become invalid and cause bodily injury if
i
Advertisement
Table of Contents
Troubleshooting

Related Manuals for Aeonmed Shangrila 590P


Summary of Contents for Aeonmed Shangrila 590P
- Page 1 Statement Beijing Aeonmed Co, Ltd. (here in called Aeonmed) holds the copyrights to this manual, which is non-public published, and reserves the rights to keep it as a secure document. Refer to this manual when operating, maintaining and repairing Aeonmed products only. Anyone other than Aeonmed may not make it known to others.
- Page 2 The label of Aeonmed original serial number or mark is removed or replaced; Other manufacturers‟ products. Security, reliability and operating condition: Aeonmed is not responsible for the security; reliability and operating condition of this product in case that: The assemblies are disassembled, extended and readjusted ...
- Page 3 Follow the steps in case that the product needs to be returned to Aeonmed: 1. Obtain the rights of return Contact with the customer service of Aeonmed by informing them the number and type of the product. The number is marked on the surface of the product. Return is unacceptable if the number cannot be identified.
-
Page 4: Table Of Contents
Shangrila590P Ventilator User Manual Contents Introduction ........................... 1–1 What‟s Shangrila590P? ....................1–1 1.1.1 Scope of application ...................... 1–1 1.1.2 Contraindication ......................1–1 Symbols ........................... 1–2 Warnings and Cautions ....................1–3 1.3.1 Warnings ........................1–3 1.3.2 Cautions ......................... 1–4 Frequently used function ....................1–6 Abbreviations and Definitions .................. - Page 5 3.9.8 Screen Lock ......................... 3–20 3.10 Ventilating parameter settings ..................3–21 3.11 Turn off the ventilator ....................3–21 Pre-use Test ........................... 4–1 Pre-use Test procedures ....................4–1 System Checkout ......................4–2 AC failure alarm test ......................4–2 Test humidifier performance .................... 4–2 Alarm test ........................
- Page 6 Shangrila590P Ventilator User Manual System technical specification ..................9–2 Operation principle ......................9–3 Performance parameters ....................9–4 9.5.1 Ventilation mode ......................9–4 9.5.2 Setting ventilating parameters ..................9–5 9.5.3 Monitoring performance ....................9–6 9.5.4 Assistant performance ....................9–7 9.5.5 Setting alarm parameters ....................9–7 Electromagnetic Compatibility ..................
-
Page 7: Introduction
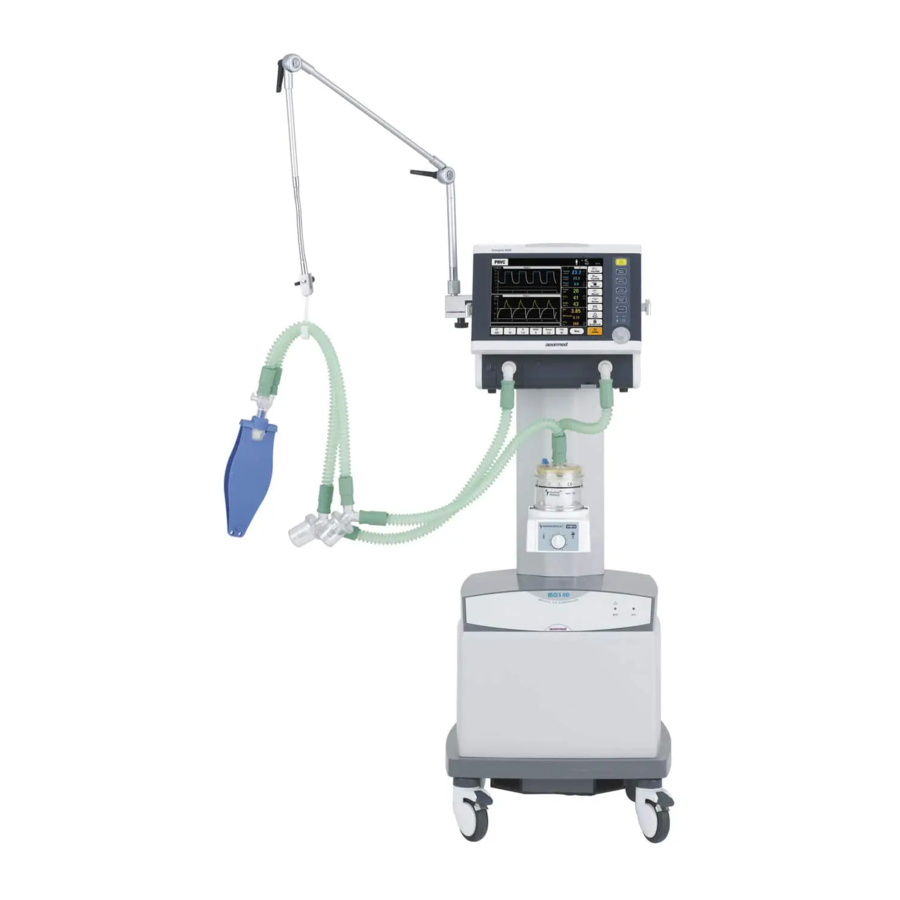
1. Introduction 1 Introduction 1.1 What‟s Shangrila590P? The Shangrila590P Ventilator System is designed to manage work of breathing, offer different modes of breath delivery, and help a practitioner select the most appropriate ventilator settings. The user interface is intended to be intuitive to anyone who knows how to operate a ventilator, and can be learned with minimal training. -
Page 8: Symbols
Shangrila590P Ventilator User Manual 1.2 Symbols Instead of illustrations, other symbols may also be utilized. Not all of them may necessarily appear in the equipment and manual. The symbols include: ON (Power) Type B applied part OFF (Power) Caution Refer to instruction Standby manual/booklet Alternating... -
Page 9: Warnings And Cautions
WARNING: An authorized service engineer must first install the ventilator and run Aeonmed‟s installation procedure, which includes calibration of various system components, before you connect a patient to the ventilator. WARNING: 590P ventilator is not intended to be a comprehensive monitoring device and does not activate alarms for all types of dangerous conditions for patients on life-support equipment. -
Page 10: Cautions
Shangrila590P Ventilator User Manual WARNING: Patients on life-support equipment must be appropriately monitored by competent medical personnel and suitable monitoring devices at all times. WARNING: An alternative source of ventilation, such as manual respiratory equipment, should always be available when using 590P ventilator. WARNING: Ensure that inspiratory and expiratory circuits are connected to the correct port before operation of equipment. - Page 11 Aeonmed recognizes that cleaning, sterilization, sanitation, and disinfection practices vary widely among health care institutions. It is not possible for Aeonmed to specify or require specific practices that will meet all needs, or to be responsible for the effectiveness of cleaning, sterilization, and other practices carried out in the patient care setting.
-
Page 12: Frequently Used Function
CAUTION: The user of this product shall have sole responsibility for any ventilator malfunction due to operation or maintenance performed by anyone not trained by Aeonmed. CAUTION: Usage of a filter on the expiratory side will increase the resistance of the patient circuit. - Page 13 1. Introduction 1.5 Definitions, Acronyms, and Abbreviations CPAP Continuous Positive Airway Pressure (setting) Respiratory rate, i.e. breaths per minute (setting) Respiratory rate of spontaneous breathing by the patient (monitored) spont Total respiratory rate, i.e. sum off and f (monitored) total spont Delivered oxygen percentage (Setting and monitored data) I : E...
-
Page 14: System Composition
Shangrila590P Ventilator User Manual Pressure support (setting) SUPP Inspiration time (setting) Inspiratory pause time; increase inspiration time to facilitate increased patient oxygenation (setting) Flow sensitivity (setting) sens Tidal volume of mechanically delivered breaths (setting) Exhaled tidal volume (monitored) Inhaled tidal volume (monitored) 1.6 System composition Name Specifications... -
Page 15: Structure
2. Structure 2 Structure 2.1 Front view CAUTION: Monitoring conditions of this system: inspiratory module: ATPD (Dry temperature and pressure) ;expiratory module: BTPS (Saturated temperature and pressure) . WARNING: Independent means of ventilation (e.g. a self-inflating manually powered resuscitator with mask) should be available whenever the Shangrila590P Ventilator System is in use. - Page 16 Shangrila590P Ventilator User Manual Controls and indicators Figure 2-2 Function k ey Press this key, you can select ventilation mode required. Mode select More details refer to section 3.2 and 3.3. Press this key, you can setup alarm parameters such as lower limit of Paw etc.
-
Page 17: Lcd Screen
2. Structure 2.1.2 LCD screen The main interface can be divided into six parts: Parameter setup area, Short Cut keys area, Patient Measured Parameters area, Patient Waveforms area, Information area and User Message Prompts area, as shown in Figure 2-3. Figure 2-3 shows the actual operational screen layout of the ventilator Figure 2-4 Main interface 2.1.2.1 Information Area... - Page 18 Shangrila590P Ventilator User Manual Figure 2-5 Information area Ventilation Mode area: Displays the current mode of Ventilation. Patient Type: Displays the current patient‟s type ( Alarm Messages area: When there is no alarm message, this area is same background color as other screen areas;...
- Page 19 2. Structure Figure 2-6 Patient waveform area 2.1.2.3 Patient Measured Parameters Area This area displays all of the monitored patient parameters and it is divided into two pages. Each page is accessed by selecting the icon 1, or 2. Figure 2-7 Patient measured parameters area 2.1.2.4 Shortcut Keys Area The ventilator has shortcut keys to access many ventilator operations, including Inspiratory Hold, Expiratory Hold, Nebulizer, Manual breath delivery, Suction, Freeze, Reset, Screen Lock,...
- Page 20 Shangrila590P Ventilator User Manual Figure 2-8 shortcuts keys area 2.1.2.5 User Message Prompts Area User message prompts area is above on the ventilation set-up area. This area is gray back ground. Information is white. Figure 2-9 Ventilation Parameter Set-up Area 2.1.2.6 Parameter Setup Area The ventilation parameter setup area is at the bottom of the screen.
-
Page 21: Front Cover-Board And Base Plate
2. Structure Figure 2-10 Parameter setup area 2.1.3 Front cover-board and base plate Figure 2-11 Front cover WARNING: The inspiratory and expiratory connectors are marked with flow-direction arrow to connect tubes rightly and conveniently. 2–7... - Page 22 Shangrila590P Ventilator User Manual Figure 2-12 Base plate Expiratory module Spout for atomization Expiratory port Emergency respiratory port Inspiratory connector Battery cover board Handrail 1. Emergency respiratory port Figure 2-13 Emegency respiratory port WARNING: The emergency respiratory port is non-conical. It‟s designed to make sure air can be inspired by patient when the ventilator failed suddenly.
- Page 23 2. Structure Used for connecting nebulizer with pipe. 3. Expiratory module Figure 2-15 Expiratory module Dial the locking switch to (unlocking) and take off expiratory module, and then disinfect it. When disinfecting finished, insert the expiratory module to the original position rightly and then the locking switch returns to (locking) automatically.
-
Page 24: Rear Panel
Shangrila590P Ventilator User Manual 2.2 Rear panel Figure 2-16 Rear panel of Shangrila590P Cooling fan Nameplate RS232 interface Nurse call Power switch Power socket Equipotential terminal Oxygen inlet Air inlet CAUTION: Do not block cooling fan port. Be careful of static electricity, take proper handling before use and grounding precautions required. -
Page 25: Nurse Call
2. Structure DB-9 Connector Pin Out Pin # Signal Name Signal Description Receive Data Transmit Data Signal Ground / Common 2.2.2 Nurse call Nurse call just works in high alarm, it doesn‟t work in middle alarm and low alarm. For the alarm level, please refer to Section 8.2 Alarm message list. -
Page 27: Operating Guide
3. Operating Guide 3 Operating Guide WARNING: Please don‟t connect ventilator to patient, before complete the settings of patient. WARNING: The clinical safety has been taken a full consideration when design. However, operator still pay attention to the ventilator‟s working state and guardianship to patients. - Page 28 Shangrila590P Ventilator User Manual Step 4 Basic settings Choose patient‟s basic information, ventilation type and etc. in basic settings interface, see right figure. Press 【Back】 to enter the standby interface, then press “start ventilating” to enter ventilation interface. Long-press 【Standby】 for 4s to return to standby interface.
-
Page 29: Setup Ventilation Mode
3. Operating Guide 3.2 Setup ventilation mode Step 1 Press the key, the ventilation mode menu appears on the screen as showed right figure. Another method: Click current ventilation mode, for example “BIVENT”, the ventilation mode menu appears on the screen as showed right figure. -
Page 30: Ventilation Mode Introduction
Shangrila590P Ventilator User Manual 3.3 Ventilation mode introduction 3.3.1 A/C In A/C mode, the ventilator delivers only mandatory breaths. When the ventilator detects patient inspiratory effort, it delivers a patient-initiated mandatory (PIM) breathe (also called an assisted breath). If the ventilator does not detect inspiratory effort, it delivers a ventilator-initiated mandatory (VIM) breath (also called a control breath) at an interval based on the set respiratory rate. -
Page 31: Pcv
3. Operating Guide to the above settings. 3.3.3 PCV PCV (Pressure Control Ventilation) is mandatory ventilation with preset respiratory frequency and pressure limit. Trigger operation refers to VCV mode. 3.3.4 PRVC PRVC breaths will be delivered at a set rate and set volume (VT). The flow pattern resembles PCV. -
Page 32: Sigh
Shangrila590P Ventilator User Manual 3.3.5 SIGH SIGH is base on VCV mode. The difference is a high tidal volume (1.5 times as set) delivers every 100 breath 3.3.6 SIMV SIMV (Synchronized Intermittent Mandatory Ventilation)is a mixed ventilator mode that allows both mandatory and spontaneous breaths. -
Page 33: Bilevel Ventilation (Bivent)
3. Operating Guide 3.3.8 Bilevel Ventilation (BIVENT) In BIVENT, breaths shall be controlled by the ventilator (mandatory). Pressure controlled breaths are provided by switching between a high and low airway pressure in an adjustable time sequence. Spontaneous breaths can be pressure supported at the high and low pressure levels. -
Page 34: Niv/Cpap
Shangrila590P Ventilator User Manual pressure (Pinsp) being delivered for an operator set period (Tinsp). Extra breaths shall be possible if the patient overcomes the pre-set trigger level or if the operator selects a manual ventilation. Patient triggered breaths shall be flow triggered. 3.3.10 NIV/CPAP NIV/CPAP is a spontaneous mode of operation and no ventilator controlled breaths are provided. - Page 35 3. Operating Guide This illustration shows NIV/CPAP spontaneous breaths with Pressure Support Figure 3-10 Pressure support will be terminated when: Inspiratory flow returns to zero during phase 1 of inspiration, (i.e. when the patient exhales or fights the ventilator), Inspiratory flow in phase 2 of inspiration phase falls below a certain ratio (Esens) of the maximum value previously supplied when compared to the peak inspiratory flow supplied Based on high Spont Inspiratory Time setting is exceeded 3–9...
-
Page 36: Alarm Settings Menu
Shangrila590P Ventilator User Manual 3.4 Alarm Settings menu Press the key, the following menu appears on the screen. Figure 3-11 Alarm settings menu 3.4.1 Setting alarm parameters There are the following parameters can be set: MV: upper limit and lower limit, unit: L; Paw: upper limit and lower limit, unit: cmH : upper and lower limit, unit: L : upper limit, unit: bpm... -
Page 37: Alarm Log Submenu
3. Operating Guide Step 1 In the 【Alarm settings】interface, press 【Alarm sound】button then it turn white, as shown in the right figure. Step 2 Turn the knob to select appropriate alarm volume and push it. You can turn off alarm volume. - Page 38 Shangrila590P Ventilator User Manual Figure 3-12 Alarm log submenu The alarm log shows alarm events in order of occurrence, with the most recent event at the top of the list. There are 3 buttons: 【Clear Log】, 【Browse】 and 【Exit】. View alarm log: Press 【Browse】button, the rectangle frame outside alarm event activated.
-
Page 39: Lung Mechanics Menu
3. Operating Guide 3.5 Lung mechanics menu Press the key, the Lung mechanics menu appears on the screen like the following figure. Figure 3-13 Lung mechanics menu 3–13... - Page 40 Shangrila590P Ventilator User Manual Static Compliance measurement: Press 【Start】 button and push it, then measuring procedure begins. Resistance measurement: Operating method is similar to the compliance measurement. Auto PEEP measurement: Operating method is similar to the compliance measurement. 3–14...
-
Page 41: Patient Data Menu
3. Operating Guide 3.6 Patient data menu Press 【Patient Data】 key, the Patient data menu appears on the screen like the following figure. Figure 3-14 Patient data menu 3.7 Configuration menu Press 【Config】key, the Configuration menu appears on the screen like the following figure. Figure 3-15 Configuration menu 3–15... - Page 42 Shangrila590P Ventilator User Manual Language: Chinese . English and so on. Unit: O、0.1KPa、mBar When pressure unit changed, the Y-axis unit of waveforms changed in-phase and keep identical. Date/Time Setting method is similar to the above. 3–16...
- Page 43 3. Operating Guide Waveform style: Line and block. Set proper waveform style according operator custom. Trigger Type: P-TRIG: pressure trigger V-TRIG: flow trigger If trigger typed changed, the relative parameter on the foot bar changed in-phase and keep identical. 3–17...
- Page 44 Shangrila590P Ventilator User Manual Waveforms: 5 types: Paw-t waveform Flow-t waveform V-t waveform Paw-V loop V-Flow loop System Information: Operating time: You can maintain ventilator periodically according to operating time. It‟s very convenient. 3–18...
-
Page 45: Patient Measured Parameters Area
3. Operating Guide 3.8 Patient Measured Parameters Area This area displays all of the monitored patient parameters and it is divided into two pages. Each page is accessed by selecting the icon 1, or 2. 1) First page display : 2)Second page display:... -
Page 46: Inspiratory Hold
Shangrila590P Ventilator User Manual 3.9.1 Inspiratory Hold Press the Inspiratory Hold key during the Inspiratory phase. Keep pressing the Inspiratory Hold key. The expiratory phase will not start until the key is released or after 10 seconds. 3.9.2 Expiratory Hold Press the expiratory Hold key during the expiratory phase. -
Page 47: Ventilating Parameter Settings
3. Operating Guide 3.10 Ventilating parameter settings 】 button in ventilation Press【V interface to select 【V 】 button as shown in right figure. Rotate the knob to adjust Vt value until the wanted, and then press it again to confirm. CAUTION: If you don‟t press the knob to confirm at last, the setting is... -
Page 49: Pre-Use Test
4. Pre-use Test 4 Pre-use Test 4.1 Pre-use Test procedures Test interval Pre-use Test should be done in the following situation: Before use of the first patient each day. Before use of each patient. After repair or maintenance. Test schedule is given in the table below: Before use of the first patient each day Before use of each patient System check:... -
Page 50: System Checkout
Shangrila590P Ventilator User Manual CAUTION: The following measures are adopted for evasion of software risks: The breathing control mechanism cannot function before the normal operation of the ventilator so that the high Paw pressure or excessive ventilation could be avoided; The hardware watchdog monitor and control system operates. -
Page 51: Breathing System Test
4. Pre-use Test more than 20cmH O, the high pressure alarm generated, and the ventilator switches to expiration phase immediately. Continuous high pressure alarm test After high pressure alarm occurs, continue to press the reservoir bag, when high pressure alarm lasting more than 15 seconds, the continuous high pressure alarm occurs. low tidal minute volume test Set the upper limit of V to 1, and adjust Vt to 500ml, low tidal minute volume alarm... - Page 52 Shangrila590P Ventilator User Manual Airway pressure upper limit (×0.1kPa) Airway pressure lower limit (×0.1kPa) Psens -0.3kPa PEEP 0kPa Gas supply rated pressure 0.4MPa 4. Check tidal volume: Cut off the gas supply, turn to the A/C ventilation mode, it should be 0 of the tidal volume monitor.
-
Page 53: Installation And Connection
5 Installation and Connection WARNING: To prevent generating wrong data and malfunction, please use the cables, hoses, and tubes from Aeonmed. WARNING: The operator will have to ensure that the inspiratory and expiratory resistances as shown in section9.3 are not exceeded when adding attachments or other components or sub-assemblies to the breathing system. -
Page 54: Installation Tools
Shangrila590P Ventilator User Manual 5.1 Installation tools Cross-screwdriver Internal hexagonal wrench: M3, M4, M5 Paper knife Figure 5-1 WARNING: Do not use excessive force to fix bolts. CAUTION: Installation personals must be professional and experienced. Abbreviation: Ventilator: Shangrila590P ventilator Compressor: MC340 medical air compressor (optional) Certificate: Product Qualified Certificate 5–2... -
Page 55: Installing Compressor
5. Installation and Connection 5.2 Installing compressor 5.2.1 Install column assembly (1) Take out column and six sets bolts, nuts, washers, spring washers. (2) Fix bolts with M5 hexagonal wrench. 5–3... - Page 56 Shangrila590P Ventilator User Manual Take out the column, set it to cover the framework. 5–4...
-
Page 57: Install Elliptical Board
5. Installation and Connection 5.2.2 Install elliptical board (1) Take out elliptical board and four sets bolts. 5–5... - Page 58 Shangrila590P Ventilator User Manual (2) Fix the elliptical board with cross-screwdriver. 5–6...
-
Page 59: Install Lines Carrier
5. Installation and Connection 5.2.3 Install lines carrier (1) Take out lines carrier and bolts. (2) Fix it on the back of column with M3 hexagonal wrench. 5.2.4 Install humidifier carrier (1) Take out humidifier carrier and bolts. 5–7... - Page 60 Shangrila590P Ventilator User Manual (2) Fix it on the face of column with M4 hexagonal wrench. 5–8...
-
Page 61: Installing Ventilator
5. Installation and Connection 5.3 Installing ventilator 5.3.1 Connect display to main unit Twist the cable of display to the baffle, and make the T block on the rear of display insert the trough of baffle. 5–9... -
Page 62: Connect Ventilator To Compressor
Shangrila590P Ventilator User Manual 5.3.2 Connect ventilator to compressor Set ventilator on the elliptical panel, one hold it to stop falling, another take out four bolts, washers, and spring-washers from accompanying file packet. Then fix them with M4 hexagonal wrench. See right picture, it is well after finishing installation. -
Page 63: Connect Accessories
5. Installation and Connection 5.4 Connect accessories Figure 5-2 connection for patient tubing 5–11... - Page 64 Shangrila590P Ventilator User Manual Figure 5-3 1 Oxygen pipeline 2 Tubes 3 Cover 4 Support arm 5 Air pipeline 6 Hanger 7 Handwheel 8 Arm carrier 5–12...
-
Page 65: Connect Pipelines
5. Installation and Connection 5.4.1 Connect pipelines (1) Connect air pipeline Plug in „Air‟ jack with one end of air pipeline, and plug in air output interface with the other end of air pipeline. (2) Connect oxygen pipeline Plug in „O ‟... -
Page 66: Install Support Arm
Shangrila590P Ventilator User Manual 5.4.2 Install support arm (1) Fix arm carrier on the handle of ventilator with handwheel. (2) Insert arm to the carrier and screw it hard. (3) Fix arm to the position required by adjusting handle of the joint. 5–14... -
Page 67: Install Humidifier
5. Installation and Connection 5.4.3 Install humidifier (1) Set the bulge on the back of humidifier to slide the trough of humidifier carrier. (2) Install adapters. 1 inlet 2 outlet(indicated by arrow) 5–15... - Page 68 Shangrila590P Ventilator User Manual CAUTION: Outlet adapter has a port for thermometer. 5–16...
-
Page 69: Connect Tubes
5. Installation and Connection 5.4.4 Connect tubes (1) Pull out sealed cover. (2) Connect one end of tube to inspiratory port, the other end to humidifier inlet. 5–17... - Page 70 Shangrila590P Ventilator User Manual (3) Connect one end of tube 2 to humidifier outlet, the other end to water trap. Connect one end of tube 3 to the water trap, the other end to Y piece. (4) Similarly, connect tube 4 from expiratory port to water trap 2, tube 5 from water trap 2 to Y piece.
- Page 71 5. Installation and Connection Then connect right-angle connector. Connect reservoir bag. 5–19...
-
Page 72: Connecting Gas And Electricity
WARNING: If voltage fluctuation exceeds 10%, Aeonmed recommends using an AC stabilizer. 2. Connecting gas supply The gas connectors designed for non-interchange to avoid man-made mistake. -
Page 73: Cleaning And Disinfection
6. Cleaning and Disinfection 6 Cleaning and Disinfection Use a cleaning and sterilizing schedule that conforms to your institution‟s WARNING: sterilization and risk-management policies. Refer to the material safety data policy of each agent. Refer to the operating and maintaining manual of all the sterilizing equipments. Wear safety gloves and safety goggles. - Page 74 Shangrila590P Ventilator User Manual Table 6-1 Cleaning, disinfecting, sterilizing Part Procedure Comments Do not allow liquid or Wipe clean with a damp cloth and mild sprays to penetrate the soap solution or with one of these ventilator or cable chemicals or their equivalents. Use connections.
-
Page 75: Cleaning: General Guidelines
Wash parts in warm water and mild soap solution. Rinse parts thoroughly in clean, warm water (tap water is fine). Aeonmed recommends that you inspect all parts at every cleaning. Replace any damaged parts. Whenever you replace parts on the ventilator, make sure it can work in a good condition before connect it to patient. -
Page 77: User Maintenance
It is recommended that you replace damaged parts with components manufactured or sold by Aeonmed. After any repair work, test the unit to ensure it complies with the manufacturer‟s published specifications. Contact the nearest Aeonmed Service Center for service assistance. In all cases, other than where Aeonmed‟s warranty is applicable, repairs will be made at Aeonmed‟s current list price... -
Page 78: Maintaining Outline And Schedule
Shangrila590P Ventilator User Manual 7.2 Maintaining Outline and Schedule The following schedule is a recommended minimum standard based upon normal usage and environmental conditions. Frequency of maintenance for the equipment should be higher if your actual schedule is more than the minimum standard. 7.2.1 User maintenance Frequency Maintenance... -
Page 79: Calibration
7. User Maintenance 7.2.3 Calibration Set the ventilator standby, then press the Config key, the Configuration submenu appears on the screen. Press the Calibration key to enter the calibration interface. Figure 7-1 Configuration menu in the standby mode Figure 7-2 Calibration submenu 7–3... - Page 80 Calibrate flow sensor Press 【Flow sensor】button, see right figure. Pay attention to on-screen prompt. Press 【Start】button, the flow sensor is calibrating. If succeed, the word Calibration completed will be on the screen as shown in right figure. If failed, contact Aeonmed. 7–4...
-
Page 81: Calibrate Flow Valve
Here are two buttons below the legend: “Start 21%” and “Start 100%”. Choose the needed one and click. Pay attention to prompt on-screen. 7.2.4 Calibrate flow valve This item must be performed by authorized personnel by Aeonmed. Follow the below processes. 7–5... -
Page 82: Calibrate Inspiratory Valve
Shangrila590P Ventilator User Manual 7.2.5 Calibrate inspiratory valve Press 【Flow value】 button, input the password “7294” , and press 【Start】 to perform calibration. Refer to Calibrate flow sensor for other processes. Pay attention to on-screen prompt. Press 【Enter】button, then enter Calibration interface. -
Page 83: Calibrate Expiratory Valve
7. User Maintenance 7.2.6 Calibrate expiratory valve Press 【Flow value】 button, input the password 3108, and Start to perform calibration. Refer to Calibrate flow sensor for other processes. Pay attention to on-screen prompt. Press【Enter】 button, then enter Calibration interface. A message “Notice: It will take a few minutes, Please Wait”... - Page 84 Shangrila590P Ventilator User Manual Height compensate Press 【 Flow value 】 button, input the password “1010”, and Start to height compensate. Press【Enter】button, then enter height compensate interface. Input new height in this page. 7–8...
-
Page 85: Replacing Fuses
7. User Maintenance 7.3 Replacing fuses WARNING: Disconnect from power supply before replacing fuses, otherwise that can injure operator even death. WARNING: Replace fuses with only those of the specified type and current rating, otherwise that can damage the equipment. CAUTION: The fuse is fragile, so replacement should be carefully. -
Page 86: Maintaining Battery
CAUTION: An authorized Aeonmed services representative can replace battery. If not to use the battery for long-time, please contact Aeonmed service representatives to disconnect battery. The waste battery should be disposed in accordance with the local policies. When „battery low‟ alarm occurs, charging should be done immediately. Or CAUTION: else, the Shangrila590P Ventilator System will shut off in several minutes automatically. - Page 87 7. User Maintenance about where you can drop off your waste equipment for recycling, please contact your local city office, your waste disposal service, or your product distributor or retailer. 7–11...
-
Page 89: Alarm And Troubleshooting
8. Alarm and Troubleshooting 8 Alarm and Troubleshooting WARNING: No repair should ever be undertaken or attempted by anyone without proper qualifications and equipment. 8.1 About alarm CAUTION: If alarm occurs, protect patient safe firstly, and then go to diagnose fault or service it necessarily. -
Page 90: Alarm Message List
Shangrila590P Ventilator User Manual 8.2 Alarm message list Message Priority Alarm definition Operator action Inspiration is Press the Insp. Hold button and do not loosen to startup the holding! alarm. After 10s, the inspiration hold is completed and the alarm disappears. - Page 91 8. Alarm and Troubleshooting Air supply High Air supply pressure less than Check air source. Obtain down!!! 0.16MPa in ventilating process. alternative ventilation if necessary. supply High supply pressure less than Check oxygen source. down!!! 0.16MPa in ventilating process. Obtain alternative ventilation if necessary.
-
Page 92: Troubleshooting
Shangrila590P Ventilator User Manual System High BDU/GUI communication fault Restart the equipment, if still failure appears. alarm, please contact with 10000!!! aftersales. 8.3 Troubleshooting Malfunctions Possible cause Recommended action AC indicator is not bright Power cord is unplugged. Plug it firmly. Power cord is damaged. -
Page 93: Specifications
9. Specifications 9 Specifications 9.1 Physical specification All specifications are approximately, maybe changed at any moment without notice. CAUTION: Do not put Shangrila590P into the shock environment. CAUTION: Do not lay the heavy on the top. Size 328mm(H)×410mm(W)×410mm(D) Weight 20kg Power cord Rating voltage: 100 to 240VAC;... -
Page 94: System Technical Specification
Shangrila590P Ventilator User Manual 9.3 System technical specification Composition: ,Air (All gas must be medical level) Pressure: 0.28MPa-0.6MPa Gas supply Velocity of flow: >60L/Min Connector: DISS-male, DISS-female, NIST (ISO 5359) Voltage & 100-240VAC, 50Hz/60Hz Frequency ≤ 95VA Power: Power supply 250V/1A, Ф5X20 (T) Fuse: Earth resistance:... -
Page 95: Operation Principle
9. Specifications 9.4 Operation principle Figure 9-1 Shangrila590P System operation principle schematic diagram 9–3... -
Page 96: Performance Parameters
Shangrila590P Ventilator User Manual 9.5 Performance parameters 9.5.1 Ventilation mode Ventilation mode A/C mode VCV mode PCV mode PSV mode SIGH mode SIMV mode SPONT mode PRVC mode NIV mode BIVENT/APRV mode 9–4... -
Page 97: Setting Ventilating Parameters
9. Specifications 9.5.2 Setting ventilating parameters Item Range Resolution Accuracy Remark Child:20-300ml 10ml ± 20 ml Peak flow = (≤1000ml) ≤100mL); Adult:50-2500ml (50<V * f / T 100ml (other) ± 15% (other) ±1bpm (≤10bpm); 4 - 100bpm 1bpm VCV/PCV/PRVC ± 10% (other) mode ±1bpm (≤10bpm);... -
Page 98: Monitoring Performance
Shangrila590P Ventilator User Manual 9.5.3 Monitoring performance Item Range Resolution Accuracy 0-4000mL ± 20mL or ± 15% of actual readings , choose the greater one. 0-4000mL ± 20mL or ± 15% of actual readings, choose the greater one. 2bpm (≤20bpm); ±10% (other) 0-100bpm 1bpm spont... -
Page 99: Assistant Performance
9. Specifications 9.5.4 Assistant performance Item Description Lung mechanics Includes static compliance measuring, Auto PEEP measuring and Resistance measuring in the airway. Emergency Start Default ventilation mode: VCV Nebulizer The function will be finished in 30 minutes. 9.5.5 Setting alarm parameters Item Range Resolution... -
Page 100: Electromagnetic Compatibility
Shangrila590P Ventilator User Manual 9.6 Electromagnetic Compatibility Changing or reassembling this equipment without Aeonmed‟s authorization may cause electromagnetic compatibility problems. Contact with Aeonmed for assistance. Designing and testing this equipment is in accordance with the following stipulations. WARNING: Using cell phone or other radio radiant equipment near this product may cause malfunction. - Page 101 9. Specifications Guidance and manufacture‟s declaration – electromagnetic emissions for all EQUIPMENT and SYSTEMS Guidance and manufacture’s declaration – electromagnetic emission The Shangrila590P Ventilator is intended for use in the electromagnetic environment specified below. The customer of the user of the Shangrila590P Ventilator should assure that it is used in such and environment.
- Page 102 Shangrila590P Ventilator User Manual Guidance and manufacture‟s declaration – electromagnetic immunity –for all EQUIPMENT and SYSTEMS Guidance and manufacture’s declaration – electromagnetic immunity The Shangrila590P Ventilator is intended for use in the electromagnetic environment specified below. The customer or the user of Shangrila590P Ventilator should assure that it is used in such an environment.
- Page 103 9. Specifications Guidance and manufacture‟s declaration – electromagnetic immunity for LIFE-SUPPORTING EQUIPMENT and SYSTEMS: Guidance and manufacture’s declaration – electromagnetic immunity The Shangrila590P Ventilator is intended for use in the electromagnetic environment specified below. The customer or the user of Shangrila590P Ventilator should assure that it is used in such an environment.
- Page 104 NOTE 4 These guidelines may not apply in all situations. Electromagnetic propagation is affected by absorption and reflection from structures, objects and people. Shangrila590P Ventilator User Manual Edition 02.02 Jan. 2017 Beijing Aeonmed Co., Ltd. 9–12...
Need help?
Do you have a question about the Shangrila 590P and is the answer not in the manual?
Questions and answers