Advertisement
Quick Links
®
Specifications:
Models Applicable ......................... HB4500; HB4500R; HB3000
Maximum Lift Capacity ................... 4,500 lb / 3,000 lb (continuous use)
Retracted Height ............................. 31-3/8
Vertical Travel ................................ 18"
Power Requirements ....................... 12 Volt DC
Outer Tube Diameter ...................... 2¼"
Power Cord Length ......................... 6 ft of #10 Gauge Wire
Foot Pad Diameter .......................... 5½"
LED Work Lights ............................. On 3 sides for Easy Nighttime Hookups
Shipping Weight ............................ HB4500 & HB4500R – 29 lb; HB3000 – 27½ lb
Warnrng:
Keep hWrds, feet Wrd body cleWa of the jWck Wrd taWnlea to Wvond the
ansk of nrjuay oa deWth!
Installation
Warnrng:
Befoae nrstWllWtnor, compWae the lnft cWpWcnty of the Husky
youa taWnlea to ersuae sWfe opeaWtnor of the jWck.
1.
Park the trailer on a level surface and block the wheels.
2.
Support the trailer tongue by the frame with jack stands.
3.
If replacing an old jack, remove the old jack from the coupler, saving the washers and bolts.
4.
Insert the Husky
Brute into the jack hole and align the bolt holes so the motor housing is facing forward as shown
®
in Figure 1.
5.
Secure the jack with three (3) grade 5, 3/8"-16 UNC bolts and washers. Place the star washers between the flat
washers and the mounting plate as shown in Figure 1. The star washers are intended to penetrate through the
paint on the mounting plate to ensure direct metal to metal contact. Bolts should be tightened to 15–20 ft•lb.
npg:
The salvaged bolts from the old jack are acceptable for reuse if they are grade 5 and in
good condition.
6.
If a lower support plate is not already present, install one in the bottom of the trailer frame. Do not operate the
jack without a lower support plate.
7.
Install the manual reset circuit breaker by either crimping or soldering one of the wires to the jack lead (Black).
Connect the other wire to the positive terminal of the battery. The breaker should be located as close to the
battery as possible and stored inside the battery box. Since the jack is internally grounded, a ground wire is not
necessary.
Warnrng:
When using an extension wire, DO NOT use a wire smaller than #10 gauge.
Operation
1.
Park your trailer on a level surface and block all dolly and trailer wheels.
npg:
For nighttime hookups, flip the light switch ON to illuminate your work area.
2.
Before operating the jack, attach the foot with the 3/8" safety lock pin provided.
Warnrng:
Do not stack blocks under the jack's foot to increase the height. Stacked blocks may
become unstable and fall.
3.
Extend the jack by pushing the operating switch UP. (With the HB4500R, you can press the UP button on the
remote control – see page 2 for remote control instructions.)
Warnrng:
Under heavy use, the internal circuit breaker may open, causing the motor to switch off.
In this case, release the operating switch, and wait 15 seconds for the breaker to reset
before resuming operation.
4.
Retract the jack by pushing the operating switch DO N. (With the HB4500R, you can press the DOWN button
on the remote control – see page 2 for remote control instructions.)
Noteg:
The jack will stop automatically at the end of the extension or retraction stroke. If you
attempt to extend or retract the jack and it does not respond, it may be at the end of the
stroke. If the jack fails to respond, try operating it in the opposite direction. If it will not
operate in either direction then see the troubleshooting guide.
5.
Before driving, remove the foot or position it in the highest position and completely retract the jack.
Manual Operation (for Back-Up & Emergency Use)
1.
Disconnect the jack from the power source. (Failure to disconnect the power could result in serious injury.)
2.
Remove the rubber access covers on the top of the jack and on the side of the motor cover.
3.
Insert the manual crank handle into the access hole on the top of the jack, engaging the drive screw.
4.
While holding the crank firmly in place, install the brake release handle on the brake lever and pull forward,
releasing the brake.
Warnrng:
Always install the crank handle and hold it firmly in place before releasing the brake on a loaded jack. Due to the Husky
if the crank is not held firmly in place, the jack may run away and the crank may spin dangerously when the brake is released.
5.
Rotate the manual crank handle counter-clockwise to extend the jack, and clockwise to retract it.
6.
When the jack is at the desired height, first re-engage the brake then remove the crank and brake release handle. Replace the rubber covers.
Made in China for / Fabriqué en Chine pour LKQ Specialty Products Group, Elkhart, IN 46516
© LKQ Specialty Products Group, 2019. All rights reserved. Tous droits reserves.
Brute Electric Jack (4,500 & 3,000 lb)
with Smart Stop®
Read and follow all instructions. If you do not understand the proper use of the product, ask your dealer/
installer for assistance. Never remove any warning decals from the product.
Tools and Components Required:
•
A-Frame Coupler with Lower Support Plate
•
Three (3) Grade 5, 1–1½" Long, 3/8"-16 UNC Bolts
•
Three (3) 3/8" Flat Washers
•
Three (3) 3/8" Star Washers (included)
•
9/16" Wrench
•
Torque Wrench
•
Wire Cutters
•
Wire Strippers
•
Crimpers OR Soldering Iron
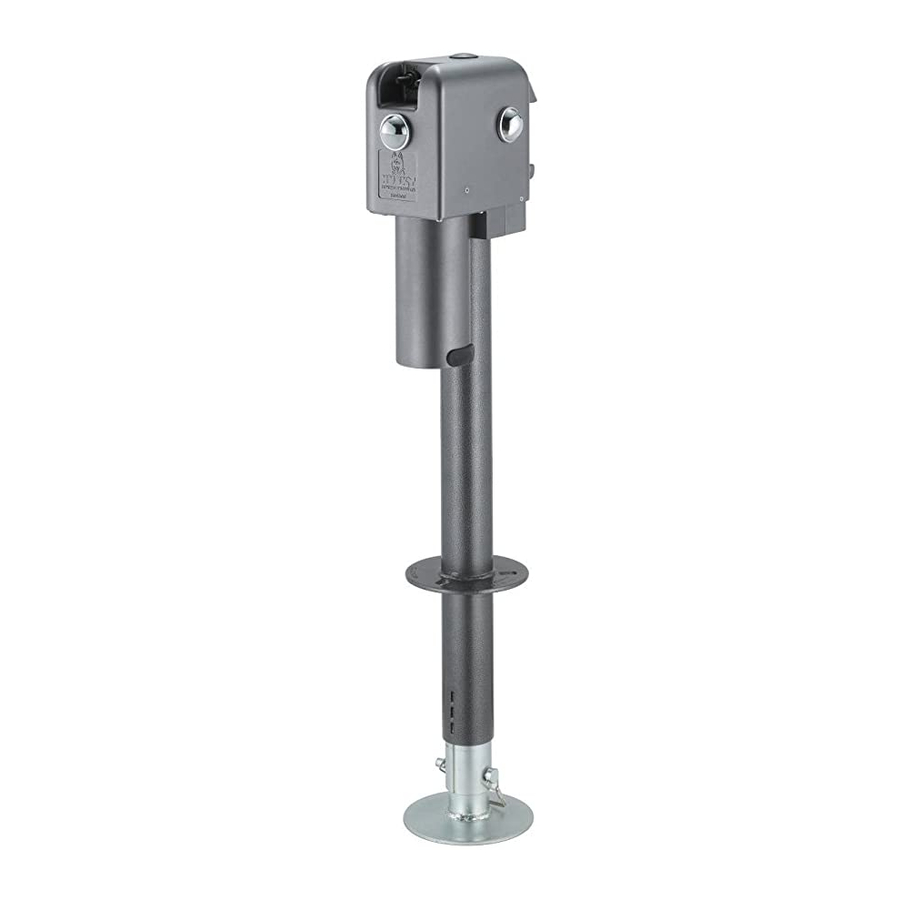
Fnnuae 1
Baute wnth
®
Manual Crank
Rubber Access Cover
Operating Switch
Light Switch
"Line"
Circuit Breaker
Terminal
"Load"
Terminal
"Line" to the
positive terminal
"Load" to
of the battery
the jack.
Safety Lock Pin
Adjustable Foot
Brute's low-friction ball screw,
®
Rev. 2019-12-17
www.huskytow.com
Advertisement

Related Manuals for Husky Brute Electric Jack HB4500


Summary of Contents for Husky Brute Electric Jack HB4500
- Page 1 While holding the crank firmly in place, install the brake release handle on the brake lever and pull forward, releasing the brake. Warnrng: Always install the crank handle and hold it firmly in place before releasing the brake on a loaded jack. Due to the Husky Brute’s low-friction ball screw, ®...
- Page 2 Lorsqu’il y a un poids sur le vérin, s’assurer de toujours installer la manivelle et de la tenir fermement en place avant de relâcher le frein. Puisque la vis à billes du vérin Brute d’Husky n’offre qu’une faible friction, le vérin pourrait s’éloigner ou la manivelle pourrait tourner de ®...
- Page 3 Remote Control (only included with the HB4500R) Commande à Distance (seulement inclus avec le HB4500R) Before using remote control, you must press the ON button. Avant d’utiliser la télécommande, appuyez sur le bouton « ON ». Press the UP button to extend the jack (raise the trailer). Appuyez sur le bouton «...
- Page 4 Entretien Due to the design of the Husky Brute’s low-friction ball screw, the inner assembly of En raison de la façon dont la vis à billes à faible fiction du vérin Brute de Husky ® ® the jack does not require regular lubrication. But to keep your jack in good, functional été...