Lifetime 9594 Assembly Instructions Manual
Universal backboard mounting kit
Hide thumbs
Also See for 9594:
- Assembly instructions manual (76 pages) ,
- Assembly instructions and owner's manual (19 pages) ,
- Assembly instructions manual (56 pages)
Table of Contents
Advertisement
Quick Links
UNIVERSAL BACKBOARD
MOUNTING KIT
MODEL #60091
MODEL 9594
• Prepare the Area
There are three ways to install Mounting Kit: Wall
Mount, Roof Mount, or Pole Mount. Read all of the
instructions thoroughly before beginning assembly
to decide which option is best suited for your use.
• Recruit Friends and Family
Assembly should take 2 people about 1
hour to complete.
SAVE THIS INSTRUCTION IN THE EVENT THAT THE MANUFACTURER
HAS TO BE CONTACTED FOR REPLACEMENT PARTS.
TOOLS REQUIRED
1/2"
(2)
3/4"
(2)
There are several installation options. The installer is responsible for selecting hardware that is
suitable for each individual installation.
QUESTIONS?
CONTACT LIFETIME CUSTOMER SERVICE:
Call: 1-800-225-3865
7:00 am–5:00 pm (Monday–Friday) MST
and 9:00 am–1:00 pm Saturday MST
9/16"
TOOLS REQUIRED
(1)
3/8"
(1)
Live Chat: www.lifetime.com
(click on "Ask An Expert" tab)
Video Instructions:
www.youtube.com/lifetimeproducts
ASSEMBLY INSTRUCTIONS
Pour le français, voir la page 2. Para el español, ver la página 3.
Backboard, Rim, and Net not included.
7/16"
(2)
(1)
For Customer Service in Mainland
Europe and the United Kingdom,
E-mail: cs@lifetimeproducts.eu
TABLE OF CONTENTS
Icon Legend................................4
Notices....................................5
Parts Identifi er............................6
Mounting Kit Assembly................6
Wall Mount Assembly..................9
Roof Mount Assembly................13
Pole Mount Assembly................17
Registration........................20
Warranty................................21
MODEL# AND PRODUCT ID
(you will need both when contacting us)
Model Number: 9594
Product ID:
Advertisement
Table of Contents

Related Manuals for Lifetime 9594


Summary of Contents for Lifetime 9594
- Page 1 There are several installation options. The installer is responsible for selecting hardware that is suitable for each individual installation. QUESTIONS? MODEL# AND PRODUCT ID CONTACT LIFETIME CUSTOMER SERVICE: (you will need both when contacting us) Model Number: 9594 Call: 1-800-225-3865 Live Chat: www.lifetime.com...
- Page 2 Il y a plusieurs options d’installation. L’installateur est responsable du choix de la quincaillerie nécessaire, convenable à chaque installation. N° DE MODÈLE ET RÉFÉRENCE DU ® QUESTIONS ? CONTACTEZ AUX SERVICES À LA CLIENTÈLE LIFETIME PRODUIT (vous aurez besoin des deux lorsque vous nous contactez) N° de modèle : 9594 Composer le 1-800-225-3865 t’Chat en direct: www.lifetime.com...
-
Page 3: Table Of Contents
Se ofrecen varias opciones de instalación. Es el instalador quien se hace responsable de elegir la piezas adecuadas para una instalación determinada. MODEL E ID DEL PRODUCTO ® ¿PREGUNTAS? PÓNGASE EN CONTACTO CON LOS SERVICIOS DE CLIENTES LIFETIME (necesitará los dos al contactarnos) Número de modelo: 9594 Para nuestros servicios a Llamar : 1-800-225-3865 Chat en vivo: www.lifetime.com... -
Page 4: Leyenda De Íconos
ICON LEGEND / LÉGENDE DES ICÔNES / LEYENDA DE ÍCONOS • Indicates special heed should be taken when reading. • Ceci indique que vous devez faire attention à ce que vous lisez. • Indica que uno debe prestar atención al leer. •... -
Page 5: Advertencias Y Avisos
WARNINGS & NOTICES / AVERTISSEMENTS ET AVIS / ADVERTENCIAS Y AVISOS SAFETY INSTRUCTIONS FAILURE TO FOLLOW THESE WARNINGS MAY RESULT IN SERIOUS INJURY OR PROPERTY DAMAGE AND WILL VOID WARRANTY. Owner must ensure that all players know and follow these rules for safe operation of the system. To ensure safety, do not attempt to assemble this product without following the instructions carefully. -
Page 6: Identifi Cador De Piezas
MOUNTING KIT / KIT DE MONTAGE / EQUIPO DE MONTAJE HARDWARE REQUIRED / QUINCAILLERIE REQUISE / HERRAJE REQUERIDO Hardware Bag / Sac de quincaillerie / Bolsa de herraje APJ (x14) CZY (x2) ETB (x2) AAS (x2) AAA (x4) ABS (x2) AAR (x2) BNP (x1) AAB (x2) - Page 7 • This mounting bracket is for use Option A – Wall Mount, Option B – Roof Mount, and Option C – Pole Mount. with Lifetime ® backboards only. Read all of the instructions thoroughly before beginning assembly to decide • Ce kit de montage est conçu which option is best suited for your use.
- Page 8 SECTION 1 (CONTINUED) / SECTION 1 (SUITE) / SECCIÓN 1 (CONTINUACIÓN) TOOLS AND HARDWARE REQUIRED / OUTILS ET QUINCAILLERIE REQUIS / INSTRUMENTAL Y HERRAJE REQUERIDOS 7/16 in/po (12 mm) (x2) AAS (x2) ABS (x2) AAB (x2) • NOTE: Refer to the instructions included with the •...
-
Page 9: Montaje Mural
WALL MOUNTING / MONTAGE MURAL / MONTAJE MURAL 8" 115 5/8" (9' 7 5/8") a. Locate and mark two consecutive studs a. Repérez et marquez deux montants a. Ubique en el muro dos tirantes in the wall where you would like the consécutifs dans le mur où... - Page 10 SECTION 1 (CONTINUED) / SECTION 1 (SUITE) / SECCIÓN 1 (CONTINUACIÓN) TOOLS AND HARDWARE REQUIRED / OUTILS ET QUINCAILLERIE REQUIS / INSTRUMENTAL Y HERRAJE REQUERIDOS 1/2 in/po (13 mm) (x2) APJ (x4) APN (x4) ABD (x4) a. Place the Extension Brackets (ESH) in the Stud Brackets (ESG), and align the diagonal holes. Attach the end of the Extension Bracket with the two smaller holes to the Stud Brackets.
- Page 11 SECTION 1 (CONTINUED) / SECTION 1 (SUITE) / SECCIÓN 1 (CONTINUACIÓN) TOOLS AND HARDWARE REQUIRED / OUTILS ET QUINCAILLERIE REQUIS / INSTRUMENTAL Y HERRAJE REQUERIDOS 1/2 in/po (13 mm) (x2) APJ (x10) APN (x10) ABD (x10) • Attach the smaller holes in the Diagonal Supports •...
- Page 12 SECTION 1 (CONTINUED) / SECTION 1 (SUITE) / SECCIÓN 1 (CONTINUACIÓN) TOOLS AND HARDWARE REQUIRED / OUTILS ET QUINCAILLERIE REQUIS / INSTRUMENTAL Y HERRAJE REQUERIDOS 3/4 in/po (19 mm) (x2) CZY (x2) AAX (x2) • TWO PEOPLE ARE NECESSARY FOR THIS STEP a.
-
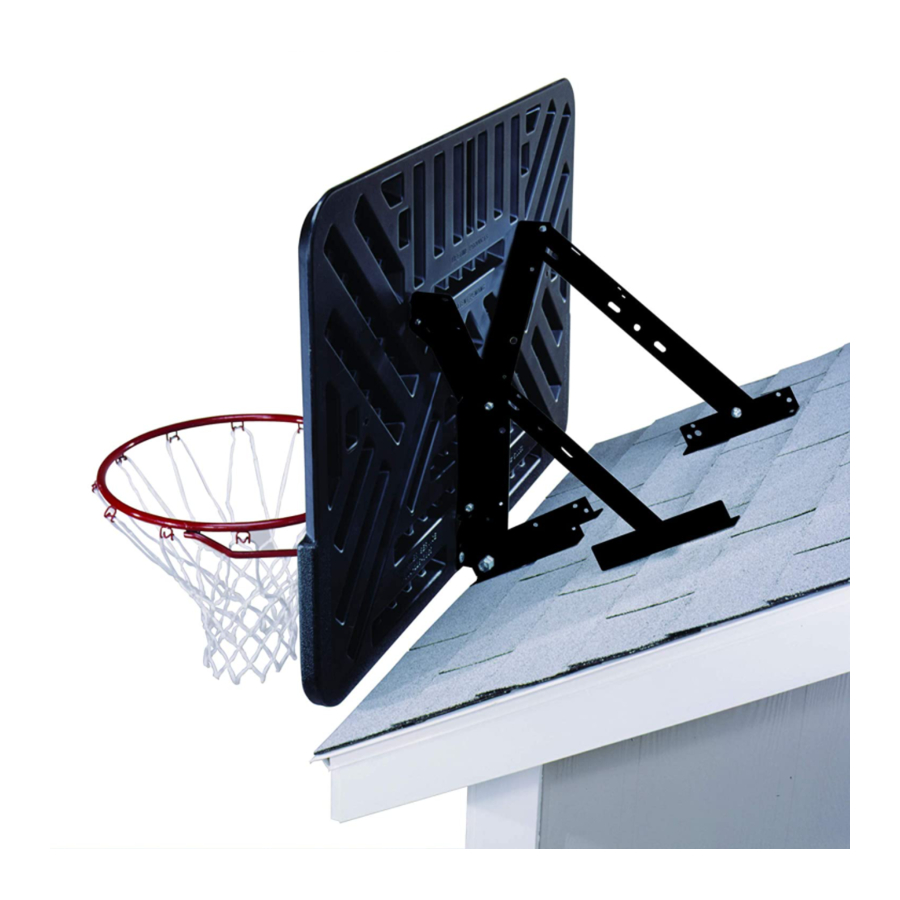
Page 13: Montaje Al Techo
ROOF MOUNTING / MONTAGE À TOIT / MONTAJE AL TEJADO • Place two Extension Brackets (ESH) 2 1/2" (63,5 mm) apart on the edge of the roof. The end of the Brackets with the larger hole should be along the edge of the roof. Secure the Brackets to the roof with hardware (not included) appropriate for use on the roof. - Page 14 SECTION 1 (CONTINUED) / SECTION 1 (SUITE) / SECCIÓN 1 (CONTINUACIÓN) TOOLS AND HARDWARE REQUIRED / OUTILS ET QUINCAILLERIE REQUIS / INSTRUMENTAL Y HERRAJE REQUERIDOS 3/8 in/po (10 mm) (x1) • Carefully undo the Nuts holding the Backboard Brackets on the Backboard. Place a Brace Angle Piece (DZS) on the end of each Bolt and reattach the Nuts.
- Page 15 SECTION 1 (CONTINUED) / SECTION 1 (SUITE) / SECCIÓN 1 (CONTINUACIÓN) TOOLS AND HARDWARE REQUIRED / OUTILS ET QUINCAILLERIE REQUIS / INSTRUMENTAL Y HERRAJE REQUERIDOS 3/4 in/po (19 mm) (x2) CZY (x1) AAX (x1) • Lift the Backboard up to the Extension Brackets mounted on the roof. Align the larger holes in the Extension Brackets with the bottom holes in the Backboard Brackets.
- Page 16 SECTION 1 (CONTINUED) / SECTION 1 (SUITE) / SECCIÓN 1 (CONTINUACIÓN) TOOLS AND HARDWARE REQUIRED / OUTILS ET QUINCAILLERIE REQUIS / INSTRUMENTAL Y HERRAJE REQUERIDOS 1/2 in/po (13 mm) (x2) APJ (x4) ABD (x4) APN (x4) • Attach the long slots in the Stud Brackets (ESG) to the upper Angle Braces on each Backboard Bracket with a Hex Bolt (APJ), a Flat Washer (ABD), and a Flange Nut (APN).
-
Page 17: Montaje Al Poste
MOUNTING TO A POLE / L’INSTALLATION AU POTEAU / MONTAJE A UN POSTE 9/16 in/po (15 mm) APJ (x2) APN (x2) 1/2 in/po (13 mm) (x2) ETB (x2) AAA (x4) ABD (x2) • a. Make a mark on the pole 115 3/4" (9' 7 3/4") from the ground. Place two U-Bolts (ETB) around the pole and slide a Saddle Bracket (CZZ) over the legs of each U-Bolt. - Page 18 SECTION 1 (CONTINUED) / SECTION 1 (SUITE) / SECCIÓN 1 (CONTINUACIÓN) TOOLS AND HARDWARE REQUIRED / OUTILS ET QUINCAILLERIE REQUIS / INSTRUMENTAL Y HERRAJE REQUERIDOS 1/2 in/po (13 mm) (x2) APJ (x2) ABD (x2) APN (x2) • Place an Extension Bracket (ESH) at the top of a Pole Mount Bracket. While holding the Extension Bracket in place, place the end of a Diagonal Support (ESI) next to the Extension Bracket so the smaller hole in the Support lines up with the lower hole in the Bracket.
- Page 19 SECTION 1 (CONTINUED) / SECTION 1 (SUITE) / SECCIÓN 1 (CONTINUACIÓN) TOOLS AND HARDWARE REQUIRED / OUTILS ET QUINCAILLERIE REQUIS / INSTRUMENTAL Y HERRAJE REQUERIDOS 3/4 in/po (19 mm) (x2) CZY (x2) AAX (x2) • Carefully lift the Backboard up to the Pole Mount Assembly. Align the large holes at the ends of the lower Extension Brackets (ESH) with the bottom holes in the Backboard Brackets.
-
Page 20: Registro
REGISTER today! ENREGISTREZ VOTRE PRODUIT EN LIGNE À WWW.LIFETIME.COM Chez Lifetime®, nous nous engageons à fournir des produits innovateurs de qualité. Lors de votre inscription, vous aurez l’occasion de nous faire parvenir vos commentaires. Votre opinion est importante pour nous. - Page 21 2. This warranty is nontransferable and is expressly limited to the repair or replacement of defective product. If the product is defective within the terms of this warranty, Lifetime Products, Inc. will repair or replace defective parts at no cost to the purchaser.
- Page 22 6. Cette garantie remplace expressément toutes autres garanties, expresses ou tacites, y compris les garanties de commercialisation ou d’adaptation à un but particulier dans la mesure permise par les lois fédéraux et des états. Ni Lifetime Products, Inc. ni aucun de ses représentants n’assure aucune autre responsabilité concernant ce produit. Cette garantie vous accorde des droits particuliers, et vous aurai peut-être des autres droites qui varient d’un état à...
-
Page 23: Garantía
NO ESTÁN DISPONIBLES O SON OBSOLETAS. 1. El comprador original recibe la garantía de que los sistemas de basquetbol Lifetime estarán libres de defectos de material o de mano de obra por un período de cinco años a contar desde la fecha de la compra original. La palabra “defectos” se defi ne como imperfecciones que perjudican el uso del producto. - Page 24 ® MEJORE SU COMPRA DE LIFETIME AGREGANDO ACCESORIOS U OTROS MARAVILLOSOS PRODUCTOS Para comprar accesorios u otros productos visítenos en: de Lifetime®, visítenos en: www.lifetime.com O llame al: 1-800-424-3865 De lunes hasta viernes 7:00 hr–17:00 hr Horario Éstandar de la Montaña (MST) y sábados 9:00 hr–13:00 hr (MST)
Need help?
Do you have a question about the 9594 and is the answer not in the manual?
Questions and answers