Table of Contents
Advertisement
Quick Links
WM–Nano
U s e r ' s M a n u a l
IMPORTANT
•Read this manual thoroughly, and do not perform installation, operation,
maintenance, or inspection unless you fully understand all of the contents.
•Keep this manual in a safe place where you can refer to it easily while
installing, operating, and carrying out maintenance or inspections.
Rice Lake Retail Solutions
P/N 132998
Advertisement
Table of Contents

Subscribe to Our Youtube Channel
Related Manuals for ISHIDA WM-Nano

Summary of Contents for ISHIDA WM-Nano
- Page 1 WM–Nano U s e r ’ s M a n u a l IMPORTANT •Read this manual thoroughly, and do not perform installation, operation, maintenance, or inspection unless you fully understand all of the contents. •Keep this manual in a safe place where you can refer to it easily while Rice Lake Retail Solutions installing, operating, and carrying out maintenance or inspections.
-
Page 2: Table Of Contents
Table of contents NOTICES Precaution Symbols Precautions for machine Installation Precautions for safe use Precautions of handling Attentions of operation About your machine Trays and Film Daily maintenance Start up/shut down Routine cleaning and maintenance Basic Operation Film change Tray programming Function key... -
Page 3: Notices
Limitations of Liability ISHIDA assumes no responsibility for special, indirect, or consequential damages, loss of profits or commercial loss in any way connected with the machine, whether such claim is based on contract, warranty, negligence, or strict liability. -
Page 4: Precaution Symbols
Precaution Symbols The following precaution symbols are used in this manual. This machine is manufactured for use according to proper procedures by a qualified person and only for the purposes described in this manual. The following conventions are used to indicate and classify precautions depending on the level of danger, or seriousness of potential injury. Always heed the information provided in this manual. -
Page 5: Precautions For Machine Installation
Precautions for machine Installation Do not install the machine in the following types of places 1)Places subject to excessive vibration or unstable foundations 2)Places exposed to direct cold air from air conditioners or refrigerators 3)Places where the floor or foundation is unstable 1)Places subject to high temperatures or high humidity 2)Places exposed to direct sunlight 3)Places where water or other liquids are easily spilled on... - Page 6 POWER SUPPLY - Please use single phase 200V to 240V - Please connect to a proper circuit that matches the specific plug with the earth ground for this machine. A power supply with fluctuating voltages can damage the machine or cause operation problems. - Please do not step on the power cable or put heavy things on it.
- Page 7 LEVEL GAUGE - Please level the machine horizontally. - If the machine is not level it may cause incorrect weight readings and poor wrapping. - When the machine is not level, please adjust the jacks (four legs) referring to the level bubble. - Ensure all machine and stand jacks make firm contact and the weight is evenly distributed.
-
Page 8: Precautions For Safe Use
Precautions for safe use Warning stickers are attached to the machine to inform the risks to operators. The meanings of warning stickers and attentions for handling are explained as follows. Please always keep these stickers clean. Please do not remove the stickers or damage the lettering. Meanings of Warning Stickers The seal heater roller continues to be hot during operation or even for awhile after you turn off the machine, so please keep your hands... - Page 9 This is attached at the infeed unit. During the weighing operation, as the infeed table moves, please keep your hands away from the infeed table. It may pinch your fingers or hands. This is attached at the film cutter unit. When you touch the film cutter part, it will cut your finger, please do not touch it.
- Page 10 Positions of each Warning Sticker and Points to be aware of when handling the machine...
- Page 11 Cutting power to the machine - For safety, please shut down the power before performing maintenance on the machine. - Please be careful because even when the switch is turned to the "OFF" position, there is still electric power inside the machine. - In order to prevent other persons from starting up the machine during the service work, the following steps are recommended.
-
Page 12: Precautions Of Handling
Precautions of handling -Please do not put your hand inside the infeed unit or wrapper unit. If you have to put your hand inside to take out something on the infeed unit or wrapper unit, please do not forget to press EMERGENCY SWITCH. - Page 13 - Please do not insert or remove the power plug with wet hands. It can cause an electric shock or short-circuit. - Please do not modify the power plug or power cable. It can cause a fire or electric shock. - Please do not pull, damage or modify the power cord.
- Page 14 - When you use water for cleaning the floor, please be careful not to put water on the machine. It can breakdown the machine or make the machine dirty. - When you clean the machine, please turn off the main power of the machine. Hands can be pinched by the infeed conveyor.
- Page 15 It can breakdown the machine or lower the weighing performance. - Please do not damage or peel off the warning stickers. If any decals are damaged or peeled off please contact your Ishida servicing agent for replacements. - Please do not give a big shock on the machine.
- Page 16 Only use film of the correct type and size for the machine. Contact your local Ishida supplier for details. - Please contact your local Ishida service agent for installation of the machine. - When you move the machine, please contact your...
-
Page 17: Attentions Of Operation
If you continue using the machine under abnormal status, it can cause a fire or breakdown the machine. Please stop using the machine and contact to your local Ishida service agent. - Please do not insert or remove the power plug while the machine is ON. -
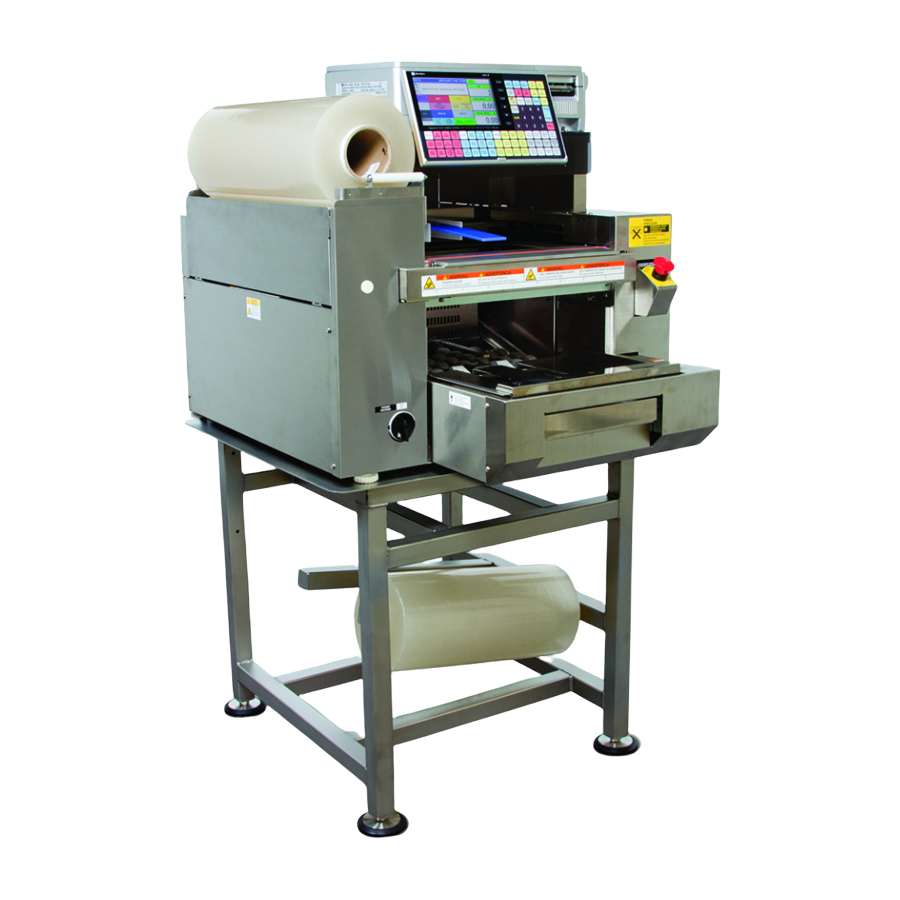
Page 18: About Your Machine
About your machine This section explains the names and functions of each part of the machine. This manual uses the names explained as below. Please remember the names of each part to read further. General view of main unit INCLUDED ITEMS - OPERATION MANUAL (1 PC) - GUARANTEE SHEET 1 PC - THERMAL HEAD CLEANER (felt pen, cleaning liquid): 1 set... -
Page 19: Trays And Film
- use contents that do not fit in the tray - position contents in only part of the tray - overfill the tray Wrapping Size:WM-Nano ‘M’ Type Depth: 90~210mm (3.5”~8.3”); FP: 80mm (3.1”) Width: 150~330mm (5.9”~13”); FP: 120mm (4.7”) Height: 10~130mm (0.4”~5.1”) Tray height: ≤45mm (1.8”) -
Page 20: Daily Maintenance
Daily maintenance CLEANING Switch off the main power supply before carrying out daily maintenance. Do not touch the discharge heaters as they will still be hot for approximately 15 minutes. Do not use water directly on the machine. POWER SUPPLY Please turn off the main power of the machine NO WATER Please do not pour water on the machine directly. - Page 21 Front cover Wipe with a soft dry cloth. Clean any areas contaminated by food residue with a cloth dampened with alcholol such as lsopropanol (isopropyl). Infeed unit Remove the weighing table. Wash the weighing table using a mild detergent and dry thoroughly. Lift unit Remove the lift unit and rinse with water containing a mild detergent.
- Page 22 Left and Right Folders Make sure there is no food or dirt on the Left and Right Folders. Dry thoroughly. Spray with alcohol. Garbage tray Remove the garbage tray. Clean and dry thoroughly. Spray with alcohol.
-
Page 23: Start Up/Shut Down
Start up/shut down Start up Parts of the machine may start to move when the main power switch is turned on. Do not put your fingers or hand inside the machine while the main power switch is turned on. Do not touch the main power switch with a wet hand. The discharge heater gets very hot and may cause burns. - Page 24 Before shut down Check that nothing has been left on the weighing table or in the wrapping area. Power off Turn off the main power switch. About Seal heater The seal heater remains hot for some time after the power has been switched off. Do not touch it for about 15 minutes.
-
Page 25: Routine Cleaning And Maintenance
Routine cleaning and maintenance Daily routine Routine cleaning of the parts described in this section should be carried out on a daily basis. Routine cleaning Press the "CLEANING" function key then press "START". After the machine moves to the cleaning mode position turn OFF the machine. Wait until the Seal Heater cools down (approximately 15 minutes) before starting to clean the machine. - Page 26 Weighing table Remove the weighing table and wash it or wipe it with a cloth dampened (not wet) with water to which a mild detergent has been added. If there is any food residue, clean the weighing table with alcohol. After cleaning the weighing table as described above, clean the scale section with a soft cloth.
-
Page 27: Basic Operation
Basic Operation Operation check After cleaning the machine, carry out the procedures described in this section to check that the machine is operating correctly. Power supply Turn on the main power switch. Original Position Touch RETURN on the screen. The infeed pushers, lift unit, and folders, etc. -
Page 28: Film Change
Film Change Loading the film (Change film width) Do not put film in the wrong way. It may cause problems. STEP 1 Press the EMERGENCY SWITCH. STEP 2 Open the film cover. STEP 3 Place film on the fillm rollers. Make sure the film comes off the bottom of the roll as shown in the picture at the right. - Page 29 STEP 4 Adjust the front edge of the film to align with the outer roller, as shown in the picture at the right. Adjust the white film roll guide if necessary. Loosen the knob and slide the guide so it lightly touches the film core. Tighten the knob. The guide should touch but not bind the roll.
- Page 30 STEP 8 Release the EMERGENCY SWITCH. STEP 9 Press the FILM FEED key. STEP 10 Press the EMERGENCY SWITCH. STEP 11 Remove the film...
- Page 31 STEP 12 Release the EMERGENCY SWITCH.
-
Page 32: Tray Programming
Press "PROGRAM", go down to page 8 with the down arrow key. Press the "TRAY" key. Note: This step may be protected by a password. Contact you ISHIDA agent. Call up tray Key in a new tray number and press PLU if you would like to create a new tray. - Page 33 Tray name change Press EDIT to program the tray name. * Use the numeric keys to enter a number in the tray name. Copy tray If you want to copy an existing tray, key in its number and press the COPY key.
-
Page 34: Function Key
Function keys Please refer to the Uni-7 manuals for detailed operation of the standard function keys. The following function keys are available for the WM-Nano only. Explanation of function keys *RETURN: Resets the mechanical parts of the wrapper to the normal starting position. - Page 35 Memo...
- Page 36 44 SANNO-CHO, SHOGOIN, SAKYO-KU KYOTO, 606-8392 JAPAN PHONE: 81-75-771-4141 FACSIMILE: 81-75-751-1634 URL: http://www.ishida.com...
Need help?
Do you have a question about the WM-Nano and is the answer not in the manual?
Questions and answers