Advertisement
Quick Links
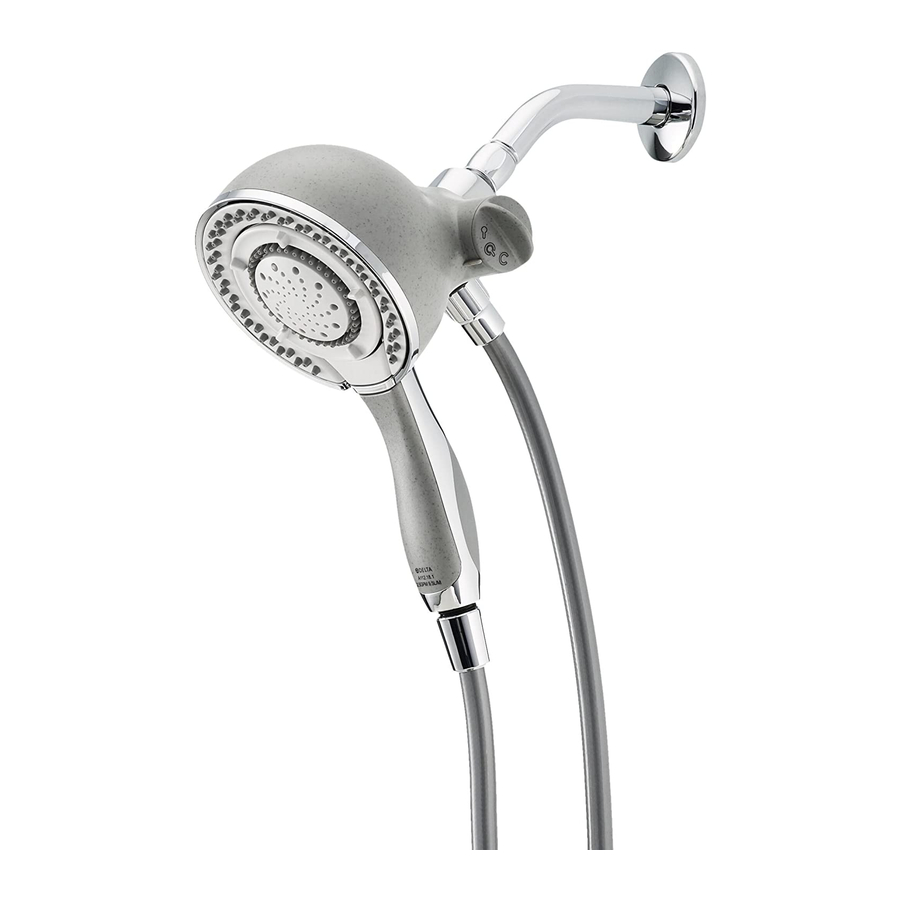
In2ition Installation Instructions
Parts Included
Shower Head
Hand Shower
Flexible Hose
Hose Washer
(2)
Cleaning of Parts
Only clean with a mild
non-abrasive detergent and
soft cloth.
Note: Any other cleaning
product not specifically
designed for cleaning plastic
or metal surfaces may damage
the finish.
Limited Lifetime Warranty
Delta Faucet warrants to
the owner of this product
that it is free from defects in
materials or workmanship as
listed above from the date of
purchase. For service either
return it to the location where
purchased or return the
product postage prepaid (we
recommend United Parcel
Service) to Alsons Corporation,
3010 W. Mechanic Street,
Hillsdale, Mich. 49242 for
repair or replacement at our
discretion at no charge.This
warranty gives you specific
legal rights. You may also
have other rights that vary
where you reside.
For assistance or problems
with installation: In the U.S.A.
call Toll Free: 1-888-775-3699,
8:00 a.m. to 6:00 p.m.
Eastern Standard Time
Monday - Friday
WARNING: Plumbing Codes require that shower heads and hand showers provide a small but continuous flow of water (trickle) when in "PAUSE" mode. Because of this continuous flow, in
certain circumstances pressure variations in the water line and/or changes in the position of shower temperature control handle while in "PAUSE" mode could result in dramatic changes to
the temperature of the water when the shower head or hand shower is returned to the "ON" position.
ALWAYS point the shower head away from yourself when returning to the "ON" position and feel the water with your hand before resuming your shower to ensure the water flow is not
too hot or too cold. DO NOT allow children or others who might not understand this warning to use the "PAUSE" function.
1. Install the shower head.
2. Install hand shower.
a. Place the hose washers into the hose nuts on each
end of the hose.
b. Connect the ribbed end of the Flexible Hose to the
Shower Head. Connect the other end of the Flexible
Hose to the Hand Shower. All connections should be
able to be made by hand tightening.
4. Removing the Hand Shower from the Shower Head.
a.
Pull the lower
part of the
Hand Shower
away from
the Shower
Head.
a. Make sure to turn off water supply before installing
the diverter.
b. Remove existing Shower Head from Shower Arm.
c. Apply Teflon tape to Shower Arm if necessary, to ensure
leak free connection.
d. Hand tighten the Ball Connector of the Shower Head to
the Shower Arm. (Use pliers if necessary for firm
installation.)
3. Insert hand shower into shower head.
a.
Insert Hand
Shower at an
Angle into the
Shower Head.
b.
a. The Hand Shower
b.
should be removed
at an angle to
release from the
Shower Head.
a. The Hand Shower
should be inserted
at an angle so the
tab on the top of
the Hand Shower
fits into the slot in
the Shower Head.
b. Gently push the
Hand Shower into
the Shower Head.
Hand
Shower
• If the Shower Head
snaps into
moves when
place.
removing the Hand
Shower, tighten the
connection between
the Shower Head
and the Shower Arm.
b. Once the Hand
Pull the Hand
Shower is released
Shower down,
from the lower clips
away from
of the Shower Head,
the slot in the
gently pull the Hand
Shower Head.
Shower away from
the slot in the upper
portion of the
Shower Head.
75580
Advertisement

Related Manuals for Delta In2ition 75580


Summary of Contents for Delta In2ition 75580
- Page 1 Shower • If the Shower Head Limited Lifetime Warranty snaps into moves when place. Delta Faucet warrants to removing the Hand the owner of this product Shower, tighten the that it is free from defects in connection between materials or workmanship as...
Need help?
Do you have a question about the In2ition 75580 and is the answer not in the manual?
Questions and answers