
Related Manuals for InoTec SCAMAX H12

Summary of Contents for InoTec SCAMAX H12
- Page 1 User Manual SCAMAX® Document Scanner Type: H12 Version 2019.12 InoTec GmbH . Biedrichstrasse 11 . 61200 Woelfersheim Tel.: +49 (0) 6036 9708-0 . Fax: +49 (0) 6036 9708-15 eMail: info@inotec.eu . http://www.inotec.eu...
-
Page 2: Table Of Contents
Table of Contents User Manual H12 / SCAMAX® 8x1 - Version 2019.12 Table of Contents 1. Introduction ............11 . - Page 3 Table of Contents User Manual H12 / SCAMAX® 8x1 - Version 2019.12 ..........22 3.2.
- Page 4 Table of Contents User Manual H12 / SCAMAX® 8x1 - Version 2019.12 ......36 4.5. Job Management (Administrator Rights required!) .
- Page 5 Table of Contents User Manual H12 / SCAMAX® 8x1 - Version 2019.12 ..59 4.6.3.3.3. Current Output to Tray 1/Tray 2/Rear at ..59 4.6.3.3.4.
- Page 6 Table of Contents User Manual H12 / SCAMAX® 8x1 - Version 2019.12 ........... 70 4.6.5.
- Page 7 Table of Contents User Manual H12 / SCAMAX® 8x1 - Version 2019.12 ......85 4.7.5.4.
- Page 8 Table of Contents User Manual H12 / SCAMAX® 8x1 - Version 2019.12 ......103 6.2.
- Page 9 Table of Contents User Manual H12 / SCAMAX® 8x1 - Version 2019.12 ......117 9.1.6.
- Page 10 Table of Contents User Manual H12 / SCAMAX® 8x1 - Version 2019.12 ......126 9.2.27. Stepper Driver Overheated (Error 241) .
-
Page 11: Introduction
Introduction User Manual H12 / SCAMAX® 8x1 - Version 2019.12 Introduction This manual contains information about the correct handling of SCAMAX® document scanners, type H12 . This type includes the models 801, 811 and 821. Additional models and special editions with a different configuration are possible. All models are identical in design. -
Page 12: Dust Exposure
Introduction User Manual H12 / SCAMAX® 8x1 - Version 2019.12 1.2.1.2. Dust Exposure Dependent on age, condition and the previous storage of the scan documents the dust exposure can increase in the immediate vicinity of the scanner. If symptoms like tussive or mucosal irritations sud- denly occur in coherence to such a material, an adequate ventilation should be ensured. -
Page 13: Danger Spot Seize/Entangle
Introduction User Manual H12 / SCAMAX® 8x1 - Version 2019.12 1.2.2.2. Danger Spot Seize/Entangle The beside warning icon indicates to the risk of seize or entangle, which is caused by the fast rotating Input Rollers or Paper Transport Rollers in case of this scanners. Besi- de the risk to grab with the fingers into the rotating rollers, it is offering a higher risk to entangle long hairs or similar parts in it. -
Page 14: Danger Spot Crush/Jam 2
Introduction User Manual H12 / SCAMAX® 8x1 - Version 2019.12 1.2.2.4. Danger Spot Crush/Jam 2 This warning icon indicates to the possible risk of crush or jam body parts if the Rack Gaiters has been released. In this case metal braces between the Lifting Columns are exposed, which are normally covered by this Gaiters. -
Page 15: General Description
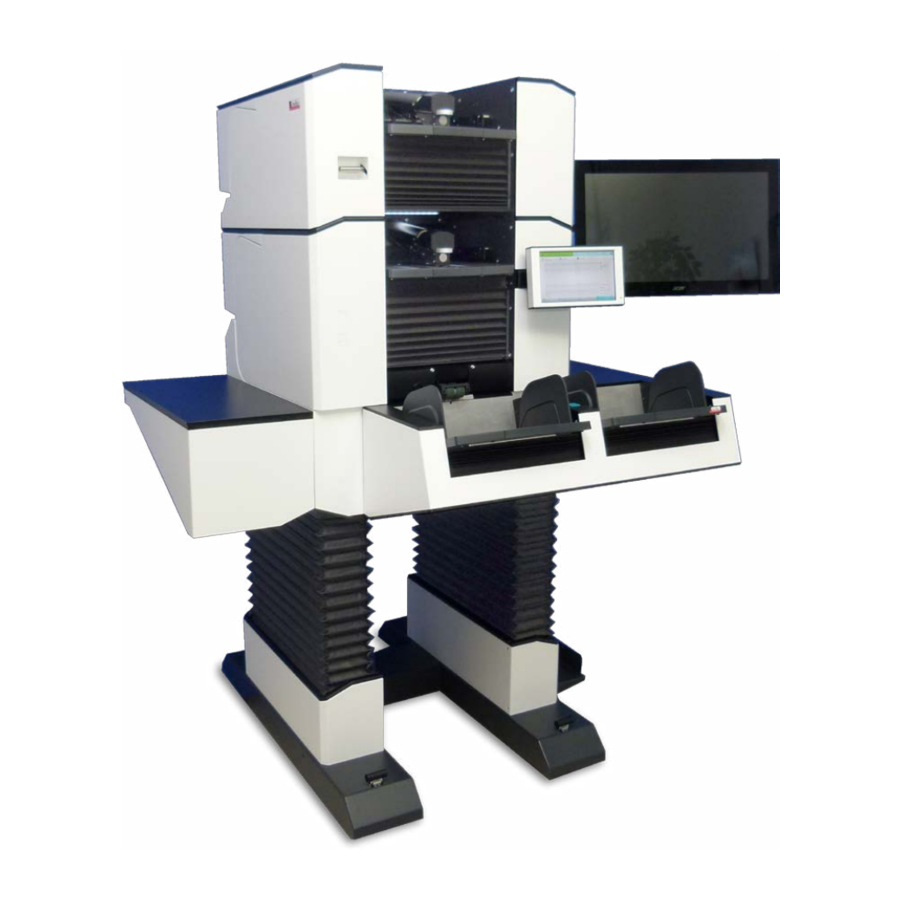
General description User Manual H12 / SCAMAX® 8x1 - Version 2019.12 General description The SCAMAX® H12 type scanners are designed for daily document processing in large volumes. They are among the most powerful and flexible high volume scanners that are offered on the market. The integrated motorized height adjustment moves the console machine to the desired working height of the user if necessary, and thus allows an optimized workplace ergonomics. -
Page 16: Scamax® Upgrade Concept 801/811/821
User Manual H12 / SCAMAX® 8x1 - Version 2019.12 2.1. SCAMAX® upgrade concept 801/811/821 The H12 scanner type supports the flexible upgrade system developed by InoTec GmbH. Through this the document scanner can be optimally adapted to changing production volumes by upgrading the scanning speed. -
Page 17: Straight Through Paper Path Elevation
General description User Manual H12 / SCAMAX® 8x1 - Version 2019.12 2.2.5. Straight Through Paper Path Elevation Should scan material be processed, by which the thickness significantly exceeds the bounds of a document, for example, closed envelopes with multiple inlaid sheets, the possibility exists with this option to gradual increase the straight-through paper path by more than 100%. -
Page 18: Device Views
General description User Manual H12 / SCAMAX® 8x1 - Version 2019.12 2.3. Device Views As illustrated in the figure on the left, the devices of the H12 type consist schematically of a Scanner Upper Section (red area) and a Scanner Lower Section (green area). The location of the main components and function groups and their names are shown in the figures in the following chapters. -
Page 19: Expansion Stage (Dual Input Hopper / 2Nd Output Hopper)
General description User Manual H12 / SCAMAX® 8x1 - Version 2019.12 2.3.1.2. Expansion Stage (Dual Input Hopper / 2nd Output Hopper) 2nd Out- Monitor Arm put Hopper 2nd Out- put Tray Output Touchscreen Hopper Capacitive Output Tray Shelf Left Shelf Right Dual Input Input Tray Hopper... -
Page 20: Interior Scan Plane
General description User Manual H12 / SCAMAX® 8x1 - Version 2019.12 2.3.3. Interior Scan Plane Below the image of the opened scanner with view of the Scan Plane. Roller Assembly Document In- put Detection Ultra Sonic Double Feed Detection PreScan Print Area Rear Scan Front Scan Area... -
Page 21: Startup Operation
The devices of this type are delivered in specially made wooden crates. If desired, the packaging will be taken back by InoTec GmbH after erecting the device. Transport without a corresponding transport box is not recommended, as this may cause damage to the device. -
Page 22: Setting Up The Device
Startup Operation User Manual H12 / SCAMAX® 8x1 - Version 2019.12 3.2. Setting Up the Device Since the device was partially dismantled for shipment, the unpacking and setting up of the scanner is carried out exclusively by an authorized expert for this. As work place a location shall be selected, at which the scanner is not exposed to direct sunlight, chemicals or vibration. -
Page 23: Power Supply / Main Switch
Startup Operation User Manual H12 / SCAMAX® 8x1 - Version 2019.12 3.4.1. Power Supply / Main Switch The Power Supply unit on the rear panel consists of power connector Main Switch and Main Switch. For connect, the device should be turned off, i.e. the Main Switch set to "0"... -
Page 24: Connecting The External Image Display (Optional)
Startup Operation User Manual H12 / SCAMAX® 8x1 - Version 2019.12 3.4.5. Connecting the External Image Display (optional) If the internal scan client is used, a separate monitor must be used to display the scanned documents. This is directly connected to the existing HDMI connection (Fig. chapter 3.4.). The mains adapter or the power cord of the monitor must be connected to a standard electrical socket outlet. -
Page 25: Installation Of Drivers
The installer file is labelled TwainSetupScamaxUSB3.exe and may be found on the USB flash drive shipped with the scanner. Alternatively, the installer may be downloaded from the InoTec website. Upon launching the installer, you will be asked for your choice of installation language. -
Page 26: Isis-Compatible Driver (Ms61)
Another, special driver for all scan software depending on the ISIS communication protocol is also supplied. The installer file is labelled ISISSetupScamaxUSB3.exe and may also be found on the USB flash drive shipped with the scanner. Alternatively, the installer may be downloaded from the InoTec website. -
Page 27: Capacitive Touchscreen
Capacitive Touchscreen User Manual H12 / SCAMAX® 8x1 - Version 2019.12 Capacitive Touchscreen The touchscreen is the central control element of the scanner. All necessary settings for the operation of the device and adjustments can be made with it. During the scanning operation, all essential infor- mation for the scanned documents and meaningful messages in case of failure with graphic details and help text for fault elimination (see chapter 9.) appear in real time. -
Page 28: Info
Capacitive Touchscreen User Manual H12 / SCAMAX® 8x1 - Version 2019.12 4.1.3. Info The round icon with the in the cen- ter, opens upon tapping a window with information about the used scanner hardware, the firmware versions used, and other important details. -
Page 29: Operation Methods
Capacitive Touchscreen User Manual H12 / SCAMAX® 8x1 - Version 2019.12 4.2. Operation Methods The touchscreen on the H12 not only responds to tapping, as one would expect, but will also accept swiping gestures. For operation, only the finger or a specially designated operator pen should be used. Other objects, e.g. -
Page 30: Color Picker Dialog
Capacitive Touchscreen User Manual H12 / SCAMAX® 8x1 - Version 2019.12 Several keyboard shortcuts are available for assisting with text input. The function keys used for these shortcuts will change their appearance, each time they are pressed. In the example to the left, we have shown the same key in its default state, after one and after two subsequent taps. -
Page 31: Event List
Capacitive Touchscreen User Manual H12 / SCAMAX® 8x1 - Version 2019.12 4.2.3. Event List Many scan-profiles use scan-time events to control or trigger func- tions. This is particularly true in the case of Stream Control (see chapter 4.6.2.5.4.) or the control of paper Output (see chapter 4.6.3.3.). Scan-time events are also used for the extended activation of more complex func- tions such as Double Feed Detection (see chapter 4.6.4.1.) or Annotations (see chapter 4.6.6.). -
Page 32: Scan Processing
Capacitive Touchscreen User Manual H12 / SCAMAX® 8x1 - Version 2019.12 4.3. Scan Processing Immediately after turning on the scanner or by selecting the item Scan Processing in the navigation bar leads to the Scan screen. This view is always displayed during active scanning. 4.3.1. -
Page 33: Output Information
Capacitive Touchscreen User Manual H12 / SCAMAX® 8x1 - Version 2019.12 If a patch code is detected on a sheet while Patch Code Detection (see chapter 4.6.4.3.) is en- abled, both related document icons are provided with the symbol (left) and the indication of the detected patch codes (PT, P2, P3, P1, P4, P6). -
Page 34: Job And Profile Selection
Capacitive Touchscreen User Manual H12 / SCAMAX® 8x1 - Version 2019.12 will appear. All function keys below the quick-ac- cess bar will highligh- ted in green and the button will Remove QA become active . You may now re-assign any of the Quick-Access buttons by touching and then dragging the desi- red function key onto... -
Page 35: User Settings
Capacitive Touchscreen User Manual H12 / SCAMAX® 8x1 - Version 2019.12 4.4. User Settings Menu item User Settings refers to the currently logged on user (see chapter 4.1.2.) and comprises the two fields shown to the left. Tapping the Password field will launch a keypad (see chap- ter 4.2.1.), which you should use to enter a new password. -
Page 36: Job Management (Administrator Rights Required!)
Capacitive Touchscreen User Manual H12 / SCAMAX® 8x1 - Version 2019.12 4.5. Job Management (Administrator Rights required!) Via the Job Manage- ment, the used scan jobs of the internal scan client will be defined and managed. These job definitions contain image settings such as type, format, name, storage location. -
Page 37: General
Capacitive Touchscreen User Manual H12 / SCAMAX® 8x1 - Version 2019.12 4.5.1. General Af ter selec ting the item General in the Job menu or the navigation bar, the adjacent mask opens in the display area. Since these set- tings relate to the inter- nal scan-client, they will be discussed elsewhere in this manual. -
Page 38: Index File
Capacitive Touchscreen User Manual H12 / SCAMAX® 8x1 - Version 2019.12 4.5.4. Index File If index data should be stored together with the generated image files, this can be defined via the menu item Index File. Since these settings relate to the internal scan-client, they will be discussed elsewhere in this manual. -
Page 39: Profile Management (Administrator Rights Required!)
Capacitive Touchscreen User Manual H12 / SCAMAX® 8x1 - Version 2019.12 4.6. Profile Management (Administrator Rights required!) The Profile Manage- ment allows you to cre- ate and manage scan profiles, which contain all the images, paper and scanner settings that are needed for an efficient, project-based scan processing. -
Page 40: General
Capacitive Touchscreen User Manual H12 / SCAMAX® 8x1 - Version 2019.12 As soon as any scan-profile has been changed beyond its default settings, a default button will appear, in the tool bar. Tapping this key will return all settings in this scan-profile to their default value. - Page 41 Capacitive Touchscreen User Manual H12 / SCAMAX® 8x1 - Version 2019.12 When using a second output hopper, this toggle-key will switch between output trays. Glossy documents (i.e. documents with a highly reflective surface across their full width) may occasionally cause false detection of a Paper Jam at Paper Input (see chap- ter 9.2.7.).
-
Page 42: Image
Capacitive Touchscreen User Manual H12 / SCAMAX® 8x1 - Version 2019.12 Tapping the key will open a separate screen sho- wing all four counters available in the current scan profile, using their custom Description (see chapter 4.6.5.1.2.) and listing their current Counter Value. Tapping one of the counter fields will launch a keypad (see chapter 4.2.1.), allowing you to change the value. -
Page 43: Gamma Correction
Capacitive Touchscreen User Manual H12 / SCAMAX® 8x1 - Version 2019.12 4.6.2.1.2. Gamma Correction After activating Gamma Correction option, you may adjust the brightness of a scanned image, for all three color channels and for the greyscale channel. The extended menu has slide controls for each of the three color chan- nels Red, Green, and Blue... -
Page 44: Resize Image
Capacitive Touchscreen User Manual H12 / SCAMAX® 8x1 - Version 2019.12 4.6.2.1.5. Resize Image Whereas the previous option will selectively enlarge or reduce images along their edges, Resize Image will crop or expand images regardless of their original format. You may specify target height and width with a resolution of a tenth of a mm. -
Page 45: Dropout Setting 1-3
Capacitive Touchscreen User Manual H12 / SCAMAX® 8x1 - Version 2019.12 4.6.2.2.2. Dropout Setting 1-3 A more flexible method of color replacement is achieved by processing accurately defined color ranges. For this purpose, three separate Dropout Settings are available, which may be configured individually, but can be used in parallel. -
Page 46: Fill Color
Capacitive Touchscreen User Manual H12 / SCAMAX® 8x1 - Version 2019.12 will also be removed. For Brightness, the Range - and Range + settings determine whether brighter or darker shades of the dropout color will also be removed. In order to arrive at useful settings, you should start by tuning the Range –... -
Page 47: Delete Image(S) At
Capacitive Touchscreen User Manual H12 / SCAMAX® 8x1 - Version 2019.12 4.6.2.4. Delete Image(s) at This function will re- move all images be- longing to a scanned page, whenever a cer- tain scan-time event occurs. In the configu- ration screen, you may choose a suitable entry from the event list (see chapter 4.2.3.)using the... - Page 48 Capacitive Touchscreen User Manual H12 / SCAMAX® 8x1 - Version 2019.12 From the drop-down list in field Resolution, you may select an indivi- dual scan resolution, only valid for this stream. The default setting is , indicating that this stream will adopt the resolution Main Resolution set in the field of the same name, on the Resolution screen (see chapter 4.6.2.3.).
-
Page 49: Gray
Capacitive Touchscreen User Manual H12 / SCAMAX® 8x1 - Version 2019.12 4.6.2.5.2. Gray The creation of the gray image is activated via this menu item and configured within its three setting masks. Apart from the missing Subsampling setting in the Compression screen, all configuration items here are identical to those of the Color stream. - Page 50 Capacitive Touchscreen User Manual H12 / SCAMAX® 8x1 - Version 2019.12 the background has been successfully removed from the form when applying the default Bright- ness threshold of 200. Appropriately adjusting the two other settings has resulted in all gray areas to be converted into (predominantly) whi- te areas.
- Page 51 In order to illustrate the function’s operation, we’ll use our company logo as an example. The InoTec logo (left) is composed of adjacent white, black and red areas. The default Outlining setting of 50 suppresses all red areas, only the boundaries around them remain.
-
Page 52: Stream Control
Capacitive Touchscreen User Manual H12 / SCAMAX® 8x1 - Version 2019.12 Switching to Strong Filter will improve conversi- on quality further, the resulting image contains even less noise and appears clearer. Activating the Disable Dynamic control will turn off the complex and powerful binarization fun- ction offered by the scanner, an algorithm designed to create the best possible bitonal images from virtually any mix of source documents. - Page 53 Capacitive Touchscreen User Manual H12 / SCAMAX® 8x1 - Version 2019.12 Please note: On the one hand, the use of the Toggle-Mode will simplify document preparation, since e.g. only one patch code type needs to be inserted, to effectively switch between two image types. On the other hand, the resulting sequencing might confuse scan operators if the scan process is in- terrupted for any reason, e.g.
- Page 54 Capacitive Touchscreen User Manual H12 / SCAMAX® 8x1 - Version 2019.12 If all fields on this screen have been deactivated, then Toggle-Mode must have been selected, using field Toggle at (see previous page). Conversely, if any fields on this screen are selected first, both Tog- gle fields on screen General will be deactivated.
-
Page 55: Blank
Capacitive Touchscreen User Manual H12 / SCAMAX® 8x1 - Version 2019.12 The Binarization Threshold is the level beyond which binarization is considered unsafe. The lower this level is set, the more important smaller details will become and the faster the switch from bitonal to the desired alternate image type (see far above) will happen. -
Page 56: Input/Output
Capacitive Touchscreen User Manual H12 / SCAMAX® 8x1 - Version 2019.12 Margins: Reduces the image area utilized for blank page detection by the margins specified here. The default value of 15 mm will be sufficient to exclude typical document marks (such as punch and stap- le holes) from blank page detection. -
Page 57: Paper Path Elevation
Capacitive Touchscreen User Manual H12 / SCAMAX® 8x1 - Version 2019.12 The list shows the most commom paper formats. The specification is always in portrait orientation. Specifying landscape and portrait formats is not necessary here, since the orientation of paper feed is defined in a separate point. -
Page 58: Feeder Mode
Capacitive Touchscreen User Manual H12 / SCAMAX® 8x1 - Version 2019.12 4.6.3.2.1. Feeder Mode The Feeder Mode is configurable with this menu item. If the scanner is equipped with a Dual In- put Hopper (see chapter 2.2.1.), then Feeder Mode will default to Dual, a mode only available with this particular input hopper. -
Page 59: Switch Out1/Out2 At
Capacitive Touchscreen User Manual H12 / SCAMAX® 8x1 - Version 2019.12 All fields relating to a Tray 2 are available only if the scanner is equipped with a 2nd Output Hopper (see chapter 2.2.3.). The operation of each of the fields will be discussed in more detail, below. 4.6.3.3.1. -
Page 60: Orientation
Capacitive Touchscreen User Manual H12 / SCAMAX® 8x1 - Version 2019.12 4.6.3.4. Orientation The five options on this screen determine how documents are placed into input hoppers and in which orientation the resulting images will be transferred. The scanner will use this information to apply image rotation, whenever necessary. -
Page 61: Deskew
Capacitive Touchscreen User Manual H12 / SCAMAX® 8x1 - Version 2019.12 of images, which would otherwise be rotated according to the front. 4.6.3.5. Deskew In the Deskew screen the skewness correction for the output images is activated and configu- red. In addition to straigh- tening up images, the Deskew function will... -
Page 62: Scanner
Capacitive Touchscreen User Manual H12 / SCAMAX® 8x1 - Version 2019.12 stances, adjustment of these two dynamic threshold values is unnecessary. The lowermost setting on this screen specifies the Dust Tolerance, during edge detection. By default, a detected object needs to be longer than 2 mm before it is considered to be an edge. -
Page 63: Stop At Input
Capacitive Touchscreen User Manual H12 / SCAMAX® 8x1 - Version 2019.12 4.6.4.1.2. Stop at Input This option is activated by default. It ensures that paper input is stopped and retained in the feed area of the scanner, whenever Double Feed Detection occurs within the first 2 cm of the offending paper intake. -
Page 64: Sensor Configuration
Capacitive Touchscreen User Manual H12 / SCAMAX® 8x1 - Version 2019.12 4.6.4.1.6. Sensor Configuration This setting will launch two setup screens requi- red for the configuration of the three ultrasonic sensors performing Double Feed Detection. On the Settings screen, the lowermost field Number of Verifications specifies how often the sensing process will be repeated,... -
Page 65: Scan Speed
Capacitive Touchscreen User Manual H12 / SCAMAX® 8x1 - Version 2019.12 4.6.4.2.1. Scan Speed Use this control to throttle the scanner‘s page throughput. The method for achieving this re- duction depends on the type of paper output used (see chapter 5.7.3.). If a High Speed Stacker Arm (see below) is installed and active, throughput reduction will be achieved by increasing the gaps bet- ween documents. -
Page 66: Scan Pause At
Capacitive Touchscreen User Manual H12 / SCAMAX® 8x1 - Version 2019.12 4.6.4.2.6. Scan Pause at Select an event which will automatically inter- rupt the scanning process. Since only events can be used which have occurred before the currently scanned image, a narrowed down version of the event list (see chapter 4.2.3.) is presented here. -
Page 67: Patch Decoder Settings
Capacitive Touchscreen User Manual H12 / SCAMAX® 8x1 - Version 2019.12 4.6.4.3. Patch Decoder Settings This setting mask con- tains all the necessary settings to define the patch code detection. The mask pictured here is graphically edited, because it exceeds the display area of the touchscreen. -
Page 68: Required Tracks At Input
Capacitive Touchscreen User Manual H12 / SCAMAX® 8x1 - Version 2019.12 4.6.4.3.4. Required Tracks at Input Whereas patch code detection by camera is based on 15 virtual strips evenly spaced across a variable detection area (see above), early patch code detection during paper intake is limited to the five optical sensors mounted in the paper input path. -
Page 69: Read On
Capacitive Touchscreen User Manual H12 / SCAMAX® 8x1 - Version 2019.12 All information about recognized bar codes is passed along with their respective images, as metadata. Such images are also marked with a special symbol, in the sheet information area of the scan screen (see chapter 4.3.1.). -
Page 70: Counters
Capacitive Touchscreen User Manual H12 / SCAMAX® 8x1 - Version 2019.12 4.6.5. Counters The setting group Coun- ter has four menu items access to the configura- tion of the four available scanner counters. 4.6.5.1. Counter Settings Since the settings de- tails are the same for all counters, only Counter 1 will be discussed, here. -
Page 71: Counter Increment
Capacitive Touchscreen User Manual H12 / SCAMAX® 8x1 - Version 2019.12 4.6.5.1.3. Counter Increment The drop-down list at the top and the entry field Increment Value below specify the count events and the increments used by this counter. You may choose a suitable trigger event from the Event List (see chapter 4.2.3.). -
Page 72: Enable/Disable Imprinter
Capacitive Touchscreen User Manual H12 / SCAMAX® 8x1 - Version 2019.12 4.6.6.1.1. Enable/Disable Imprinter Checking the top setting, Print Initially, will turn on the printing function at the start of each scan-process. The next four settings operate independently of the top setting and allow one-time or permanent printer activation and de-activation, each of them triggered by an associated event. - Page 73 Capacitive Touchscreen User Manual H12 / SCAMAX® 8x1 - Version 2019.12 Here an example using the counter 1 with a value of 123456: Print text information Print result Print text information Print result %CNT1% 123456 %NMC6% %CNT1% 123456 %NMC2% %CNT1% %NMC7% %CNT1% 0123456 %NMC3% %CNT1%...
-
Page 74: Print Margin
Capacitive Touchscreen User Manual H12 / SCAMAX® 8x1 - Version 2019.12 Character Height / Line Feed(HD) In opposed to the standard imprinter, the HD version is capable of printing up to four lines of text, simultaneously. The HD version is even capable of printing individual lines at different line heights, provided the overall height does not exceed that of four standard lines. -
Page 75: Batesstamp Front/Back
Capacitive Touchscreen User Manual H12 / SCAMAX® 8x1 - Version 2019.12 4.6.6.2. BatesStamp Front/Back This setting mask cont- ains all the parameters for configuring the di- gital image stamp. Th e m a s k p i c t u re d here is graphically edi- ted, because it exceeds the display area of the... -
Page 76: Font
Capacitive Touchscreen User Manual H12 / SCAMAX® 8x1 - Version 2019.12 4.6.6.2.4. Font These four settings modify the text formatting used by the digital image stamp. Use the top field to select between a Serif Sans Serif d Font. Use the slider below to set Monospace the Font Size to somewhere between 4 and 20 points. -
Page 77: Enable Length Control
Capacitive Touchscreen User Manual H12 / SCAMAX® 8x1 - Version 2019.12 4.6.7.1. Enable Length Control This option will enable a continuous check of incoming documents and compares them to the document dimensions (see chapter 4.6.3.1.1.) and orientation (see chapter 4.6.3.4.) specified. If the actual paper length or width exceeds these specifications, an appropriate error message (see chapter 9.2.26.) is raised and scanning will be interrupted. -
Page 78: Rule Definition
Capacitive Touchscreen User Manual H12 / SCAMAX® 8x1 - Version 2019.12 Tapping the button will change Edit Rules the appearance of this configuration screen, as shown to the left. Exis- ting rules may now be selected (and are high- lighted turquoise) and a bar with several functi- on keys is also presen- ted. -
Page 79: Conditions
Capacitive Touchscreen User Manual H12 / SCAMAX® 8x1 - Version 2019.12 The first two actions will increment or reset one of four counters. As already shown above, one of the counters ( ) is required as the reference item, plus a Counter1..4 value for either incrementing the counter by, or for resetting the counter to. -
Page 80: Complex Rules
Capacitive Touchscreen User Manual H12 / SCAMAX® 8x1 - Version 2019.12 These two items turn results from the activated bar code detection into conditions. will accept all bar codes detected, whereas will filter de- Any Barcode Barcode ==.. tection results according to a value or value range specified. The formatting of value is the same as for the Trigger Value (see chapter 4.6.4.4.4.) used during bar code configuration. -
Page 81: Hierarchical Rules
Capacitive Touchscreen User Manual H12 / SCAMAX® 8x1 - Version 2019.12 4.6.8.4.1. Hierarchical Rules Complex Rules may be daisy-chained or nested, in cases where more than four conditions are required. Daisy-chaining is achieved by creating a Complex Rule containing three items with Conditions (i.e. Rules without Action) plus a fourth item with another Complex Rule containing four more Conditions. -
Page 82: Administration (Administrator Rights Required!)
Capacitive Touchscreen User Manual H12 / SCAMAX® 8x1 - Version 2019.12 4.7. Administration (Administrator Rights required!) After selecting main menu item Administration, the adjoining segment in the navigation bar will offer a drop-down list with all of the sub-menus available from here. -
Page 83: Calibration
InoTec GmbH. 4.7.2.1. Gain Calibration Tapping this button will initiate a calibration of the scanner’s A/D (analogue/digital) converters. -
Page 84: Option Management
Capacitive Touchscreen User Manual H12 / SCAMAX® 8x1 - Version 2019.12 4.7.3. Option Management Selecting menu item Option Management will display a screen with option information. At the top of the screen, the scanner’s Reg. ID is displayed, below is a list of already installed Active Options. -
Page 85: System Language
Capacitive Touchscreen User Manual H12 / SCAMAX® 8x1 - Version 2019.12 4.7.5.1. System Language This setting determines the global system lan- guage which is used to for menus, menu items and messages, on the scanner’s display. Additionally, individual users may make their own and differing choice (see chapter 4.4.). Besides the three main system languages, English, German and French, Russian is currently also available. -
Page 86: Job/Profile Import
Capacitive Touchscreen User Manual H12 / SCAMAX® 8x1 - Version 2019.12 Tapping the button will open a screen, which on the left side (in column: Scanner) offers two drop- down lists with all Jobs and Profiles available on this scanner. Below each drop-down list there are two more buttons, one is labelled and the... -
Page 87: Export All/Last Logfiles
Capacitive Touchscreen User Manual H12 / SCAMAX® 8x1 - Version 2019.12 4.7.6.3. Export all/last Logfiles During operation, the scanner collects logging information, which is eventually written into a new and separate file, at each scanner boot-up. The two buttons shown to the left will export such log-files onto a USB flash drive inserted into one of the available USB2 ports. -
Page 88: Scanning Documents
Scanning Documents User Manual H12 / SCAMAX® 8x1 - Version 2019.12 Scanning Documents SCAMAX® scanners offer all conditions for efficient working. In particular, the devices of the H12 type can be optimized through optional extensions of the Output/Input Hopper. The following chapters describe possible setting and correct use of the hardware to ensure optimum paper transport. -
Page 89: Operation Of The Input System
Scanning Documents User Manual H12 / SCAMAX® 8x1 - Version 2019.12 5.3. Operation of the Input System The used feeder system, processes a wide range of different paper thicknesses, also mixed in one stack. It is designed so that regardless of paper thickness and surface finish an optimal feeding performance is achieved without the need for an adjustment having to be made.Centered above the front edge of the Input... -
Page 90: Input Hopper
Scanning Documents User Manual H12 / SCAMAX® 8x1 - Version 2019.12 5.4. Input Hopper The scanners of the H12 type are equipped with a Single Input Hopper with a Input Tray or, optionally, with a Dual Input Hopper with two Input Trays. Each Input Tray can accommodate documents with a stack height of up to 10 cm (equivalent to approx. -
Page 91: Using The Single Input Hopper
Scanning Documents User Manual H12 / SCAMAX® 8x1 - Version 2019.12 If you are working with smaller paper stacks or the sup- plied Paper Guide Extensions are not needed, they can be removed easily. Since they are only held in place by two magnetic holders on the Paper Guides, they can be attached and removed easily by simply folding them in place or away. -
Page 92: Using The Dual Input Hopper
Scanning Documents User Manual H12 / SCAMAX® 8x1 - Version 2019.12 5.4.4. Using the Dual Input Hopper If the scanner is operated with the Dual Input Hopper, this is mounted movable horizontally on the front panel of the device. The side shelves are therefore smaller than in the version with a Single Input Hopper (see chapter 2.3.1.2.). -
Page 93: Scan Plane
Scanning Documents User Manual H12 / SCAMAX® 8x1 - Version 2019.12 5.5. Scan Plane Directly behind the feeder, the Scan Plane begins (see chapter 2.3.3.), in which the documents pass through the Document Input Detection and Double Feed Detection (see chapter 4.6.4.1.), as well as the PreScan Print Area (see chapter 2.3.3.) before first the Front Scan Area Front Scan Area and then the Rear Scan Area is reached. -
Page 94: Paper Output
Scanning Documents User Manual H12 / SCAMAX® 8x1 - Version 2019.12 5.6. Paper Output In order to keep the piles in the output bins forming as neat as possible, even at very high paper transport speeds, scanned documents are patterned with a wave-like structure, before being ejected into the output bins. -
Page 95: Output Hopper
Scanning Documents User Manual H12 / SCAMAX® 8x1 - Version 2019.12 5.7. Output Hopper The scanners of the H12 type are equipped with one or two Output Hoppers. Each Output Hopper allows in its Output Tray a stack height of up to 13 cm, thus offers 30% more space than the Input Hopper(s). -
Page 96: Highspeed Stacker Arm
Scanning Documents User Manual H12 / SCAMAX® 8x1 - Version 2019.12 5.7.2. HighSpeed Stacker Arm For a controlled and thus safer paper output, scanner Pressure Adjustment models with a scan speed in excess of 300 ppm are equipped with a HighSpeed Stacker Arm for each of the output hoppers, as standard. -
Page 97: Highspeed / Open Output Mode
Scanning Documents User Manual H12 / SCAMAX® 8x1 - Version 2019.12 If the additional extension is no longer needed, the lock at the top of the Stacker Arm is pulled out and this is pushed back to the first telescopic stage, so that the locking slides back into its guide when released. -
Page 98: Use Of One Output Hopper
Scanning Documents User Manual H12 / SCAMAX® 8x1 - Version 2019.12 If the used model does not have a HighSpeed Stacker Arm or or if the use of the stacker arm has been deactivated in the current scan-profile (see chapter 4.6.4.2.2.), we speak of a Open Output Mode. In this case, scanned documents are transported through the scanner and ejected into the output bin at the rated speed of the respective scanner model. -
Page 99: Use Of Two Output Hoppers
Scanning Documents User Manual H12 / SCAMAX® 8x1 - Version 2019.12 5.7.5. Use of Two Output Hoppers If the device has a 2nd Output Hopper, the Output of documents can be passed project-oriented in both Output Trays. The most common way here is the fixed assignment of a Output Tray for a Input Tray in conjunction with the Dual Input Hopper (see chapter 5.4.4.). -
Page 100: Straight Through Paper Path
Scanning Documents User Manual H12 / SCAMAX® 8x1 - Version 2019.12 5.7.6.1. Straight Through Paper Path Since documents that are ejected to the Rear Output Tray, are transported straight through the scanner, without deflection, we are talking here of a Straight Through Paper Pass. Especially in combination with the available option "Straight Through Paper Path Elevation"... -
Page 101: Start / Stop Of The Scanner
Scanning Documents User Manual H12 / SCAMAX® 8x1 - Version 2019.12 5.8. Start / Stop of the Scanner To start or stop a scan process, there are various options in this scanner model. The easiest way is to use the provided hardware keys located on the Input Hopper right (Single-Input Hopper) or central (Dual Input Hopper). -
Page 102: Opening The Scanner
Opening the Scanner User Manual H12 / SCAMAX® 8x1 - Version 2019.12 Opening the Scanner To clear a paper jam or to carry out cleaning and maintenance work, it may be necessary to open the scanner or sporadically to remove covers. All opening options are displayed below in a graphical overview and their handling clearly explained in the next few chapters. -
Page 103: Opening/Closing The Output Hopper(S)
Opening the Scanner User Manual H12 / SCAMAX® 8x1 - Version 2019.12 6.2. Opening/Closing the Output Hopper(s) Since the procedure differs between the variant with two Output Hoppers and that equipped with one Output Hopper, we explain the opening/closing below 6.2.1. -
Page 104: Removing/Attaching The Cover Output Hopper
Opening the Scanner User Manual H12 / SCAMAX® 8x1 - Version 2019.12 6.3. Removing/Attaching the Cover Output Hopper The change the print position of the Imprinter Back (see chapter 8.2.) and replace the corresponding ink cartridge, or to open the Intermediate Drive Unit (next chapter), the Cover Output Hopper on the back of the scanner must be removed first. -
Page 105: Removing/Attaching The Base Cover
Opening the Scanner User Manual H12 / SCAMAX® 8x1 - Version 2019.12 6.5. Removing/Attaching the Base Cover The Base Cover on the rear panel must be removed to gain access to the Rear Output (next chapter). For this, pull the cover on the top of the adjacent magnetic hol- ders and lift out the bottom attached suspensions. -
Page 106: Cleaning And Maintenance
Cleaning and Maintenance User Manual H12 / SCAMAX® 8x1 - Version 2019.12 Cleaning and Maintenance To achieve an optimum image quality and avoid excessive wear, it is important to keep the scanner free of dust and dirt. The exterior of the scanner must be cleaned only with a lint-free cloth and clear water. To remove paper dust inside the scanner only proven dust brush or soft cloth should be used. -
Page 107: Cleaning/Maintenance Of The Paper Input
Cleaning and Maintenance User Manual H12 / SCAMAX® 8x1 - Version 2019.12 7.2. Cleaning/Maintenance of the Paper Input With an increasing number of processed documents, some parts in the scanner get dirty or worn out, and must be cleaned or replaced. This includes in particular the friction linings of the Input Rollers and the Separation Roller. -
Page 108: Replacing The Feeder Roller Friction Linings
Cleaning and Maintenance User Manual H12 / SCAMAX® 8x1 - Version 2019.12 To clean, a lint-free cloth is soaked with some SCAMAX® SV1A Cleaning Solution for Rubbers & Belts and thus rubbed over each lining of the two Input Rollers until the adherent dirt is removed and the lining has a good grip again. -
Page 109: Cleaning The Separation Roller Friction Linings
Cleaning and Maintenance User Manual H12 / SCAMAX® 8x1 - Version 2019.12 7.2.3. Cleaning the Separation Roller Friction Linings A rising level of Double Feed Inputs (see chapter 9.2.14.) is often a sign that the Separation Roller Friction Linings should be cleaned. To do this, open the Scan Plane of the device (see chapter 6.1.) as much as necessary and press with a pen or the like on the lock of the Cover Separation Roller to fold it open. -
Page 110: Cleaning The Ultra Sonic Sensors
Cleaning and Maintenance User Manual H12 / SCAMAX® 8x1 - Version 2019.12 7.3.1. Cleaning the Ultra Sonic Sensors Since the Ultra Sonic Sensors for Double Feed Detection Lower Ultra Sonic Sensors in the front area of the Scan Plane are fitted somewhat lower, it is especially important for the lower sensors that they tested at regular intervals for deposits and most easily cleaned using the dusting brush (see chapter 3.1.). -
Page 111: Maintenance/Replacement Of The Paper Guide Springs
Cleaning and Maintenance User Manual H12 / SCAMAX® 8x1 - Version 2019.12 7.3.4. Maintenance/Replacement of the Paper Guide Springs In the frontal pressure unit, which is located between the paper input and the scan areas, you will find two rows of Paper Guide Springs. These springs serve two purposes, they are necessary for the correct functioning of the optical sensors and they also stabilize documents, while these are passing through the printing region of... -
Page 112: Imprinter
Imprinter User Manual H12 / SCAMAX® 8x1 - Version 2019.12 Imprinter Through the two integrated imprinters it is possible to print the front and/or back of the scanning material with a variety of information. The imprinters supplied in standard configurations will only print single rows in the direction of scanning, while the optional HD versions are able to print up to four lines or text in different text heights. -
Page 113: Ink Cartridge Of The Imprinter
Imprinter User Manual H12 / SCAMAX® 8x1 - Version 2019.12 8.3. Ink Cartridge of the Imprinter Both available Imprinter types use conventional ink jet cartridges from Hewlett Packard, which are available in different inks. These ink cartridges are characterized by high reliability, ease of use and worldwide availability. -
Page 114: Capacity Of The Ink Cartridges
Imprinter User Manual H12 / SCAMAX® 8x1 - Version 2019.12 Notice If the ink cartridge is removed in order to replace it with a new one, this must be done with an active device, so that the level can be reset. After inserting the ink cartridge a prompt appears on the display with the opportunity to put the ink reservoir again at 100% via a button, thereby indicated the use of a new ink cartridge or to keep the amount of ink on the current value, when the ink cartridge, for example to control or clean, was removed and reinstalled. -
Page 115: Choice Of Print Position
Imprinter User Manual H12 / SCAMAX® 8x1 - Version 2019.12 8.4. Choice of Print Position Both default Imprinters have nine different horizontal print positions, of which one is in the middle and the remaining eight are left and right in the edge region of the DIN formats A6, A5, A4 and A3. -
Page 116: Disruptions
If errors are not be remedied by the measures specified in each case, the service engineer or technical support of InoTec GmbH (see chapter 10.3.) is to be notified. 9.1. -
Page 117: 2Nd) Output Hopper Open
Disruptions User Manual H12 / SCAMAX® 8x1 - Version 2019.12 9.1.2. (2nd) Output Hopper Open (Warning 101/102) These warnings appear initially only in the status area, meaning that the Output Hopper or the 2nd Output Hopper is not closed properly. To eliminate the respec- tive warning, the Output Hoppers must be properly clo- sed (see chapter 6.2.). -
Page 118: 2Nd) Output Tray Full
Disruptions User Manual H12 / SCAMAX® 8x1 - Version 2019.12 9.1.7. (2nd) Output Tray Full (Warning 109/110) These warnings mean that the Output Tray of the Out- put Hopper or the 2nd Output Hopper has reached its maximum tray height (see chapter 5.7.). To eliminate the warning, the documents must be removed from the con- cerning Output Tray. -
Page 119: Rear Output Active
Disruptions User Manual H12 / SCAMAX® 8x1 - Version 2019.12 9.1.12. Rear Output Active (Warning 127) This warning will be displayed if the paper-guide was pointing to the rear-output tray, during a paper jam. Paper jams should always be resolved according to the General Paper Jam Handling (see chapter 9.2.). -
Page 120: Error Messages
Disruptions User Manual H12 / SCAMAX® 8x1 - Version 2019.12 9.2. Error Messages In the following various error messages are shown, which may occur during device initialization or handling of the scanner. Especially with paper jam messages that are determined by the continuous transport path sensors, it should be noted that the reported jams are often not actual jam error, but a document that got stuck in the transport possibly only briefly. -
Page 121: 2Nd) Output Hopper Open
Disruptions User Manual H12 / SCAMAX® 8x1 - Version 2019.12 9.2.2. (2nd) Output Hopper Open (Error 201/202) These errors are displayed when the Output Hopper was opened during scanning or the 2nd Output Hopper was not properly closed at Scanstart. To eliminate the error, the Output Hoppers must be properly closed (see chapter 6.2.). -
Page 122: (Error 210)
Disruptions User Manual H12 / SCAMAX® 8x1 - Version 2019.12 9.2.7. Paper Jam at Paper Input (Error 210) This error indicates a paper jam that occurred in the input area. This is the case when a document could not be properly drawn in by the Roller Assembly. To correct the error, proceed according to General Paper Jam Hand- ling (see chapter 9.2.). -
Page 123: (Error 221)
Disruptions User Manual H12 / SCAMAX® 8x1 - Version 2019.12 9.2.11. Paper Jam Before (2nd) Paper Output (Error 215/216) These errors indicate a paper jam, which occurred prior to the paper outputs. To eliminate the respective error, proceed according to General Paper Jam Handling (see chapter 9.2.). -
Page 124: (Error 222)
Disruptions User Manual H12 / SCAMAX® 8x1 - Version 2019.12 9.2.15. Button Quick-Stop Pressed (Error 222) This message appears when the red button Quick-Stop (see chapter 5.8.2.) at the Input Hopper has been pressed. In this case, the reason for the Quick-Stop is to be eliminated and before anew Scanstart, proceed ac- cording to General Paper Jam Handling (see chapter 9.2.). -
Page 125: (Error 227)
Disruptions User Manual H12 / SCAMAX® 8x1 - Version 2019.12 9.2.20. Paper Inside Rear Output Area (Error 227) This error indicates that a scan process has been started, although documents are still in the Rear Output Area. This happens when according to a previous error, this area has not been cleared. -
Page 126: (Error 233)
If the error occurs again, the service en- gineer or the technical support of InoTec GmbH (see chapter 10.3.) is to be notified. 9.2.28. Patch Detection Inconsistency... -
Page 127: (Error 245)
(see chapter 4.7.6.2.), but the USB flash drive contains a file with exported scan jobs or profiles that are incompatible with the scanner‘s firm- ware version. In case of doubt, please contact the InoTec GmbH software support department. Page 127 of 136... -
Page 128: (Error 249)
If the error is not eliminated that way, the service engineer or the technical support of InoTec GmbH (see chapter 10.3.) is to be notified. 9.2.37. Linak Uncalibrated (Error 253) This error occurs if the calibration of the scanner‘s height... -
Page 129: (Error 255)
Disruptions User Manual H12 / SCAMAX® 8x1 - Version 2019.12 9.2.39. Barcode Check Digit Wrong (Error 255) This error occurs if Barcode Detection (see chapter 4.6.4.4.) is active for the current scan profile and if correct barcode type(s) with check digit selected is/are detected, but the check digit of the barcode on the current docu- ment is incorrect. -
Page 130: (Error 271)
General Paper Jam Handling (see chapter 9.2.) to be per- formed. In all other cases, the scanner will have to be restarted. If the state cannot be eliminated, the service technician or technical support of InoTec GmbH (see chapter 10.3.) is to be notified. 9.4. -
Page 131: Image Disruptions
Disruptions User Manual H12 / SCAMAX® 8x1 - Version 2019.12 9.5. Image Disruptions In many cases, image disruptions can be eliminated by cleaning the Scan Areas (see chapter 7.3.2.) or possibly by a White Calibration (Contact administrator). If both actions are carried out unsuccessfully, other causes and their elimination are listed in the following passage 9.5.1. -
Page 132: Attachments
Attachments User Manual H12 / SCAMAX® 8x1 - Version 2019.12 Attachments 10.1. Technical Specification Generally Scanning Method CCD line camera Illumination LED Illumination (diffuse) Optical Resolution 600 dpi 75 / 100 / 150 / 200 / 240 / 300 / 400 / 600 dpi Output Resolutions Dual or multi resolution possible Output Compressions... - Page 133 Attachments User Manual H12 / SCAMAX® 8x1 - Version 2019.12 Paper Processing / Handling Dust-protected by NoSCRATCH glass guides, Scan Areas variable height with switchable Scan Background (black / white) Automatic tray up to 130 mm stack height with active air ex- traction, adjustable Paper Stop, asymmetrically adjustable Paper Document Output Front Guides, tray extension for long documents (max 485 mm) and...
-
Page 134: Contact Information
10.3. Contact Information For questions regarding the document scanners from InoTec company, in principle, the local partners or traders should be the first point of contact. Should this not be available, also one of the following contact options can be used depending on the type of question. - Page 135 Attachments User Manual H12 / SCAMAX® 8x1 - Version 2019.12 10.4. Warning/Error Code Table The following tables contain all warnings and error messages that may occur during operation of the scanner, sorted by their three-digit code, which is displayed above the title in the respective message window.
- Page 136 Attachments User Manual H12 / SCAMAX® 8x1 - Version 2019.12 Code Error Headline Chapter Paper Jam Inside Output Tray 9.2.13. Paper Jam Inside 2nd Output Tray 9.2.13. Double Feed Detected 9.2.14. Button Quick-Stop Pressed 9.2.15. Switch Input Hopper Failed 9.2.16. Calibration Failed 9.2.17.
Need help?
Do you have a question about the SCAMAX H12 and is the answer not in the manual?
Questions and answers