Table of Contents

Related Manuals for Siemens BE520LMR0


Summary of Contents for Siemens BE520LMR0
- Page 1 Microwave Oven BE520LMR0 User manual and installation instructions Register your product on My Siemens and discover exclusive ser- vices and offers. siemens-home.bsh-group.com/welcome The future moving in. Siemens Home Appliances...
-
Page 2: Table Of Contents
en Safety ¡ Under supervision. Never leave the appli- Table of contents ance unattended when cooking for short periods. ¡ In private households and in enclosed USER MANUAL spaces in a domestic environment. ¡ Up to an altitude of max. 4000 m above Safety .............. - Page 3 Safety en WARNING ‒ Risk of burns! WARNING ‒ Risk of electric shock! The appliance and its parts that can be Incorrect repairs are dangerous. touched become hot during use. ▶ Repairs to the appliance should only be ▶ Caution should be exercised here in order carried out by trained specialist staff.
-
Page 4: Safety
en Safety and pillows filled with grain or cereal may Heated food gives off heat. The cookware catch fire, even several hours later. may become hot. ▶ Never dry food or clothing with the appli- ▶ Always use oven gloves to remove cook- ance. -
Page 5: Preventing Material Damage
Preventing material damage en etrates this cavity, it could cause the cook- WARNING ‒ Risk of serious harm to ware to crack. health! ▶ Only use microwave-safe cookware. The surface of the appliance may become Cookware and containers made from metal or damaged if it is not cleaned properly. Mi- cookware with metal edging may lead to crowave energy may escape. -
Page 6: Environmental Protection And Saving En- Ergy
en Environmental protection and saving energy Always place the popcorn bag on a glass plate. ▶ Liquid that penetrates the interior of the appliance may The microwave feed is damaged by the removal of the damage the turntable drive. cover. Monitor the cooking process. ▶... -
Page 7: Familiarising Yourself With Your Appliance
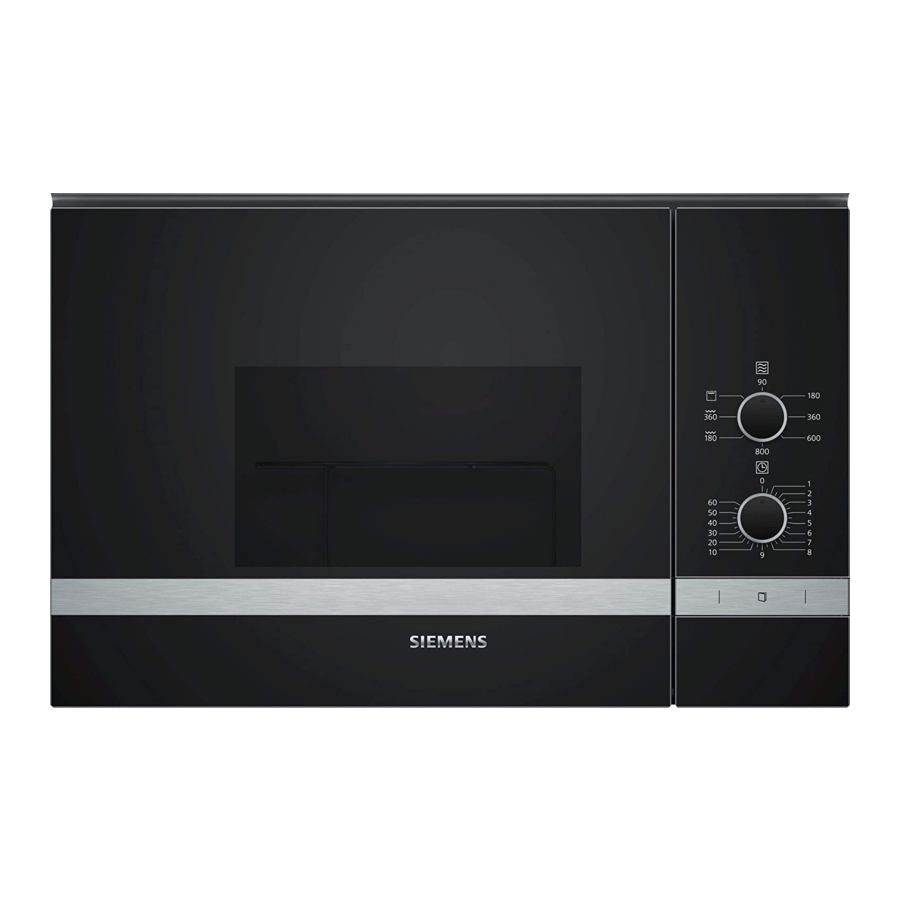
Familiarising yourself with your appliance en 4 Familiarising yourself with your appliance 4.1 Control panel You can use the control panel to configure all functions of your appliance and to obtain information about the operating status. Note: On certain models, specific details such as col- our and shape may differ from those pictured. - Page 8 en Accessories 4.3 Cooling fan 4.4 Condensation The cooling fan switches on and off as required. Condensation can occur in the cooking compartment The cooking compartment remains cold during mi- and on the appliance door when cooking. Condensa- crowave operation. Despite this, the cooling fan will still tion is normal and does not adversely affect appliance switch on.
-
Page 9: Accessories
Basic operation en Place the empty cookware in the cooking compart- 7.2 Microwave-safe cookware and ment. accessories Set the appliance to the maximum microwave power To heat food evenly and avoid damaging your appli- setting for 30 seconds to 1 minute. ance, it is important to use the right cookware and ac- Start the operation. -
Page 10: Grill
en Grill To continue the operation, close the appliance door. 7.7 Cancelling the operation a The set cooking time continues to count down. Set the time selector to 0. ▶ 8 Grill You can brown or gratinate your food using the grill. To continue the operation, close the appliance door. -
Page 11: Cleaning And Servicing
Cleaning and servicing en Note: Slight differences in colour on the front of the WARNING ‒ Risk of injury! appliance are caused by the use of different materi- Scratched glass in the appliance door may develop als, such as glass, plastic and metal. into a crack. For stainless steel appliance fronts, apply a thin Do not use any harsh or abrasive cleaners or sharp ▶... -
Page 12: Troubleshooting
en Troubleshooting Once the duration has elapsed, keep the door Leave the cooking compartment to dry with the door closed for a further three minutes. open. Wipe out the cooking compartment with a soft cloth. 10 Troubleshooting You can rectify minor faults on your appliance yourself. WARNING ‒ Risk of electric shock! Read the troubleshooting information before contacting Incorrect repairs are dangerous. - Page 13 Disposal en 11 Disposal Find out here how to dispose of old appliances cor- This appliance is labelled in accord- rectly. ance with European Directive 2012/19/EU concerning used elec- 11.1 Disposing of old appliance trical and electronic appliances (waste electrical and electronic equip- Valuable raw materials can be reused by recycling.
- Page 14 en How it works Delicate parts, such as the legs and wings of Issue chicken or fatty outer layers of roasts, can be After defrosting, poultry or ¡ Set a lower microwave covered with small pieces of aluminium foil. The foil meat should not be de- power setting.
-
Page 15: How It Works
How it works en Food Weight in g Microwave power Cooking time in mins setting in W Vegetables, e.g. peas 10–15 Fruit, e.g. raspberries 7–10 Fruit, e.g. raspberries 1. 180 1. 8 2. 90 2. 5–10 Butter, defrosting 1. 180 1. 1 2. 90 2. - Page 16 en How it works Heating frozen food in the microwave Observe the recommended settings for using the microwave to heat frozen food. Food Weight in g Microwave power Cooking time in mins setting in W Set menu, plated meal, ready meal with 2–3 300–400 8–11 components Soup...
- Page 17 How it works en Do not cover the food when grilling. 13.5 Cooking ‒ Do not cover the food when combining the mi- ‒ With your appliance you can cook food. crowave and grill. Always place the cookware on the turntable. Cooking food Always place the wire rack on the turntable when ‒...
- Page 18 en How it works Food Amount Accessories Type of Cooking Information crowave heating time power in mins setting in W Bake, savoury, made 1000 g Cookware 30–40 The maximum thickness of from cooked ingredi- without lid the food is 4 cm. ents, e.g. potato gratin Soups, gratinated, 2–4 cups Cookware 15–20 e.g. onion soup...
-
Page 19: Installation Instructions
Installation instructions en 13.6 Test dishes These overviews have been produced for test institutes to facilitate appliance testing in accordance with EN 60350-1:2013 or IEC 60350-1:2011 and EN 60705:2012, IEC 60705:2010. Cooking with the microwave Recommended settings for cooking with the microwave. Food Microwave power Cooking time in mins Note:... - Page 20 en Installation instructions ¡ Only a licensed professional may connect 14.4 Fitted units appliances without plugs. Damage caused Here, you can find notes on safe installation. by incorrect connection is not covered un- ATTENTION! der the warranty. Any shavings may impair the function of electrical com- ponents.
- Page 21 Installation instructions en Remove the cover at the base of the microwave. 14.7 Installation dimensions in the tall unit Observe the installation dimensions and the safety clearances in a tall unit. Screw the middle screw tightly on the base of the microwave. 14.8 Preparing the tall unit Determine the wall thickness of the unit.
- Page 22 en Installation instructions Secure the four supporting feet to the base of the Screw the appliance in until the appliance is cent- microwave. rally aligned. Check the clearance to the adjacent appliances. 14.10 Installing the appliance Secure the spacers to the appliance in accordance with the wall thickness.
- Page 24 Valid within Great Britain: Imported to Great Britain by BSH Home Appliances Ltd. Grand Union House Old Wolverton Road Wolverton, Milton Keynes MK12 5PT United Kingdom Manufactured by BSH Hausgeräte GmbH under the trademark licence of Siemens AG *9001611099* 9001611099 (010315)
Need help?
Do you have a question about the BE520LMR0 and is the answer not in the manual?
Questions and answers