Table of Contents
Advertisement
Available languages
Available languages
Quick Links
Advertisement
Chapters
Table of Contents

Related Manuals for Dcybel BOOM POWER

Summary of Contents for Dcybel BOOM POWER
- Page 1 BOOM POWER PORTABLE RADIO/CD PLAYER WITH MP3 AND USB PORT LECTEUR CD/RADIO PORTABLE MP3 ET PORT USB DRAAGBARE RADIO/CD-SPELER MET MP3 EN USB-POORT INSTRUCTION MANUAL NOTICE D'UTILISATION GEBRUIKSAANWIJZING...
-
Page 2: Table Of Contents
Table of Contents WARNINGS ......................2 IMPORTANT SAFETY INSTRUCTIONS............... 4 CONTROLS....................... 7 BATTERY OPERATION (NOT SUPPLIED) ..............7 MAINS OPERATION ....................8 FM RADIO OPERATION................... 8 DISCS OPERATION ....................8 USB OPERATION ....................11 AUX IN ........................11 TROUBLESHOOTING ....................11 SPECIFICATIONS .................... -
Page 3: Warnings
WARNINGS This appliance is intended for domestic household use only and should not be used for any other purpose or in any other application, such as for non domestic use or in a commercial environment. Ventilation Allow at least a 10 cm gap all around the product. The ventilation should not be impeded by covering the ventilation openings with items, such as newspapers, table‐ cloths, curtains, etc. No naked flame sources, such as lighted candles, should be placed on the apparatus. GB‐2 ... - Page 4 Attention should be drawn to the environmental aspects of battery disposal. This apparatus is not suitable for use in a tropical climate. The apparatus shall not be exposed to dripping or splashing and that no objects filled with liquids, such as vases, shall be placed on the apparatus. Batteries (battery pack or batteries installed) shall not be exposed to excessive heat such as sunshine, fire or the like. Where the MAINS plug or an appliance coupler is used as the disconnect device, the disconnect device shall remain readily operable. GB‐3 ...
-
Page 5: Important Safety Instructions
IMPORTANT SAFETY INSTRUCTIONS Symbols This equipment is double insulated and an earth connection is not required. This mark is applied to show the equipment conforms to European safety and electromagnetic compatibility standards. Dangerous voltage constituting a risk of electric shock is present inside this equipment. There are important operating and maintenance instructions in the literature accompanying this equipment. GB‐4 ... - Page 6 Class 1 laser product This apparatus contains a low power laser device. Invisible laser radiation when the enclosure is opened and interlocks are defeated. Avoid exposure to beam. This digital disc player employs a laser system. Use of controls, adjustments, or the performance of procedures other than those specified herein may result in hazardous radiation exposure. To prevent direct exposure to laser beam, do not open the enclosure. Never stare directly into the laser beam. Do not install this apparatus in a confined space such as a book case or similar unit. GB‐5 ...
- Page 7 BATTERY WARNING: Only adults should handle the batteries. Do not allow a child to use this product unless the Battery Cover is securely attached to the Battery Compartment. The battery type used in this product is six UM‐2 size batteries. These batteries are located internally and are readily accessible. Remove the battery cover on the bottom of the product to remove the batteries. These batteries must be disposed of at your local recycling point. GB‐6 ...
-
Page 8: Controls
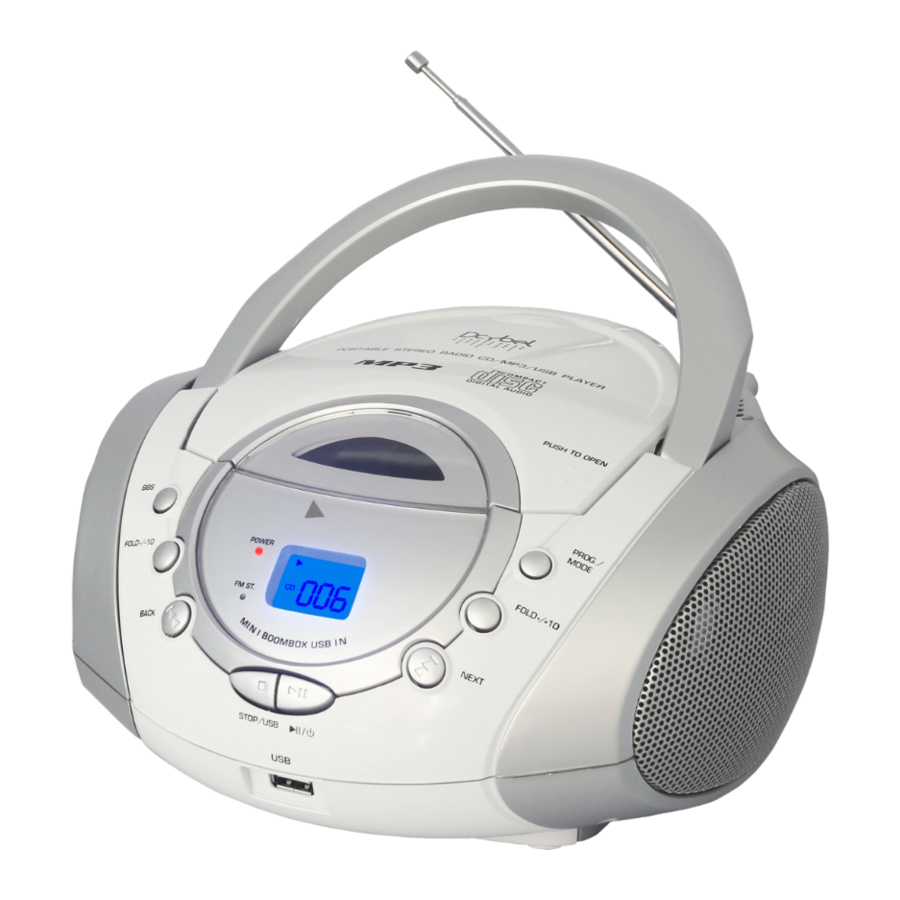
CONTROLS Front 1. Handle 9. PROG./MODE button 2. CD door 10. FOLD+/+10 button 3. POWER indicator light /NEXT button 4. Display 12. Speakers 5. FM ST. indicator light button 6. BBS: Bass boost button 14. STOP/USB button 7. FOLD‐/‐10 button 15. USB port 8. BACK/ button Rear and Bottom 16. Telescopic aerial 17. FUNCTION switch: TUNER‐OFF‐CD/MP3/USB/AUX ... -
Page 9: Mains Operation
If the unit is not to be used for a prolonged period of time, remove the batteries to avoid damage by battery leakage. MAINS OPERATION 1. Place the player on a flat stable surface. 2. Plug the mains lead into the AC~ jack located on the rear of the player ensuring that the plug is pushed fully into the jack. 3. Plug the other end of the mains lead into the mains socket. The mains socket used for the player must remain accessible during normal use. In order to disconnect the player from the mains, the mains plug should be removed from the mains power socket completely. SWITCHING ON THE UNIT Set the FUNCTION switch to the TUNER or CD/MP3/USB/AUX position to turn on the unit. If there is no operation within about 15 minutes when the FUNCTION switch is set to the CD/MP3/USB/AUX position, the unit will turn off automatically. Press to switch on the unit again. FM RADIO OPERATION 1. Extend the telescopic aerial. Note: Fully extend and reposition the aerial for optimum reception. 2. Set the FUNCTION switch to the TUNER position. The POWER indicator light will illuminate. 3. Turn the VOLUME control knob to a comfortable volume level. 4. Turn the TUNING knob to tune in to the desired FM station. The FM ST. indicator light will illuminate for a stereo signal. 5. - Page 10 Cleaning agents may damage the CD. Do not expose the CD to rain, moisture, sand or to excessive heat. CD/CD‐R/CD‐RW/MP3 discs The player can playback CD/CD‐R/CD‐RW/MP3 discs that have been finalised upon completion of recording. The player may fail to playback some discs due to poor recording and wide variation in quality of the discs. Inserting a disc 1. Push the right corner of the CD door to open it. 2. Insert a disc on the disc tray with the label side facing up. 3. Close the CD door. Playing a CD 1. Set the FUNCTION switch to the CD/MP3/USB/AUX position. The player will scan the contents of the CD. The total number of tracks will then be displayed. 2. The player will start by pressing . Playback will start from the first track and the display will show the current track number and the symbol . 3. Adjust the volume by turning the VOLUME control knob. 4. You can activate the bass boost function by pressing BBS. The unit will boost the sound output of the bass frequencies. To deactivate this function, press BBS again. 5. To interrupt playback, . ...
- Page 11 For MP3 disc, when the number of tracks on the disc exceeds 10, first press FOLD+/+10 or FOLD‐/‐10 and then repeatedly press / to select the desired track. If the MP3 disc contains more than one folder, press and hold FOLD+/+10 or FOLD‐/‐ 10 for about 2 seconds to skip next/previous folder. Search function While the disc is playing, press and hold / . Release the button when the desired point (passage) of the track is reached. Playback will start again from this point. Disc repeat mode While the disc is playing, repeatedly press PROG./MODE to select the desired repeat mode. Symbol status on the display Description To repeat a single track Flashing To repeat all tracks Stop flashing To repeat all tracks in the folder (for MP3 only) FOLDER shows Random playback RDM To play the first 10 seconds of each track (for CD disc only) INTRO Normal playback Disappear Programmed play By programming the player you can play up to 20 disc / 99 MP3 tracks in any desired order. 1. In stop status, press PROG./MODE. ...
-
Page 12: Usb Operation
USB OPERATION Inserting and removing a USB memory device Carefully insert a USB memory device into the USB port. To remove the USB memory device simply pull it out. Selecting USB mode Set the FUNCTION switch to the CD/MP3/USB/AUX position and then press and hold STOP/USB to select the USB mode. The display will show the total number of folders and the total number of tracks. Playback control in USB mode is similar to CD mode. NOTE: The USB memory device should not be removed during playback as damage or corruption of files may occur. AUX IN Connect an audio cable (not supplied) to the AUX IN jack on the rear of the unit. Connect the other end to a suitable output socket on your auxiliary device. Set the FUNCTION switch to the CD/MP3/USB/AUX position. You can play music from an auxiliary device through the speakers of the player. TROUBLESHOOTING Problem Possible Cause Possible Solution The player will not 1. Unit not in CD mode. 1. Select CD mode. play. 2. CD is not installed or installed 2. Load a CD with label side incorrectly. up. CD skips while Disc is dirty or scratched. ... - Page 13 Disposal As a responsible retailer we care about the environment. As such we urge you to follow the correct disposal procedure for the product, packaging materials and if applicable, accessories and batteries. This will help conserve natural resources and ensure that the materials are recycled in a manner that protects health and the environment. You must follow laws and regulations about disposal. Waste electrical products and batteries must be disposed of separately from household waste when the product reaches the end of its life. Contact the store where you bought the product and your local authority to learn about disposal and recycling. The batteries must be disposed of at your local recycling point. See the operating instructions to find out how to remove the batteries for disposal. We apologize for any inconvenience caused by minor inconsistencies in the operating instructions, which may occur as a result of product improvement and development. Darty Holdings SNC © 14 route d’Aulnay 93140 Bondy, France 09 / 06 / 2015 GB‐12...
- Page 14 Table des matières AVERTISSEMENTS ..................... 2 CONSIGNES DE SÉCURITÉ IMPORTANTES ............. 4 COMMANDES ......................7 UTILISER DES PILES (NON FOURNIES) ..............7 INSTALLER L’APPAREIL .................... 8 UTILISER LA RADIO FM .................... 8 UTILISER DES DISQUES ..................... 8 UTILISER LE PORT USB ..................... 10 UTILISER L’ENTRÉE AUX ..................
-
Page 15: Avertissements
AVERTISSEMENTS Cet appareil est destiné à un usage domestique uniquement. Toute utilisation autre que celle prévue pour cet appareil, ou pour une autre application que celle prévue, par exemple une application commerciale, est interdite. Aération Prévoyez un espace libre d'au moins 10 cm tout autour du produit. - Page 16 Il convient d’attirer l’attention sur les problèmes d’environnement à la mise au déchet des piles. Cet appareil n'est pas destiné à être utilisé sous un climat tropical. L’appareil ne doit pas être exposé á des égouttements d'eau ou des éclaboussures et de plus qu'aucun objet rempli de liquide tel que des vases ne doit être placé...
-
Page 17: Consignes De Sécurité Importantes
CONSIGNES DE SÉCURITÉ IMPORTANTES Symboles Cet appareil est équipé d’une double isolation, il n’est donc pas nécessaire de le connecter à la terre. Ce symbole indique que l’appareil est conforme aux normes européennes de sécurité et de compatibilité électromagnétique. Une tension électrique dangereuse présentant un risque de choc électrique est présente à... - Page 18 Appareil laser de classe 1 Cet appareil est équipé d'un laser à basse puissance. Faisceau laser invisible quand le boîtier est ouvert ou quand le mécanisme de fermeture est faussé. Évitez toute exposition au faisceau laser. Ce lecteur CD intègre un dispositif laser. L’utilisation de commandes de contrôle et de dispositifs de réglages, ou l’exécution de procédures autres que...
- Page 19 N'installez pas cet appareil dans un espace confiné, par exemple dans une bibliothèque ou un autre meuble. MISES EN GARDE CONCERNANT LES PILES : Les piles ne doivent être manipulées que par les adultes. Ne laissez pas un enfant utiliser cet appareil si le couvercle du logement des piles n'est pas correctement refermé.
-
Page 20: Commandes
COMMANDES Avant Dessus 1. Poignée 2. Couvercle du plateau de lecture CD 9. Touche PROG./MODE 3. Voyant d’alimentation 10. Touche FOLD+/+10 [Dossier+/+10] 4. Écran 11. Touche /NEXT [ /Suivant] 5. Voyant FM ST. 12. Haut-parleurs 6. BBS : Touche Renforcement des 13. -
Page 21: Installer L'appareil
INSTALLER L’APPAREIL 1. Posez le lecteur sur une surface plane et stable. 2. Branchez la fiche du cordon d’alimentation dans la prise d'alimentation (AC ~) au dos du lecteur en veillant à insérer complètement la fiche dans la prise. 3. Branchez l’autre fiche du cordon d'alimentation dans une prise secteur. La prise secteur dans laquelle le lecteur est branché... - Page 22 Disques CD/CD-R/CD-RW/MP3 Le lecteur peut lire les disques CD/CD-R/CD-RW/MP3 finalisés après gravage. Le lecteur peut ne pas pouvoir lire certains disques à cause de mauvais enregistrements et de grandes différences de qualité entre les disques. Insérer un disque 1. Appuyez sur le coin droit du couvercle du plateau de lecture pour l’ouvrir. 2.
-
Page 23: Utiliser Le Port Usb
Rechercher un passage Pendant la lecture d’un disque, maintenez appuyé. Relâchez la touche quand vous avez atteint le point (passage) recherché dans la piste. La lecture reprend depuis ce point. Répéter la lecture Pendant la lecture d’un CD, appuyez plusieurs fois sur PROG./MODE pour sélectionner le mode de répétition désiré. -
Page 24: Utiliser L'entrée Aux
REMARQUE : Le support mémoire USB ne doit pas être retirée pendant la lecture, car cela peut l’endommager et corrompre les fichiers. UTILISER L’ENTRÉE AUX Branchez un câble audio (non fourni) dans la prise AUX IN au dos de l'appareil. Branchez l’autre fiche du câble dans la sortie audio appropriée d’une source audio externe. - Page 25 Mise au rebut En tant que revendeur, nous nous préoccupons de l'environnement. Aidez-nous en observant toutes les instructions de mise au rebut de vos produits, emballages et, le cas échéant, accessoires et piles. Nous devons tous oeuvrer pour la protection des ressources naturelles et nous efforcer de recycler tous les matériaux d'une manière qui ne puisse nuire ni à...
- Page 26 Inhoudsopgave WAARSCHUWINGEN ........................2 BELANGRIJKE VEILIGHEIDSINSTRUCTIES ................. 4 BESCHRIJVING VAN DE ONDERDELEN ..................7 WERKING OP BATTERIJEN (NIET MEEGELEVERD) ..............7 WERKING OP HET LICHTNET ....................... 8 WERKING VAN DE FM-RADIO ....................... 8 DISKS AFSPELEN ........................... 8 USB WERKING ..........................11 AUX IN.............................
-
Page 27: Waarschuwingen
WAARSCHUWINGEN Dit apparaat is alleen bedoeld voor huishoudelijk gebruik en mag niet voor andere doeleinden of toepassingen worden gebruikt, zoals niet- huishoudelijk gebruik of in een commerciële omgeving. Ventilatie Laat minstens een vrije ruimte van 10cm rond het product. Belemmer de ventilatie niet door het afdekken van de ventilatie-openingen met voorwerpen zoals een krant, tafelkleed, gordijn, enz. - Page 28 Gooi batterijen aan het einde van hun levensduur op een juiste manier weg. Dit apparaat is niet geschikt voor gebruik in een tropisch klimaat. Stel het apparaat niet bloot aan druppelend of spattend water en plaats geen, met vloeistof gevulde, voorwerpen zoals vazen op het apparaat.
-
Page 29: Belangrijke Veiligheidsinstructies
BELANGRIJKE VEILIGHEIDSINSTRUCTIES Symbolen Dit apparaat is dubbel geïsoleerd en heeft geen aardaansluiting nodig. Deze markering is aangebracht om aan te geven dat het apparaat voldoet aan de Europese richtlijnen inzake veiligheid en elektromagnetische compatibiliteit. In het inwendige van het apparaat bestaat een gevaarlijke spanning die een risico op elektrische schokken oplevert. - Page 30 Klasse 1 laserproduct Dit product bevat een laser met een laag vermogen. Er is onzichtbare laserstraling wanneer de behuizing wordt geopend en de vergrendelingen worden genegeerd. Vermijd blootstelling aan de straal. Deze digitale discspeler maakt gebruik van een lasersysteem. Het gebruik van gelijk welke bediening, aanpassing of procedure hier niet vermeld kan een gevaarlijke blootstelling aan...
- Page 31 Kijk nooit rechtstreeks in de laserstraal. Installeer dit product niet in een nauwe ruimte zoals een boekenkast of gelijksoortig meubilair. BATTERIJWAARSCHUWING: Alleen volwassenen mogen batterijen installeren. Een kind mag dit apparaat alleen gebruiken als het batterijdeksel op een juiste manier op het batterijvak is vastgemaakt.
-
Page 32: Beschrijving Van De Onderdelen
BESCHRIJVING VAN DE ONDERDELEN Vooraanzicht Bovenaanzicht 1. Handgreep 9. PROG. knop 2. CD-klep 10. FOLD+/+10 knop 3. POWER controlelampje /NEXT knop 4. Display 12. Luidsprekers 5. FM ST. controlelampje knop 6. BBS: Bassboost knop 14. STOP/USB knop 7. FOLD-/-10 knop 15. -
Page 33: Werking Op Het Lichtnet
Haal de batterijen uit het toestel als u het gedurende een lange periode niet zult gebruiken, om schade door het lekken van de batterijen te vermijden. WERKING OP HET LICHTNET 1. Plaats de speler op een stabiel en vlak oppervlak. 2. - Page 34 Schoonmaakmiddelen kunnen de CD beschadigen. Stel de CD niet bloot aan regen, vocht, zand of extreme hitte. CD/CD-R/CD-RW/MP3-discs De speler kan CD/CD-R/CD-RW/MP3-discs afspelen die nadat het opnemen was afgelopen, zijn voltooid of gefinaliseerd. Mogelijk kan de speler bepaalde discs niet afspelen door hun slechte opnamekwaliteit of door de grote verscheidenheid in kwaliteit van de discs.
- Page 35 Voor MP3-dics, wanneer het aantal tracks op de disc groter dan 10 is, druk eerst op FOLD+/+10 of FOLD-/-10 en druk vervolgens herhaaldelijk op om de gewenste track te selecteren. Als de MP3-disc meerdere mappen bevat, druk en houd FOLD+/+10 of FOLD-/-10 circa 2 seconden ingedrukt om naar de volgende/vorige map te gaan.
-
Page 36: Usb Werking
USB WERKING Een USB-geheugenapparaat inbrengen en verwijderen Breng het USB-geheugenapparaat voorzichtig in de USB-poort. Trek het USB- geheugenapparaat uit om te verwijderen. USB-modus selecteren Stel de FUNCTION schakelaar in op de positie CD/MP3/USB/AUX, en druk en houd STOP/USB vervolgens ingedrukt op de USB-modus te selecteren. •... - Page 37 Verwijdering Als een verantwoordelijke verdeler hechten wij waarde aan het milieu. Daarom raden wij U aan om de correcte verwijderingprocedure te volgen voor uw product, verpakkingsmaterialen, en indien van toepassing, accessoires en batterijen. Dit draagt bij tot de instandhouding van natuurlijke bronnen en zorgt ervoor dat de materialen gerecycleerd worden op een manier die de gezondheid en het milieu beschermt.
Need help?
Do you have a question about the BOOM POWER and is the answer not in the manual?
Questions and answers