Table of Contents
Advertisement
Available languages
Available languages
Quick Links
Advertisement
Chapters
Table of Contents

Related Manuals for JVC RD-F327B


Summary of Contents for JVC RD-F327B
- Page 1 NOTICE D’UTILISATION RD-F327B Platine Disque à Lecteur CD...
-
Page 2: Table Of Contents
Table des matières AVERTISSEMENTS ............................... 2 DESCRIPTION ................................3 TÉLÉCOMMANDE ............................... 4 PRÉCAUTIONS D’UTILISATION ..........................4 BRANCHEMENT ................................4 RÉGLER L'HORLOGE ..............................5 RÉGLER L’ALARME ..............................5 RAPPEL D'ALARME ..............................5 FONCTION MINUTEUR ............................5 ÉCOUTER LA RADIO ..............................6 SYNTONISATION .............................. -
Page 3: Avertissements
[Union Européenne] Cher client, Cet appareil est conforme aux directives et normes européennes applicables concernant la compatibilité électromagnétique et la sécurité électrique. Le représentant européen du fabricant est: Darty Holdings SAS © 14 route d’Aulnay 93140 Bondy, France AVERTISSEMENTS: Cet appareil est destiné à un usage domestique uniquement. Toute utilisation autre que celle prévue pour cet appareil, ou pour une autre application que celle prévue, par exemple une application commerciale, est interdite. -
Page 4: Description
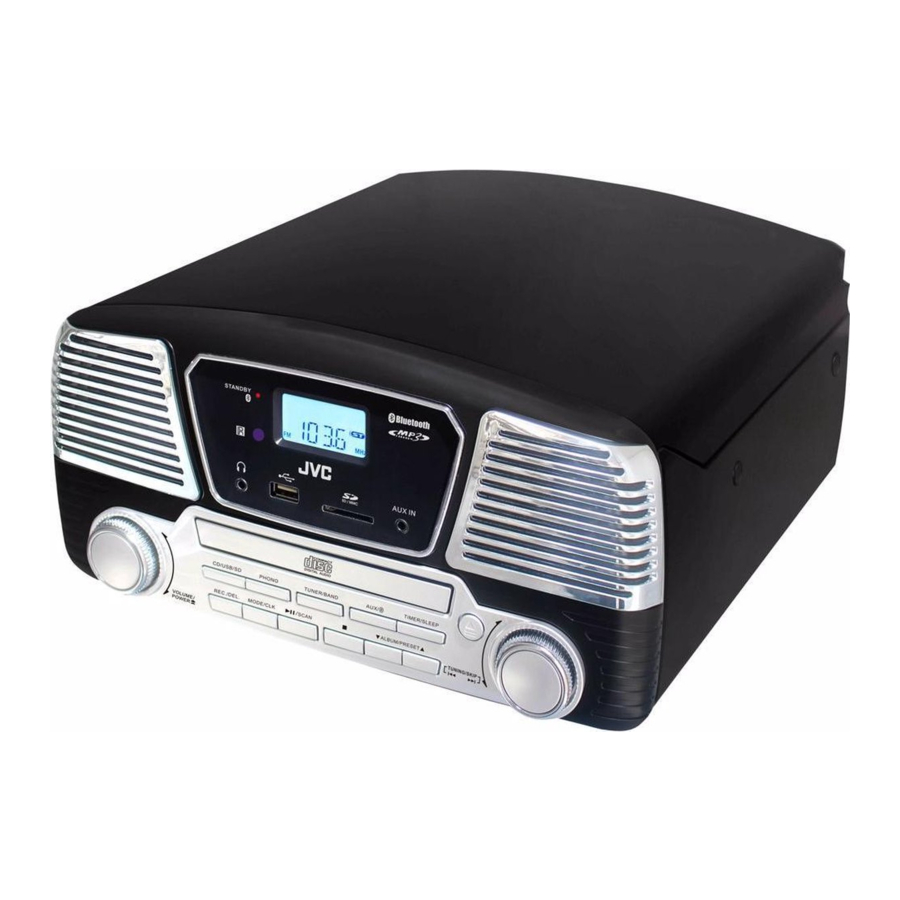
DESCRIPTION 4 5 6 7 8 9 3 4 5 6 7 21 22 17 18 19 20 21 22 15 1. Haut-parleur 2. Prise casque/écouteurs 3. Capteur des signaux de la télécommande 4. Voyant de veille/Bluetooth 5. Port 6. Écran 7. -
Page 5: Télécommande
20. Bouton 21. Bouton 22. Bouton 23. Bouton 24. Pare-poussière 25. Antenne filaire FM 26. Prise d'alimentation externe 27. Prise LINE-OUT (Gauche) 28. Prise LINE-OUT (Droite) 29. Adaptateur pour 45 tours 30. Levier élévateur 31. Sélecteur d'activation/désactivation de l'arrêt automatique 32. -
Page 6: Régler L'horloge
Le voyant de veille rouge s’allume. 2. Appuyez sur le bouton marche/arrêt de l’appareil ou de la télécommande pour allumer l'appareil. Le voyant de veille rouge s’éteint et l’écran s’allume. RÉGLER L'HORLOGE Dans le mode veille, appuyez sur pendant 3 s environ. -
Page 7: Écouter La Radio
ÉCOUTER LA RADIO SYNTONISATION Appuyez sur pour sélectionner le mode radio. Appuyez sur pour sélectionner la bande désirée (AM ou FM). Réglez la fréquence de la station désirée en maintenant le bouton tourné pendant 2 s environ, puis relâchez le bouton. ... -
Page 8: Entrée Aux In Et Encodage
REMARQUES : Retirez la protection de la tête de lecture. Cartouche Veillez à détacher le bras de lecture de son support avant de l'utiliser et à le refixer après utilisation. Tête de lecture Appuyez plusieurs fois sur le bouton de la télécommande jusqu'à ce que l'écran affiche «... -
Page 9: Lire Des Fichiers Mp3 D'une Carte Mémoire Ou D'un Support Usb
Il faut 3~5 s environ pour lire le support de stockage. 3. Tournez le bouton pour sélectionner le mode désiré (USB ou SD) pour l'encodage. Puis appuyez pour confirmer. Le système démarre l'encodage après quelques secondes. 4. Pour terminer l’encodage, appuyez sur , l’appareil retourne dans le mode AUX et le morceau est enregistré dans le dossier «... -
Page 10: Supprimer Des Fichiers D'une Carte Sd Ou D'un Support Usb
Appuyez sur pendant la lecture. « one » clignote à l’écran. Appuyez sur pour confirmer. L'icône USB ou SD clignote à l’écran. La copie est en cours d'exécution. Une fois la copie terminée, l’appareil arrête automatiquement la lecture. ... - Page 11 1. Appuyez plusieurs fois sur jusqu'à ce que « CD » s'affiche. 2. Appuyez sur pour ouvrir le plateau de lecture CD. 3. Insérez un CD dans le plateau de lecture, puis appuyez à nouveau sur pour le refermer. L'appareil démarre la lecture du CD. REMARQUE: Le couvercle du plateau CD ne peut pas être ouvert dans le mode veille.
-
Page 12: L'entrée Aux
Le voyant bleu clignote pour indiquer que l'appareil est prêt pour la connexion de votre source Bluetooth. 2. Allumez la fonction Bluetooth de votre source Bluetooth, recherchez dessus « RD-F327B » et connectez-la. 3. Une fois la connexion établie, le voyant bleu s'arrête de clignoter. Démarrez la lecture sur la source audio. -
Page 13: Spécifications
Darty Holdings SAS © 14 route d’Aulnay 93140 Bondy, France 06 / 09 / 2017 Ce produit est distribué et garanti exclusivement par Etablissement Darty et Fils. "JVC" est une marque de JVC KENWOOD Corporation utilisée par Etablissement Darty et Fils sous licence. - Page 14 GEBRUIKSAANWIJZING RD-F327B Platenspeler met CD-speler...
- Page 15 Inhoudsopgave WAARSCHUWING ............................... 2 BESCHRIJVING VAN DE ONDERDELEN........................ 3 AFSTANDSBEDIENING .............................. 4 VOORZORGSMAATREGELEN ..........................4 AANSLUITING ................................4 DE TIJD INSTELLEN ..............................5 DE WEKKER INSTELLEN ............................5 SLUIMERFUNCTIE ..............................5 TIMERFUNCTIE ............................... 5 NAAR DE RADIO LUISTEREN ........................... 6 DE RADIO AFSTEMMEN ............................
-
Page 16: Waarschuwing
[Europese Unie] Beste klant, Dit apparaat is in overeenstemming met de geldende Europese richtlijnen en normen inzake elektromagnetische compatibiliteit en elektrische veiligheid. Europese vertegenwoordiger van de fabrikant is: Darty Holdings SAS © 14 route d’Aulnay 93140 Bondy, France WAARSCHUWING: Dit apparaat is alleen bestemd voor huishoudelijk gebruik en mag niet voor andere doeleinden of toepassingen worden gebruikt, zoals niet-huishoudelijk gebruik of in een commerciële omgeving. -
Page 17: Beschrijving Van De Onderdelen
BESCHRIJVING VAN DE ONDERDELEN 4 5 6 7 8 9 3 4 5 6 7 21 22 17 18 19 20 21 22 15 1. Luidspreker 2. Oor-/koptelefoonaansluiting 3. Afstandsbedieningsensor 4. Stand-by/Bluetooth-controlelampje poort 6. Scherm kaartsleuf aansluiting 9. CD-klep 10. Aan/uit /Volumeknop knop knop knop... -
Page 18: Afstandsbediening
knop knop knop knop 24. Stofkap 25. FM-draadantenne 26. Externe netadapteraansluiting 27. LINE-OUT aansluiting (links) 28. LINE-OUT aansluiting (rechts) 29. 45 RPM (toeren per minuut) adapter 30. Hefboom 31. Automatische stop aan/uit knop 32. 33/45/78 RPM snelheidsregelaar 33. Toonarm 34. Armvergrendeling Om gehoorbeschadiging te vermijden, luister niet gedurende een lange periode aan een hoog volumeniveau. -
Page 19: De Tijd Instellen
DE TIJD INSTELLEN In stand-by, druk en houd circa 3 seconden ingedrukt. 12h / 24h knippert op het display. Terwijl de tijdnotatie knippert, draai aan de knop om de 12u of 24u-tijdnotatie te selecteren. Druk op om te bevestigen. ... -
Page 20: Naar De Radio Luisteren
NAAR DE RADIO LUISTEREN DE RADIO AFSTEMMEN Druk op om de radiomodus te activeren. Druk op om de gewenste band (AM of FM) te selecteren. Stem af op het gewenste station door aan de knop te draaien en circa 2 seconden vast te houden voordat u de knop loslaat. -
Page 21: Grammofoon En Codering
GRAMMOFOON EN CODERING OPMERKINGEN: Pick-upelement Verwijder de naaldbescherming. Zorg dat de toonarm van de toonarmsteun is losgemaakt voordat u het toestel in werking stelt en maak opnieuw vast na gebruik. Naaldbescherming Druk herhaaldelijk op op de afstandsbediening totdat het scherm “PHON” weergeeft. Stel de snelheidsregelaar in op de juiste stand afhankelijk van de af te spelen plaat. -
Page 22: Mp3-Liedjes Via Usb-Opslagmedia Of Geheugenkaart Afspelen
Het toestel leest het geheugenapparaat gedurende 3-5 seconden. 3. Draai aan de knop om de gewenste modus (USB of SD) voor codering te selecteren. Druk vervolgens op om te bevestigen. Het systeem start het coderingsproces na enkele seconden. 4. -
Page 23: Bestanden Van Usb / Sd-Kaart Verwijderen
Druk tijdens het afspelen op “one” knippert op het scherm. Druk op om te bevestigen. Het USB of SD-pictogram knippert op het scherm. Het kopiëren wordt uitgevoerd. Eenmaal het kopiëren is voltooid, stopt het toestel automatisch met afspelen. ... -
Page 24: Compact Disc (Cd) Afspelen En Coderen
COMPACT DISC (CD) AFSPELEN EN CODEREN 1. Druk herhaaldelijk op totdat “CD” wordt weergegeven. 2. Druk op om de CD-klep te openen. 3. Stop een CD-disc in de lade en druk opnieuw op om de CD-klep te sluiten. Het systeem start met het afspelen van de CD-disc. OPMERKING: De CD-klep kan in stand-by niet worden geopend. -
Page 25: De Tracks Splitsen Voor Usb/Sd-Opname In De Platenspeler/Aux-In Modus
2. Schakel de Bluetooth-functie op uw Bluetooth-apparaat in en zoek naar “RD-F327B” om de verbinding te maken. 3. Eenmaal de verbinding tot stand is gebracht, stopt het blauwe controlelampje met knipperen en start het afspelen van uw apparaat. -
Page 26: Technische Gegevens
Darty Holdings SAS © 14 route d’Aulnay 93140 Bondy, France 06 / 09 / 2017 Dit product wordt exclusief door Etablissement Darty et Fils gedistribueerd en onderhouden. “JVC” is het handelsmerk van JVC KENWOOD Corporation,dat door Etablissement Darty et Fils onder licentie wordt gebruikt. - Page 27 MANUAL DE INSTRUCCIONES RD-F327B Tocadiscos con reproductor de CD...
- Page 28 ĺndice de materias ADVERTENCIAS ................................2 UBICACIÓN DE LOS CONTROLES .......................... 3 MANDO A DISTANCIA ............................... 4 MEDIDAS DE PRECAUCIÓN ............................ 4 CONEXIÓN ..................................4 AJUSTE DEL RELOJ ..............................5 AJUSTE DE LA ALARMA ............................5 FUNCIÓN DE REPETICIÓN DE ALARMA ......................5 FUNCIÓN DEL TEMPORIZADOR ........................
-
Page 29: Advertencias
[Unión Europea] Estimado cliente, Este aparato cumple con las directivas europeas y demás normas pertinentes de compatibilidad electromagnética y seguridad eléctrica. Representante europeo del fabricante es: Darty Holdings SAS © 14 route d’Aulnay 93140 Bondy, France ADVERTENCIAS: Este aparato ha sido diseñado solamente para uso doméstico y no deberá utilizarse para ningún otro propósito o aplicación, como puedan ser fines no domésticos o comerciales. -
Page 30: Ubicación De Los Controles
UBICACIÓN DE LOS CONTROLES 4 5 6 7 8 9 3 4 5 6 7 2 3 4 5 6 7 21 22 17 18 19 20 21 22 15 20 21 22 15 1. Altavoz 2. Toma de auriculares 3. -
Page 31: Mando A Distancia
20. Botón 21. Botón 22. Botón 23. Mando 24. Cubierta de polvo 25. Cable de antena FM 26. Toma para el adaptador de alimentación 27. Toma LINE OUT (izquierda) 28. Toma LINE OUT (derecha) 29. Adaptador de 45 RPM (revoluciones por minuto) 30. -
Page 32: Ajuste Del Reloj
AJUSTE DEL RELOJ En el modo suspendido, pulse unos 3 segundos. "12h / 24h" parpadeará en la pantalla. Mientras el formato de la hora parpadea en la pantalla, gire el mando para seleccionar el formato de 12 o 24 horas. Pulse el botón para confirmar. -
Page 33: Escuchar La Radio
ESCUCHAR LA RADIO SINTONIZACIÓN DE LA RADIO Pulse para activar el modo de radio. Pulse para seleccionar la banda deseada (AM o FM). Sintonice la emisora que desee girando el mando y manteniéndolo en esa posición unos 2 segundos antes de soltarlo. ... -
Page 34: Modo Phono (Tocadiscos) Y Grabación
MODO PHONO (TOCADISCOS) Y GRABACIÓN NOTAS: Cápsula Retire el protector de la aguja. Asegúrese de que el brazo fonocaptor esté desmontado del soporte del brazo antes de llevar a cabo este paso y volver a asegurarlo después. Ensamblaje de la aguja Pulse reiteradamente en el mando a distancia hasta que la pantalla muestre “PHON”. - Page 35 2. Pulse Espere 3-5 segundos a que lea el dispositivo de memoria. 3. Gire el mando para seleccionar el modo deseado (USB o SD) para la grabación y pulse para confirmar. El sistema iniciará la grabación tras unos segundos. 4.
-
Page 36: Eliminar Un Archivo Del Dispositivo Usb O La Tarjeta De Memoria
Conecte el dispositivo USB o la tarjeta SD y seleccione el modo USB o CARD. Pulse durante la reproducción. La palabra “one” (una) parpadeará en la pantalla. Pulse para confirmar. El icono USB o SD parpadeará en la pantalla para indicarle que está llevando a cabo la copia. Una vez finalizada la copia, la unidad detendrá... - Page 37 3. Coloque un CD en la bandeja y pulse otra vez para introducir la bandeja en el lector de CD. La unidad iniciará la lectura del CD. NOTA: La puerta del lector de CD no puede abrirse en el modo suspendido. Cuando se apague el tocadiscos, la puerta del lector de CD se cerrará...
-
Page 38: Tocadiscos O Aux In
La luz indicadora azul parpadeará para indicarle que la unidad está lista para conectarse con su dispositivo Bluetooth. 2. Active la función Bluetooth de su dispositivo y busque “RD-F327B” para conectarse. 3. Una vez conectado con éxito, la luz indicadora azul dejará de parpadear y podrá comenzar la reproducción desde su dispositivo. -
Page 39: Datos Técnicos
Darty Holdings SAS © 14 route d’Aulnay 93140 Bondy, France 06 / 09 / 2017 Este producto es distribuido y garantizado exclusivamente por Etablissement Darty et Fils. “JVC” es la marca comercial de JVC KENWOOD Corporation, utilizada por Etablissement Darty et Fils bajo licencia. - Page 40 MANUAL DE INSTRUÇÕES RD-F327B Gira-discos com leitor de CD...
- Page 41 ĺndice AVISOS .................................... 2 LOCALIZAÇÃO DOS CONTROLOS ........................3 TELECOMANDO ................................4 PRECAUÇÕES DE UTILIZAÇÃO ..........................5 LIGAÇÃO ..................................5 ACERTAR O RELÓGIO ..............................5 ACERTAR O DESPERTADOR ..........................5 FUNÇÃO SNOOZE ..............................6 FUNÇÃO DO TEMPORIZADOR .......................... 6 OUVIR RÁDIO ................................6 SINTONIZAÇÃO DO RÁDIO ..........................
-
Page 42: Avisos
[União Europeia] Caro cliente, Este aparelho encontra-se em conformidade com as diretivas europeias válidas e normas relativas à compatibilidade eletromagnética e segurança elétrica. Representante europeu do fabricante é: Darty Holdings SAS © 14 route d’Aulnay 93140 Bondy, France AVISOS: Este aparelho destina-se apenas a uma utilização doméstica e não deve ser utilizado para qualquer outro fim ou em qualquer outra aplicação, tal como a utilização não doméstica ou num ambiente comercial. -
Page 43: Localização Dos Controlos
LOCALIZAÇÃO DOS CONTROLOS 4 5 6 7 8 9 3 4 5 6 7 21 22 17 18 19 20 21 22 15 1. Altifalante 2. Entrada para auscultadores/headphones 3. Sensor do telecomando 4. Indicador luminoso de Standby/Bluetooth 5. Porta 6. -
Page 44: Telecomando
13. Botão 14. Botão 15. Botão 16. Botão de abrir/fechar a porta do CD 17. Botão 18. Botão 19. Botão 20. Botão 21. Botão 22. Botão 23. Manípulo 24. Capa de poeira 25. Antena de fio FM 26. Entrada do adaptador da alimentação 27. -
Page 45: Precauções De Utilização
CUIDADO: A utilização de controlos, ajustes ou procedimentos para além dos especificados neste manual poderá provocar uma exposição perigosa à radiação. Esta unidade não deverá ser afinada ou reparada por outras pessoas para além de pessoal de reparação qualificado. PRECAUÇÕES DE UTILIZAÇÃO INSTALAÇÃO ... -
Page 46: Função Snooze
Definir a hora de ligar o despertador: "ON" pisca no ecrã. Para acertar as horas, rode o manípulo para selecionar as horas corretas. Depois, prima para confirmar. Para acertar os minutos, rode o manípulo para selecionar os minutos corretos. Depois, prima para confirmar. -
Page 47: Predefinir Estações De Rádio
Sintonize a estação desejada, rodando e mantendo premido o manípulo durante cerca de 2 segundos. Depois, deixe de premir o manípulo. A unidade começa a procura automática e pára quando encontra uma estação de rádio. PREDEFINIR ESTAÇÕES DE RÁDIO Pode predefinir até... -
Page 48: Fonograma E Codificação
NOTA: A velocidade de gravação é de 1:1 e depende do tempo de reprodução do rádio FM ou FM estéreo. O formato de gravação está predefinido para os 128 kbps. Durante a codificação do rádio FM e FM estéreo, a frequência de rádio será fixada e não pode ser sintonizada. FONOGRAMA E CODIFICAÇÃO NOTAS: Retire o protetor da agulha. -
Page 49: Entrada Auxiliar E Codificação
2. Prima Leva 3 a 5 segundos para ler o dispositivo de memória. 3. Rode o manípulo para selecionar o modo desejado (USB ou SD) para codificação. A seguir, prima para confirmar. O sistema começa a codificação passados alguns segundos. 4. - Page 50 Prima para interromper a reprodução. BOTÃO DE AVANÇAR / RETROCEDER Durante a reprodução, rode o manípulo para reproduzir o ficheiro anterior ou seguinte. PROCURAR NA PASTA Prima para procurar na pasta para a frente ou para trás. FUNÇÃO DE REPETIÇÃO Durante a reprodução, prima para reproduzir repetidamente uma faixa.
-
Page 51: Apagar Ficheiro De Usb / Cartão Sd
Copiar 1 pasta Insira um dispositivo USB ou um cartão SD e selecione a função USB ou CARTÃO. Certifique-se de que a unidade está no modo parado. Prima para procurar a pasta que deseja copiar. Prima "one" pisca no ecrã. Rode o manípulo até... -
Page 52: Reprodução E Codificação De Compact Disc (Cd)
modo parado. 2. Prima e mantenha premido durante cerca de 3 segundos. "one" pisca no ecrã. 3. Rode o manípulo até que "ALL" seja apresentado. 4. Prima para confirmar. O ícone USB ou SD pisca no ecrã. O apagamento está agora a ser efetuado. 5. - Page 53 1. Prima repetidamente no telecomando até que "CD" seja apresentado. 2. Prima "MEM" e "P01" piscam no ecrã. 3. Selecione a faixa desejada, rodando o manípulo Se for necessário selecionar a pasta, prima para procurar a pasta para a frente e para trás. 4.
-
Page 54: Dividir A Função De Faixas Para A Gravação Usb/Sd No Gira-Discos/Auxiliar
O indicador azul começa a piscar, indicando que a unidade está pronta para se ligar ao seu dispositivo Bluetooth. 2. Ligue a função Bluetooth do seu dispositivo Bluetooth e procure "RD-F327B" para efetuar a conexão. 3. Após ter efetuado a conexão, o indicador luminoso azul pára de piscar e inicia a reprodução do seu dispositivo. -
Page 55: Poupança De Energia
Darty Holdings SAS © 14 route d’Aulnay 93140 Bondy, France 06 / 09 / 2017 Este produto é distribuído exclusivamente e com a garantia da Etablissement Darty et Fils. “JVC” é uma marca comercial da JVC KENWOOD Corporation, usada sob licença pela Etablissement Darty et Fils. PT-15... - Page 56 INSTRUCTION MANUAL RD-F327B Turntable with CD Player...
- Page 57 Table of Contents WARNINGS ........................................2 LOCATION OF CONTROL .................................... 3 REMOTE CONTROL ...................................... 4 PRECAUTIONS FOR USE ..................................... 4 CONNECTION ........................................ 4 SETTING THE CLOCK ....................................5 SETTING ALARM ..................................... 5 SNOOZE FUNCTION ..................................5 TIMER FUNCTION ................................... 5 LISTENING TO RADIO ....................................
-
Page 58: Warnings
[European Union] Dear Customer, This apparatus is in conformance with the valid European directives and standards regarding electromagnetic compatibility and electrical safety. European representative of the manufacturer is: Darty Holdings SAS © 14 route d’Aulnay 93140 Bondy, France WARNINGS: This appliance is intended for domestic household use only and should not be used for any other purpose or in any other application, such as for non domestic use or in a commercial environment. -
Page 59: Location Of Control
LOCATION OF CONTROL 4 5 6 7 8 9 3 4 5 6 7 21 22 17 18 19 20 21 22 15 1. Speaker 2. Earphone/Headphone jack 3. Remote control sensor 4. Standby/Bluetooth indicator light port 6. Display card slot jack 9. -
Page 60: Remote Control
button button button knob 24. Dust cover 25. FM wire antenna 26. External power adapter jack 27. LINE-OUT jack (Left) 28. LINE-OUT jack (Right) 29. 45 RPM(Remixes Per Minute) adapter 30. Lift lever 31. Auto stop on/off button 32. 33/45/78 RPM speed selector 33. -
Page 61: Setting The Clock
SETTING THE CLOCK In standby state, press and hold for about 3 seconds. 12h / 24h will flash on the display. While the time format is flashing, turn the knob to select 12h or 24h format. Press to confirm. ... -
Page 62: Presetting Radio Stations
the knob. The unit will start auto scanning and stop when a radio station is found. PRESETTING RADIO STATIONS Up to 30 FM and 20 AM radio stations can be preset. When the desired radio station is found, press The program number will flash. -
Page 63: Aux In Jack & Encoding
Place the record on the platter and do not let the record touch the lid. Use the 45 rpm adaptor if you are playing 45 rpm records. Unlock the tone arm from the rest, and then slowly move it to the record side. The platter will start to rotate. -
Page 64: Playback Of Mp3 Song Via Usb Storage Media Or Memory Card
PLAYBACK OF MP3 SONG VIA USB STORAGE MEDIA OR MEMORY CARD CONNECTING Repeatedly press until the display shows “USB” or “CARD”, then insert a memory device. The system will start reading the memory device automatically and the display will show the total number of mp3 files (e.g. -
Page 65: File Delete From Usb / Sd Card
Press to confirm. The USB or SD icon will flash on the display. Copying is performing now. When the USB or SD icon stops flashing, it means that the folder copying is completed. Copy all tracks Insert a USB device or SD card and select the USB or CARD function. Ensure the unit is in stop mode. Press ... - Page 66 knob to play the previous or next file. During playback, turn FOLDER SEARCHING Press to search folder backward or forward. REPEAT FUNCTION During playback, press once, single track will be played repeatedly. Press again, it will repeatedly play all tracks in the whole CD disc. TRACKS PROGRAMMING Up to 99 mp3 tracks and 20 audio tracks can be programmed and played in any order.
-
Page 67: Split Track Function For Usb/Sd Recording For Turntable/Aux In
The blue indicator will flash, indicating that the unit is ready for connecting with your Bluetooth-enabled device. 2. Switch on the Bluetooth function of your Bluetooth device, and search “RD-F327B” for connection. 3. After connection is successful, the blue indicator light will stop flashing, then start to playback your device. -
Page 68: Disposal
Darty Holdings SAS © 14 route d’Aulnay 93140 Bondy, France 06 / 09 / 2017 This product is manufactured, distributed, serviced and warranted exclusively DARTY et Fils. “JVC” is the trademark of JVC KENWOOD Corporation, used by Etablissement DARTY et Fils under license.
Need help?
Do you have a question about the RD-F327B and is the answer not in the manual?
Questions and answers