
Subscribe to Our Youtube Channel
Related Manuals for ProLights TABLEDC


Summary of Contents for ProLights TABLEDC
- Page 1 TABLEDC REVOLUTIONARY FULL COLOUR EVENT BATTERY TABLE LAMP USER MANUAL MANUALE UTENTE EN - IT...
- Page 2 TABLEDC All rights reserved by Music & Lights S.r.l. No part of this instruction manual may be reproduced in any form or by any means for any commercial use. In order to improve the quality of products, Music&Lights S.r.l. reserves the right to modify the characteristics stated in this instruction manual at any time and without prior notice.
-
Page 3: Table Of Contents
TABLEDC TABLE OF CONTENTS Safety General instructions General instructions Warnings and installation precautions Warnings and installation precautions 1 Introduction 1. 1 Technical drawing 1. 1 Technical drawing 1. 2 Operating elements and connections 1. 2 Operating elements and connections 2 Installation 2. -
Page 4: General Instructions
TABLEDC WARNING! Before carrying out any operations with the unit, carefully read this instruction manual and keep it with cure for future reference. It contains important information about the installation, usage and maintenance of the unit. SAFETY General instruction • The products referred to in this manual conform to the European Community Directives and are there- fore marked with . -
Page 5: Introduction
TABLEDC - 1 - INTRODUCTION 1.1 TECHINCAL DRAWING Technical drawing TABLEDW Technical drawing TABLEDW-Pack Fig.1... -
Page 6: Operating Elements And Connections
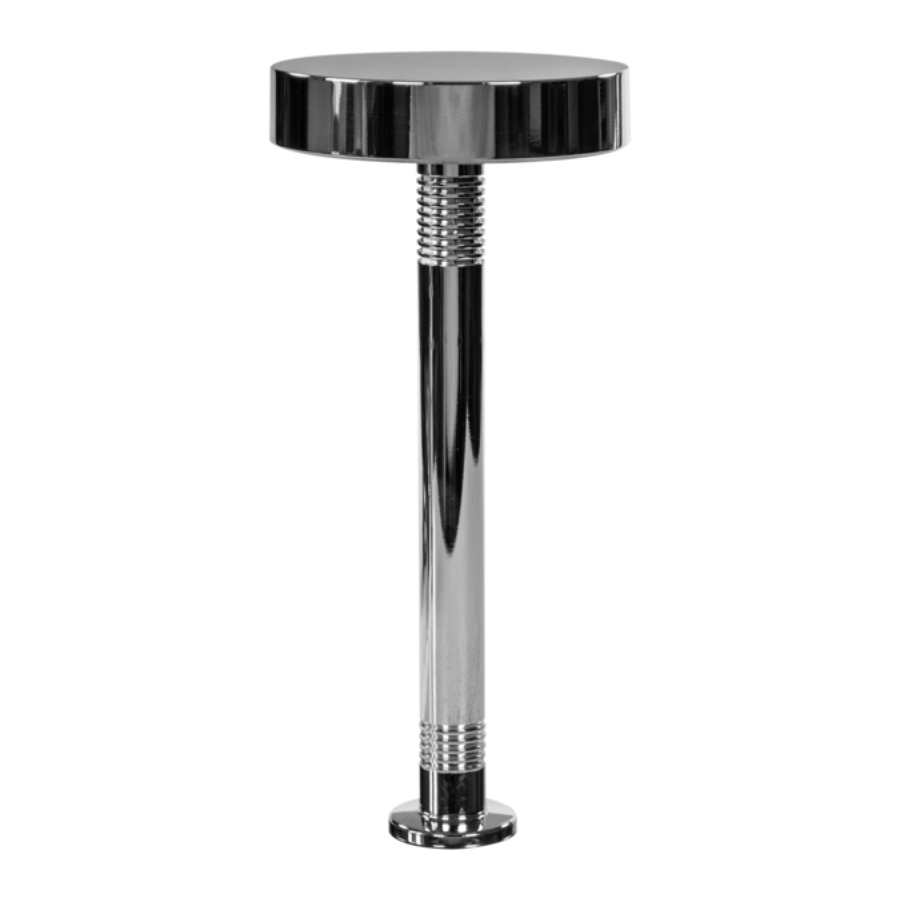
TABLEDC 1.2 OPERATING ELEMENTS AND CONNECTIONS Fig.3 1. TOP LED & PCB with removable cover 2. Tube / extension - junction system for connecting two pipes to extend the height, and battery compartment. 3. Metal plate. 4. Display OLED with display and 4 button used to access the control panel functions and manage them. -
Page 7: Installation
TABLEDC - 2 - INSTALLATION 2.1 MOUNTING TABLED can be placed on a solid floor with fixing possibility through the magnetic base that can be placed on the table or under the tablecloth. Moreover, thanks to the joint system to connect 2 pipes, the height can be extended. -
Page 8: Functions And Settings
TABLEDC - 3 - FUNCTIONS AND SETTINGS 3.1 OPERATION Switch on the TABLED with the power switch. The unit is ready for operation and can be operated via a DMX controller or it independently performs its show program in succession. -
Page 9: Menu Structure
TABLEDC 3.4 MENU STRUCTURE MENU ð ð CONNECT DMX Address 001 - 512 ð ð DMX mode BASIC 4 Ch STANDARD 7 Ch EXTENDED 10 Ch ADVANCED 12 Ch ð ð ð Wireless Receive On/Off ð Receive connect ð ð... -
Page 10: Dmx Addressing
TABLEDC ð ð ð Static Preset ð ð ð Manual Color 000 - 255 ð 000 - 255 ð 000 - 255 ð 000 - 255 3.5 DMX ADDRESSING To be able to operate the TABLED with a light controller, set the unit DMX start address for the first DMX channel. -
Page 11: Dmx Configuration
TABLEDC 3.7 DMX CONFIGURATION The TABLED has 5 DMX channel configurations which can be accessed from the control panel. • Press the ENTER button to access the main menu. • Press the UP/DOWN button to scroll the menu, select the Set icon, then press the ENTER button to enter the next menu. -
Page 12: Ir Setup
TABLEDC after a specified time that you can set using the arrow buttons. To have the display always on select Always On or set a value of On - 10s - 20s - 30s to turn off the display after the amount of time you choose. -
Page 13: Wireless Operation
TABLEDC • Press the UP/DOWN button to scroll the menu, select the icon Information, then press the ENTER but- ton to enter the next menu. • Press the UP/DOWN button to scroll through the menu, then select one of the following information and press the ENTER button to display it. -
Page 14: Dmx Channels
TABLEDC 3.14 DMX CHANNELS BASIC TABLED 4 Ch 7 Ch 10 Ch FUNCTION Value 0~100% 000 - 255 Green 0~100% 000 - 255 Blue 0~100% 000 - 255 White 0~100% 000 - 255 Dimmer 000 - 255 Strobe Open 000 - 015... - Page 15 TABLEDC BASIC FUNCTION 4 Ch 7 Ch 10 Ch Value Effect speed Slow to speed 000 - 255 Dimmer fade Preset dimmer speed from display menu 000 - 000 Dimmer snap to fade 001 - 255 FUNCTION 12 Ch Value...
- Page 16 TABLEDC FUNCTION 12 Ch Value Color 8 236 - 240 Color 9 241 - 245 Color 10 246 - 250 Color 11 251 - 255 Effects NO function 000 - 051 Effect 1 052 - 102 Effect 2 103 - 153...
-
Page 17: Maintenance
TABLEDC - 4 - MAINTENANCE 4.1 MAINTENANCE AND CLEANING THE UNIT • Make sure the area below the installation place is free from unwanted persons during setup. • Switch off the unit, unplug the main cable and wait until the unit has cooled down. - Page 18 TABLEDC Battery Guide New Lithium Battery Initialisation Any new fixture containing a Lithium battery should be initialised when first purchased to maximise its battery life. To do this: 1. Fully charge the unit for a minimum of 5 to 6 hours.
- Page 20 Music & Lights S.r.l. si riserva ogni diritto di elaborazione in qualsiasi forma delle presenti istruzioni per l’uso. La riproduzione - anche parziale - per propri scopi commerciali è vietata. Al fine di migliorare la qualità dei prodotti, la Music&Lights S.r.l. si riserva la facoltà di modificare, in qualunque momento e senza preavviso, le specifiche menzionate nel presente manuale di istruzioni.
-
Page 21: Tabledc
TABLEDC INDICE Sicurezza Avvertenze generali Avvertenze generali Attenzioni e precauzioni per l’installazione Attenzioni e precauzioni per l’installazione 1 Introduzione 1. 1 Disegno Tecnico 1. 1 Disegno Tecnico 1. 2 Elementi di comando e di collegamento 1. 2 Elementi di comando e di collegamento 2 Installazione 2. -
Page 22: Sicurezza
TABLEDC ATTENZIONE! Prima di effettuare qualsiasi operazione con l’unità, leggere con attenzione questo manuale e conservarlo accuratamente per riferimenti futuri. Contiene informazioni importanti riguardo l’installazione, l’uso e la manutenzione dell’unità. SICUREZZA Avvertenze generali • I prodotti a cui questo manuale si riferisce sono conformi alle Direttive della Comunità Europea e per- tanto recano la sigla . -
Page 23: Introduzione
TABLEDC - 1 - INTRODUZIONE 1.1 DISEGNO TECNICO Technical drawing TABLEDW Technical drawing TABLEDW-Pack Fig.1... -
Page 24: Elementi Di Comando E Di Collegamento
TABLEDC 1.2 ELEMENTI DI COMANDO E COLLEGAMENTI Fig. 2 1. TOP LED & PCB con cover removibile 2. Tubo/prolunga - sistema di giunzione per collegamento di 2 tubi per estendere l’altezza, ed alloggiamento batterie. 3. Piatto in metallo 4. Display OLED e 4 pulsanti per accesso e gestione delle diverse funzioni. -
Page 25: Installazione
TABLEDC - 2 - INSTALLAZIONE 2.1 MONTAGGIO Il TABLED può essere collocato su un piano solido con la possibilità di fissaggio mediante la base magneti- ca posizionabile su tavola o sotto una tovaglia. Inoltre grazie al sistema di giunzione per collegamento di 2 tubi si può... -
Page 26: Funzioni E Impostazioni
TABLEDC - 3 - FUNZIONI E IMPOSTAZIONI 3.1 FUNZIONAMENTO Per accendere il TABLED premere l’interruttore ON/OFF. L’unità può essere comandata da un’unità DMX di comando luce oppure svolgere autonomamente il suo programma. Dopo l’uso spegnere l’unità attraverso il medesimo interruttore. -
Page 27: Struttura Menu
TABLEDC 3.4 STRUTTURA MENU MENU ð ð CONNECT DMX Address 001 - 512 ð ð DMX mode BASIC 4 Ch STANDARD 7 Ch EXTENDED 10 Ch ADVANCED 12 Ch ð ð ð Wireless Receive On/Off ð Receive connect ð ð... -
Page 28: Indirizzamento Dmx
TABLEDC ð ð ð Static Preset ð ð ð Manual Color 000 - 255 ð 000 - 255 ð 000 - 255 ð 000 - 255 3.5 INDIRIZZAMENTO DMX Per poter comandare il TABLED con una console DMX, occorre impostare l’indirizzo di start DMX per il primo canale DMX. -
Page 29: Configurazioni Canali Dmx
TABLEDC 3.7 CONFIGURAZIONI CANALI DMX TABLED dispone di 5 configurazioni dei canali DMX a cui si può accedere dal pannello di controllo. • Premere il tasto ENTER per accedere al menu principale. • Premere il tasto UP/DOWN per scorrere nel menu, selezionare Connect, quindi premere il tasto ENTER per accedere al menu successivo DMX Mode. -
Page 30: Impostazioni Ir
TABLEDC di blocco tasti, premere i tasti nel seguente ordine per riottenere l’accesso ai comandi di menu: SU, GIÙ, SINISTRA, DESTRA, ENTER. Selezionare ON per attivare la funzione oppure OFF per disattivarla. • Premere il tasto ENTER per confermare la scelta. -
Page 31: Funzionamenot Con Wifi
TABLEDC 3.13 FUNZIONAMENTO CON WIFI Questa modalità consente di collegare in modalità wireless più unità TABLED, tutte gestite attraverso un’unità W-DMX (acquistabile separatamente). DMX512 Controller wireless solution Fig.6... -
Page 32: Canali Dmx
TABLEDC 3.14 CANALI DMX BASIC FUNCTION 4 Ch 7 Ch 10 Ch Value 0~100% 000 - 255 Green 0~100% 000 - 255 Blue 0~100% 000 - 255 White 0~100% 000 - 255 Dimmer 000 - 255 Strobe Open 000 - 015... - Page 33 TABLEDC BASIC FUNCTION 4 Ch 7 Ch 10 Ch Value Effect speed Slow to speed 000 - 255 Dimmer fade Preset dimmer speed from display menu 000 - 000 Dimmer snap to fade 001 - 255 FUNCTION 12 Ch Value...
- Page 34 TABLEDC FUNCTION 12 Ch Value Color 8 236 - 240 Color 9 241 - 245 Color 10 246 - 250 Color 11 251 - 255 Effects NO function 000 - 051 Effect 1 052 - 102 Effect 2 103 - 153...
-
Page 35: Manutenzione
TABLEDC - 4 - MANUTENZIONE 4.1 MANUTENZIONE E PULIZIA DEL SISTEMA OTTICO • Durante gli interventi, assicurarsi che l’area sotto il luogo di installazione sia libera da personale non qualificato. • Spegnere l’unità, scollegare il cavo di alimentazione ed aspettare finché l’unità non si sia raffreddata. - Page 36 TABLEDC Guida all’uso della batteria Inizializzazione di una nuova batteria Ogni nuovo faro contenente una batteria al litio, dovrebbe essere inizializzata al primo utilizzo per massimizzarne l’ e fficienza. Per fare questo: 1. Caricare completamente l’unità per un minimo di 5-6 ore.
- Page 37 Note...
- Page 38 Note...
- Page 40 MUSIC & LIGHTS S.r.l. - Phone +39 0771 72190 - www.musiclights.it...
Need help?
Do you have a question about the TABLEDC and is the answer not in the manual?
Questions and answers