
Related Manuals for Datavideo TP-800


Summary of Contents for Datavideo TP-800
- Page 1 CONFERENCE TELEPROMPTER KIT TP-800 CONFERENCE TELEPROMPTER KIT TP-800 Instruction Manual...
-
Page 2: Table Of Contents
SERVICE AND SUPPORT ............................... 36 Disclaimer of Product and Services The information offered in this instruction manual is intended as a guide only. At all times, Datavideo Technologies will try to give correct, complete and suitable information. However, Datavideo Technologies cannot exclude that some information in this manual, from time to time, may not be correct or may be incomplete. - Page 3 CONFERENCE TELEPROMPTER KIT TP-800 information in this document for accuracy before making any purchase decision or using the product. Datavideo Technologies is not responsible for any omissions or errors, or for any subsequent loss or damage caused by using the information contained within this manual.
-
Page 4: Fcc Compliance Statement
7. This product should only be operated from the type of power source indicated on the marking label of the AC adapter. If you are not sure of the type of power available, consult your Datavideo dealer or your local power company. -
Page 5: Warranty
registered with Datavideo within 30 days of All non-Datavideo manufactured products (product purchase. without Datavideo logo) have only one year warranty from the date of purchase. Certain parts with limited lifetime expectancy such as ... -
Page 6: Packing List
CONFERENCE TELEPROMPTER KIT TP-800 Packing List Item Description Quantity Main TP-800 ENG hard case & chassis 15” LCD control unit Extendable pole with 3/8 screw Adjustable beam splitter glass clamp Thumb screw for beam splitter clamp (Item D) 50/50 glass beam splitter... - Page 7 CONFERENCE TELEPROMPTER KIT TP-800...
-
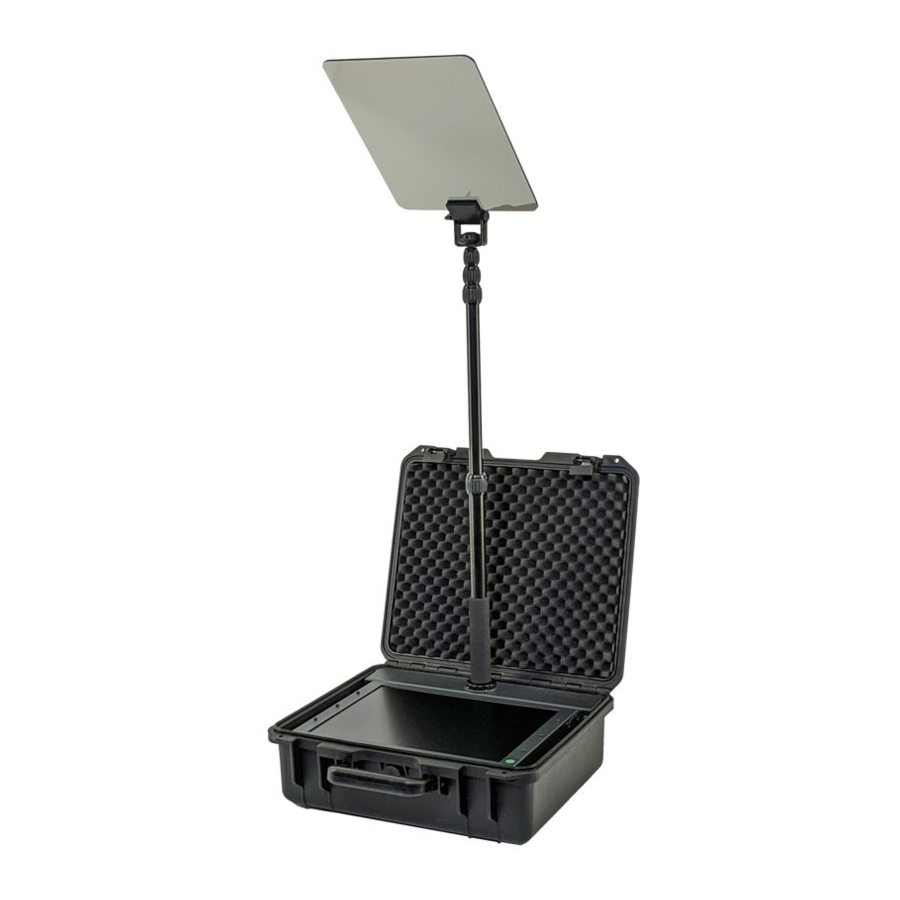
Page 8: Product Overview
TP-800 Features Product Overview Built into a ruggedized carry case The TP-800 conference teleprompter kit is designed for Completely freestanding and standalone corporate conferences or other events where a speaker is 15” 4:3 LCD with the dvPrompter Plus application addressing an audience. -
Page 9: Assembly - Tp-800
CONFERENCE TELEPROMPTER KIT TP-800 Assembly – TP-800 1. Open the lid of the main TP-800 ENG hard case & chassis (Item A). 15” LCD control unit (Item B) and 2. Lift out the remove all other items in the case. - Page 10 CONFERENCE TELEPROMPTER KIT TP-800 Screw on the extendable pole (Item C) onto the main TP-800 ENG hard case & chassis (Item A) Attach the Adjustable beam splitter glass clamp (Item D) to the top of the extendable pole (Item C) using the thumb screw (Item E)
- Page 11 CONFERENCE TELEPROMPTER KIT TP-800 left and right sides of the main TP-800 ENG hard case & chassis (Item A). You are now ready to power on the TP-800!
-
Page 12: Connect A Pc/Laptop For Control And Monitoring Over Ip
1. Connect an Ethernet cable between the TP-800 and your PC/Laptop 2. Power on the TP-800, the dvPrompter Plus app will open automatically 3. The TP-800 has the static IP address 192.168.10.10 by default, we must also set a static IP address on the PC/Laptop 4. - Page 13 CONFERENCE TELEPROMPTER KIT TP-800 8. The network control URL will be shown as below 9. Please see the ‘dv Prompter Plus App’ section of this manual for software operation instructions...
-
Page 14: Cleaning The 50/50 Glass
Datavideo recommend cleaning the glass regularly to remove dust and finger print marks. This will ensure the best image quality is recorded when the camera is looking through the glass. -
Page 15: Optional Teleprompter Remote Control
RED LED will flash. In wired mode, the remote needs to be physically cabled to the TP-800. A four-pole jack to jack plug cable is provided with this remote. One end of the cable fits into the 3.5mm input adapter (Item I, supplied with the TP-800). The other end plugs into the jack socket on the WR-500 remote. -
Page 16: Control Buttons
CONFERENCE TELEPROMPTER KIT TP-800 Control Buttons Whilst Whilst Button scrolling text text paused Speed up text scroll Next Break Marker Slow down text scroll Previous Break Marker Pause text Play text Reduce font size Load previous script Increase font size... -
Page 17: Cr2032 Battery
CONFERENCE TELEPROMPTER KIT TP-800 CR2032 Battery A CR2032 button battery is installed inside this remote. The original battery supplied (when new) is expected to last for 3 years under average / normal use. This button battery can be replaced by the user when it dies. Please remove the back case cover carefully to avoid user damage to the PCB or case. -
Page 18: Dvprompter Plus App
CONFERENCE TELEPROMPTER KIT TP-800 dvPrompter Plus App The TP-800 includes a fully unlocked version of the prompter Plus application. Documents Screen When you first launch the app, you will see the screen below. The menu bar in the top left-hand corner provides access to the various settings menus. -
Page 19: Creating And Editing Scripts
CONFERENCE TELEPROMPTER KIT TP-800 Creating and Editing Scripts Please see the ‘Network’ section of this guide to understand how to access the remote control webui of the app. To create a new script on the device simply tap the ‘+’ button, enter a title and then enter the script body into the rich text editor. -
Page 20: Playlists
CONFERENCE TELEPROMPTER KIT TP-800 Playlists Adding a script to the playlist Checking the ‘In Playlist’ option when creating or editing a script via the webui will allow the app to automatically load the next script in the list, it also allows you to quickly jump between scripts using the hardware remote control (see the control section of this guide for more information). -
Page 21: Control
CONFERENCE TELEPROMPTER KIT TP-800 Control Via the device (USB mouse) Clicking the screen when a script is loaded will display the menu bar shown below. A: Decrease text size when scrolling / jump to previous script in playlist when paused... -
Page 22: Via The Web Interface
CONFERENCE TELEPROMPTER KIT TP-800 Via the web interface Please see the ‘Network’ section of this guide to understand how to access the remote control webui of the app. The network control interface is shown below. A: Decrease text size when scrolling / jump to previous script in playlist when paused... -
Page 23: Using The Wr-500
RED LED will flash. In wired mode, the remote needs to be physically cabled to the TP-800. A four-pole jack to jack plug cable is provided with this remote. One end of the cable fits into the 3.5mm input adapter (Item I, supplied with the TP-800). The other end plugs into the jack socket on the WR-500 remote. -
Page 24: Menu Bar
CONFERENCE TELEPROMPTER KIT TP-800 Menu Bar Clicking the menu bar (found in the top left-hand corner of the documents screen will display the menu shown below, you will see three options: Home – Return to the documents screen Settings – Display all app settings Network –... -
Page 25: Settings
CONFERENCE TELEPROMPTER KIT TP-800 Settings... - Page 26 These markers can then be used to quickly jump forward or backward between points in the text, when using the hardware or network remote control, should the running order of the production change. Remote control: The optional Datavideo WR-500 controller can be used to control the script, please select either Bluetooth or wired mode.
-
Page 27: Network
CONFERENCE TELEPROMPTER KIT TP-800 Network If your device is connected to a Wi-Fi or Ethernet network you can fully control the app over the network, simply enter the webui address into the web browser of another device on the same network. - Page 28 CONFERENCE TELEPROMPTER KIT TP-800...
-
Page 29: Synchronizing Multiple Devices
Via HDMI The TP-800 features HDMI input and output ports, multiple TP-800 units can be connected in a daisy chain by connecting the HDMI output of one TP-800 to the HDMI input of another. The HDMI output port is located next to the Ethernet port. - Page 30 CONFERENCE TELEPROMPTER KIT TP-800 Tap home on the menu bar, you will see the screen below while the slave establishes a connection to the master. Once connected the screen will turn white then black, the slave will now mirror the master.
-
Page 31: Connecting An External Display
CONFERENCE TELEPROMPTER KIT TP-800 Connecting an External Display You can connect an external display using the HDMI output on the TP-800. The HDMI output port is located next to the Ethernet port. External Display Setting Disabled (Recommended if using webUI control) In this mode the external display will mirror the devices screen. -
Page 32: Specifications
CONFERENCE TELEPROMPTER KIT TP-800 Specifications Prompter Size (Max) Width 43 CM Height 200 CM Depth 41 CM Net Weight 2.8 KG Gross Weight 3.3 KG Extendable pole height 45 to 161 CM Power 12V 2A DC... - Page 33 CONFERENCE TELEPROMPTER KIT TP-800 Notes...
- Page 34 CONFERENCE TELEPROMPTER KIT TP-800 Notes...
- Page 35 CONFERENCE TELEPROMPTER KIT TP-800 Notes...
-
Page 36: Service And Support
CONFERENCE TELEPROMPTER KIT TP-800 Service and Support www.datavideo.com/product/TP-800 Jul-23.2021 Version E1 Datavideo Technologies Co., Ltd. All rights reserved 2020 G082060918E1...
Need help?
Do you have a question about the TP-800 and is the answer not in the manual?
Questions and answers