Advertisement
Available languages
Available languages
Quick Links
Modèles KIMEX 055-0064W/ 055-0100W- Série SLIM
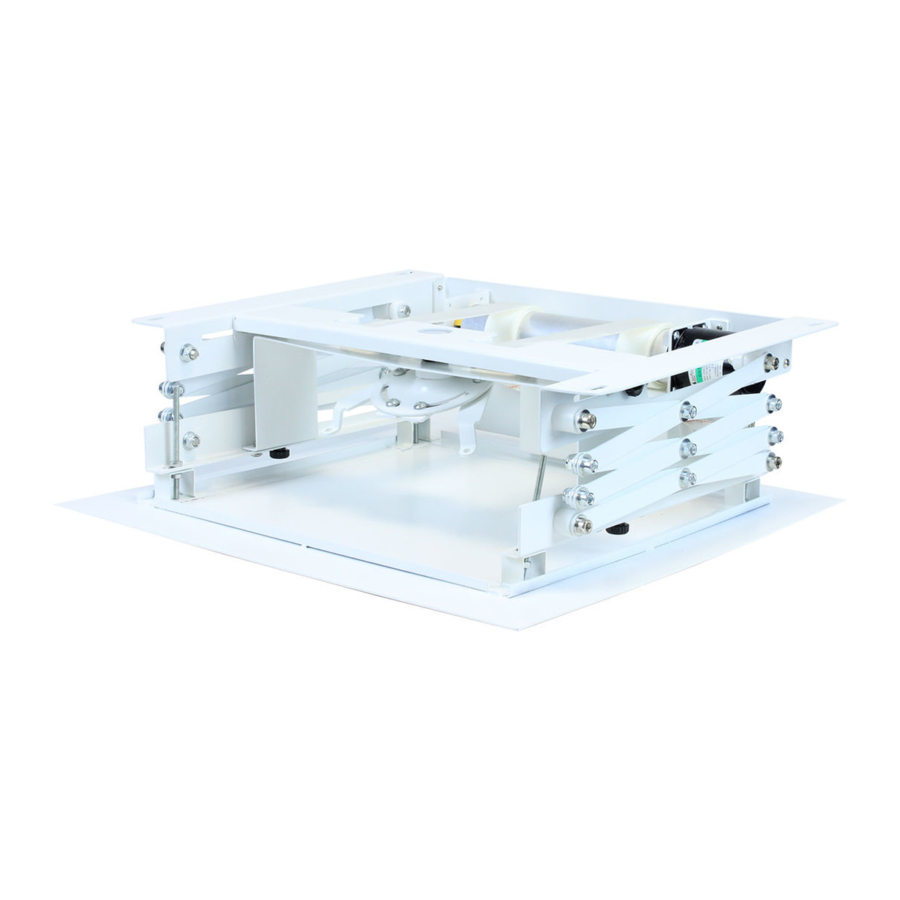
1/ Description du produit :
L'ascenseur motorisé pour projecteur (nommé en suivant "ascenseur") dispose d'un système à pantographe à double ciseaux.
Doté d'un design élégant, Il se caractérise par sa simplicité d'installation et d'utilisation.
L'ascenseur KIMEX conviendra à tout projet d'installation en entreprise ou HOME CINEMA.
Dimensions (unité: mm)
Caractéristiques
Taille de l'ascenseur réplié (mm)
Taille de l'ascenseur déplié (mm))
Distances minimales pour le
plafond et le faux plafond (mm)
Taille de la plaque inférieure (mm)
Capacité de charge
Tension nominale
Consommation électrique maximale
Inclinaison
Rotation
Moteur
Mode contrôle
Ajustement de la hauteur
Couleur
Dimensions emballage(mm)
Poids net(Kgs)
Poids avec emballage(Kgs)
Max. Distance de course(mm)
Temps de course
Manuel d'utilisation pour ascenseur motorisé
500x500x180(L1)
500x500x810(L) Max.
055-0064W
180mm
500x500
12Kg(Max.)
220-240V
60W
±20°
±20°
Moteurs synchronisés
RF/Central Control/12V Trigger/Interrupteur
Par Bouton de fin de course
Blanc
572x585x244.5mm
14
15.5
640mm
22s
055-0100W
500x500x180(L1)
500x500x1280(L) Max.
180mm
500x500
14.3
15.8
860mm
33s
Advertisement

Subscribe to Our Youtube Channel
Related Manuals for Kimex SLIM 055-0064W

Summary of Contents for Kimex SLIM 055-0064W
- Page 1 L’ascenseur motorisé pour projecteur (nommé en suivant “ascenseur”) dispose d’un système à pantographe à double ciseaux. Doté d’un design élégant, Il se caractérise par sa simplicité d’installation et d’utilisation. L’ascenseur KIMEX conviendra à tout projet d’installation en entreprise ou HOME CINEMA. Dimensions (unité: mm) 055-0100W Caractéristiques...
- Page 2 2/ Cadre d’installation: L’ascenseur doit être installé en intérieur à l’abri de toute substance corrosive ou combustible. Tension: 220-240V. Puissance: 60W 3/ Installation: 1. La distance entre le plafond et le faux-plafond doit être supérieure à la taille de l’ascenseur fermé (cf. L1). 2.
- Page 3 Guide d’installation: 1/ Enlevez le panneau décoratif (voir schéma 1). 2/ Fixez l’ascenseur au vrai plafond, prévoir un espace de 470x337 mm entre chaque vis. 3/ Installez le vidéoprojecteur à l’emplacement prévu de l’ascenseur (voir schéma 2). 4/ Installez la plaque de recouvrement décorative (voir schéma 3). 5/ Faites passer les câbles du vidéoprojecteur à...
- Page 4 Réglage de l’inclinaison de votre vidéoprojecteur : Réglez l’inclinaison de votre vidéoprojecteur avec la molette de serrage située au-dessus de la fixation du vidéoprojecteur. L’angle maximum d’inclinaison est de +/-20° (axes X, Y, Z du schéma). Angle maximum d’inclinaison : +/- 20°.
- Page 5 4、Le manuel de la télécommande et les instructions pour le système de contrôle Bouton de limite Alimentation RJ45/RJ11 HAUT STOP Trigger 12V E-Stop Interrupteur mural...
-
Page 6: Specifications
1. Specifications Température de Nombre de Mode de Fréquence radio Puissance de sortie Modèle Tension d'entrée fonctionnement connexions RF fonctionnement 433. 92MHz WIFI COMMUTATEUR WIFI-01 AC 110V -230V -20℃~+85℃ 38KHz 20pcs MANUEL / TRIGGER RF / ≤3 00W WIFI 2. 4GHz IR / DV12V / RS-485 N'utilisez pas votre main pour Lorsque la tension d'entrée est... - Page 7 Appairage télécommande RF Vous entendrez 3 Relâchez le bouton au bip Appairage Appuyez dans les 20 secondes qui Allumez le récepteur réussi Appuyez lentement sur le suivent sur le bouton "up" de la bouton "up" trois fois télécommande Suppression télécommande RF Vous entendrez 5 Relâchez le bouton au bip Appuyez dans les 20 secondes...
- Page 8 Connexion Votre support motorisé peut être contrôlé par Wi-Fi soit avec une application soit par commande vocale via un système domotique. Pour vous connecter au support, scannez le QR code et suivez les indications, ou cliquez sur ce lien : https://www.kimexinternational.com/page-cms/smart-wifi...
-
Page 9: Product Description
User’s Manual for Motorized Projector Lift Product Description: Motorized projector lift (Below simply “lift” for short) adopt double scissor type structure and the theory of double straps lifting. Featured with elegant appearance design, safety and dependable function, accurate positioning, low noise, easy-installation, etc. - Page 10 Installation Environment Required: The lift shall work indoor where there is no any corrosive or combustible substance; and should not approach the steam pipe, hot air pipe, or other central heating equipment. 1. Voltage: 110-120 V or 220-240V, Power: 60W Max Tilt angle ≤1°...
- Page 11 Guidance for Installation: Steps:① Take off the decorative panel(show as Pic.1)②Fixed the installation plate to the real ceiling by screws.(The distance between the screws are 470x337MM, show as Pic.1)③ Install the projector to the lift(Show as Pic.2) ④ Install the decorative panel(Show as Pic.3)⑤ Fix the wires of projector through the ring.(Show as Pic.3) Real Ceiling M8 Screw(4PCS)...
- Page 12 、The Angle Adjustment of the Universal Mount. (1)Adjustment of the front and back angle: Loose the screws will be OK. X/Y/Z axis maximum adjustment angle is 20°.(Note: A represent the angle) Drawing of the adjustable universal mount X/Y/Z axis maximum adjustment angle is±20°. 3、Adjust the Position of the Projector.
- Page 13 4、The manual of remote control and instructions for control system Limit Switch Power cord RJ45/RJ11 STOP DOWN DC12V Trigger E-Stop Wall panel...
- Page 14 1. Spécifications 2. Connections...
- Page 16 8. Connection Your screen can be controlled by Wi-Fi either with an app or by voice command via a home automation system. To connect to the screen, scan the QR code and follow the instructions, or click on this link: https://www.kimexinternational.com/page-cms/smart-wifi...
Need help?
Do you have a question about the SLIM 055-0064W and is the answer not in the manual?
Questions and answers