Table of Contents
Advertisement
Available languages
Available languages
Quick Links
Advertisement
Table of Contents

Related Manuals for Trust 15422


Summary of Contents for Trust 15422
- Page 1 Installation ADSL Splitter Phone Line...
- Page 2 Configuration ...
- Page 3 Wireless Configuration Make wireless connection with PC/ Laptop Vista ...
- Page 4 Opening ports (port forwarding) ‘Destination IP adress’:...
-
Page 6: Product Information
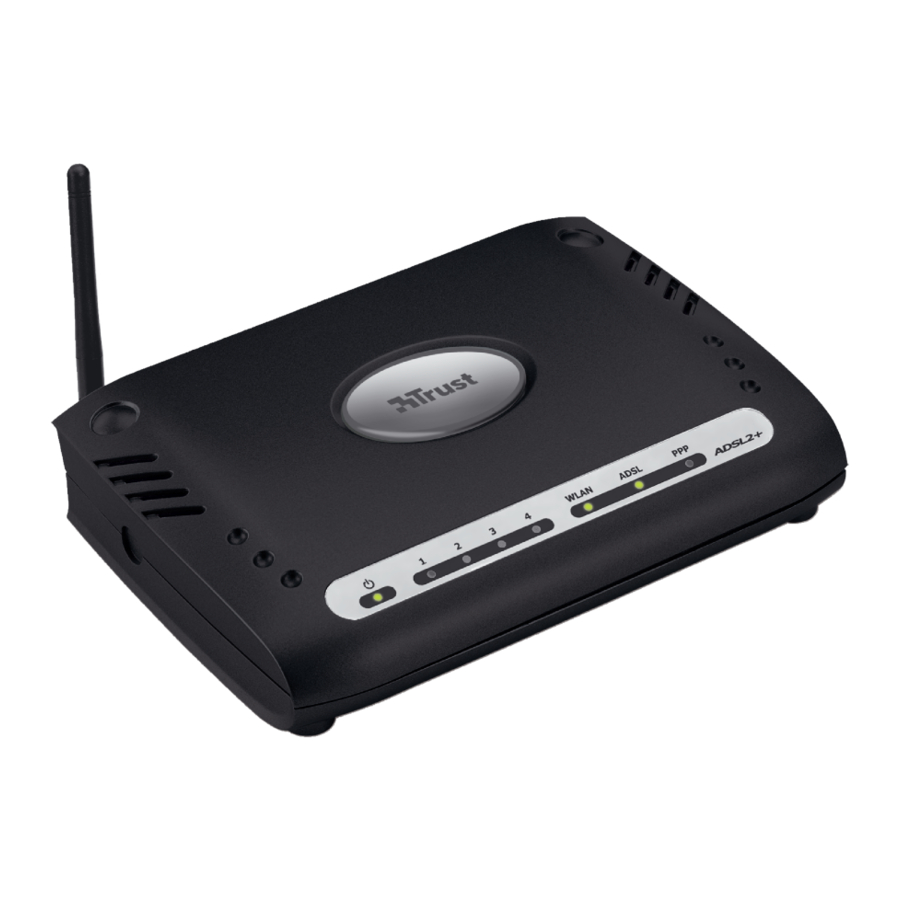
Product information A: Reset button (use: press 5 seconds with G: ADSL line connection paperclip) H: LAN (PC) connection B: Power indicator I: Power adapter connections C: LAN activity indicators: steady=PC connected / J: ADSL cable flashing=data transfer K: Network cable (Cable to PC) D: Wireless LAN indicator: steady=enabled / L: Power adapter flashing=data transfer... -
Page 7: Wireless Configuration
Wireless configuration 1. Click ‘Advanced’ 3. Click ‘Wireless’ 2. Click ‘Security’ Select: 1. WPA 2. WPA 3. Pre Shared Key. 4. Fill in a hard-to-guess password and also write it down on a piece of paper. Click ‘Apply’, ‘RestartAP’ and again ‘Apply’ Make wireless connection with PC/ Laptop Make sure no network cables are connected to the PC/Laptop anymore and that a wireless network dongle or card is installed correctly. - Page 8 Opening ports (‘port forwarding’) – Advanced Users only - Click ‘Advanced’ - Click ‘Port Forwarding’ Click on ‘Custom Port Forwarding’ Fill in: 1. Name of the program. Like: ‘torrent’. 2. ‘Source IP Address’: Normally you should fill in here: 0.0.0.0 3.
- Page 9 Wireless There are an increasing number of wireless products (video, audio, computer, etc.) which work in the same frequency range as this device. It may, therefore, be possible that the functionality of this product is limited by or is limiting for other wireless products. This can only be avoided by paying attention to the distance between products and, where possible, by changing channels.
- Page 10 Produktinformationen A: Reset-Taste (Verwendung: 5 Sekunden mit G: ADSL-Anschluss Büroklammer drücken) H: LAN-(PC-)Anschluss B: Betriebsanzeige I: Netzteilanschluss C: LAN-Aktivitätsanzeigen: leuchtet = PC J: ADSL-Kabel verbunden/blinkt = Datenübertragung K: Netzwerkkabel (Kabel zum PC) D: WLAN-Anzeige: leuchtet = aktiviert/blinkt = L: Netzteil Datenübertragung E: ADSL-Synchronisierungsanzeige: leuchtet = ADSL OK/blinkt = Verbindungsaufbau...
- Page 11 Internet sollte damit hergestellt sein. Hinweis: Wenn die nach 30 Minuten immer noch blinkt, sollten Sie sich an ADSL-Synchronisierungsanzeige Ihren Internetdienstanbieter wenden und Benutzername/Kennwort und die anderen Einstellungen überprüfen. Drahtlose Konfiguration 1. Klicken Sie auf „Advanced“ (Erweitert). 2. Klicken Sie auf „Wireless“ (Drahtlos). 2.
- Page 12 Öffnen von Ports („Port Forwarding“) – Nur für fortgeschrittene Benutzer – Klicken Sie auf „Advanced“ (Erweitert). – Klicken Sie auf „Port Forwarding“ (Portweiterleitung). Klicken Sie auf „Custom Port Forwarding“ (Benutzerdefinierte Portweiterleitung). Geben Sie Folgendes ein: 1. Name des Programms, z. B. „Torrent“. 2.
- Page 13 Dieses Modem ist nicht mit dem SDSL-Standard kompatibel. Spiele können nur über das LAN-Netzwerk gespielt werden, wenn das betreffende Spiel dies unterstützt (siehe Anweisungen zur Konfiguration des entsprechenden Spiels). Die Konfiguration der erweiterten Routeroptionen für dieses Gerät ist in der englischen erweiterten Anleitung („Advanced Manual“) auf der CD-ROM beschrieben.
-
Page 14: Informations Produit
Informations produit A : bouton de réinitialisation (utilisation : appuyer G : connecteur de ligne ADSL pendant 5 secondes avec l'extrémité d'un H : connecteur de réseau local (PC) trombone) I : connecteur de l'adaptateur d’alimentation B : témoin d'alimentation J : câble ADSL C : témoins d'activité... -
Page 15: Configuration Sans Fil
Internet devrait fonctionner normalement. Remarque : si le n'arrête pas de clignoter au bout de 30 minutes, voyant de synchronisation ADSL contactez votre FAI, vérifiez votre nom d'utilisateur, votre mot de passe et les autres paramètres Internent. Configuration sans fil 1. - Page 16 Ouverture de ports (‘port forwarding’) – Utilisateurs avancés uniquement - Cliquez sur "Avanced" (Advancé). - Cliquez sur "Port Forwarding " (Ouverture de ports). - Cliquez sur "Custom Port Forwarding" (Ouverture de ports personnalisés). Saisissez : 1. Le nom du programme. Exemple : "torrent". 2.
- Page 17 Pour jouer à des jeux sur le LAN, celui-ci doit être compatible avec le jeu ; reportez-vous aux instructions du jeu pour le configurer. Pour configurer les options de routeur avancées du modem/routeur, consultez le manuel avancé français sur CD-ROM.
-
Page 18: Informazioni Sul Prodotto
Informazioni sul prodotto A: Tasto Reset (uso: premere per 5 secondi con un G: Connessione linea ADSL oggetto appuntito) H: Connessione LAN (PC) B: Spia di alimentazione I: Connettore alimentatore di corrente C: Indicatori di attività LAN: luce fissa = PC J: Cavo ADSL collegato / lampeggiante = trasferimento dati K: Cavo di rete (cavo al PC) -
Page 19: Configurazione Wireless
Configurazione wireless 1. Fare clic su "Advanced" (Avanzate) 3. Fare clic su "Wireless" 2. Fare clic su "Security" (Sicurezza) Selezionare: 1. WPA 2. WPA 3. Pre Shared Key (Chiave precondivisa). 4. Digitare una password (possibilmente difficile da indovinare) e annotarla su carta. Fare clic su "Apply"... - Page 20 Apertura porte (port forwarding) – Solo per utenti esperti - Fare clic su "Advanced" (Avanzate) - Fare clic su "Port Forwarding" Fare clic su "Custom Port Forwarding" (Port forwarding personalizzato) Digitare: 1. Nome del programma. Es.: "torrent". 2. "Source IP Address" (Indirizzo IP di origine): nella maggior parte dei casi digitare: 0.0.0.0 3.
- Page 21 Per configurare le opzioni avanzate del router dal modem/router, consultare il manuale avanzato in inglese su CD-ROM. Per riportare il modem alle impostazioni predefinite, premere il tasto Reset (A) con un oggetto appuntito. Tutte le impostazioni, tra cui il nome utente e la password, andranno perdute. Wireless ...
Need help?
Do you have a question about the 15422 and is the answer not in the manual?
Questions and answers