
Subscribe to Our Youtube Channel
Related Manuals for REIMA AromaStreamer 650


Summary of Contents for REIMA AromaStreamer 650
- Page 1 Bedienungsanleitung Manual AromaStreamer 650, 750, 850, 950 ® www.duftmarketing.de...
-
Page 3: Table Of Contents
INHALTSVERZEICHNIS In der Bedienungsanleitung finden Sie QR-Codes, welche Sie zu Produktvideos führen, in denen die nachfolgend beschriebenen Schritte leicht nachvollziehbar dargestellt sind. Technische Details Zubehör Anwendungsbereiche Modelle des AromaStreamers ® Aufbau des Duftgerätes Netzanschluss/Blockierung/Entsperrung 7.1. Inbetriebnahme/Duftstoffwechsel (AS 650/AS 750/AS 850) 7.2. -
Page 4: Technische Details
1. Technische Details Modell Maße (mm) Spannung Leistung Abdeckung AS650 260*210*65 12 V 10 W 100m²; 300m³ AS750 320*230*90 12 V 15 W 300m²; 900m³ AS850 370*260*110 12 V 20 W 600m²; 1800m³ AS950 180*220*190 12 V 25 W 2000m²; 5000m³ 2. -
Page 5: Anwendungsbereiche
3. Anwendungsbereiche Hotels, Konferenzräume, Einkaufszentren, Ausstellungen, Bars und Cafés, Well- ness-Bereiche, Geschäftsräume und überall da, wo Sie ein Dufterlebnis genießen möchten. Duftmarketing mit Ihrem AromaStreamer kennt (fast) keine Grenzen. ® 4. Modelle des AromaStreamers ® AromaStreamer AromaStreamer AromaStreamer AromaStreamer ® ®... -
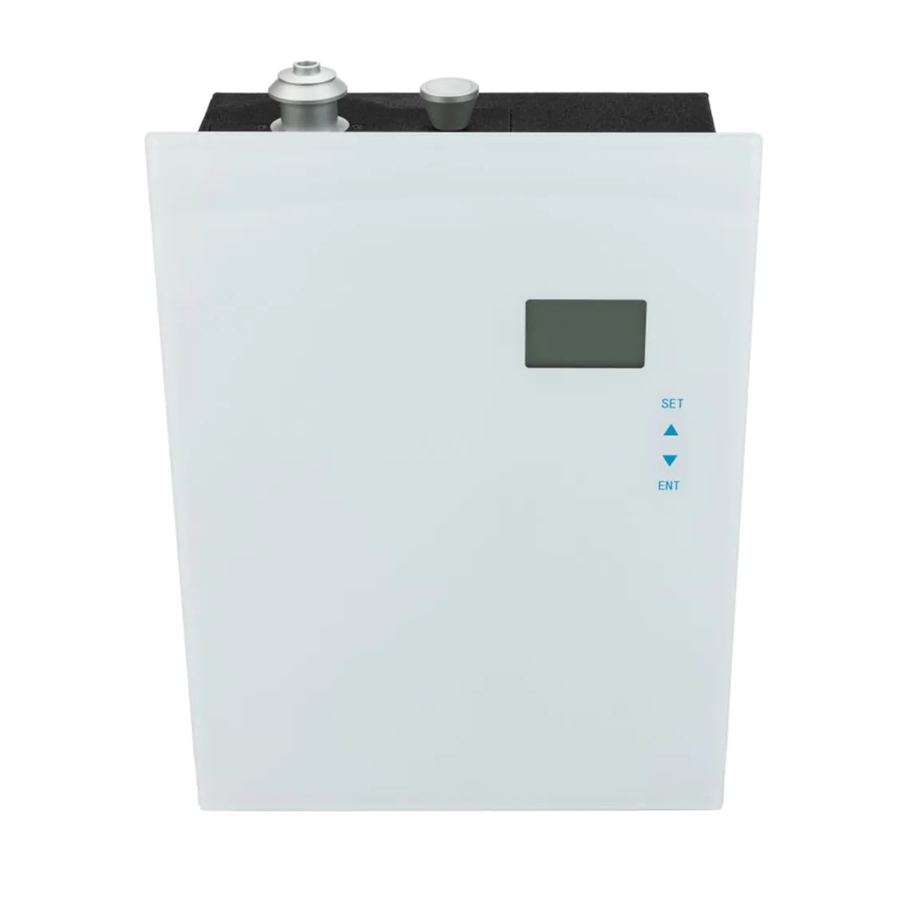
Page 6: Aufbau Des Duftgerätes
5. Aufbau des Duftgerätes Duftaustritt, LED- Anschluss Duftflasche Displayanzeige Timer für Touchdisplay Betriebsmodus zur Programmierung 6. Netzanschluss/Blockierung/Entsperrung Verbinden Sie den AromaStreamer mit der Steckdose und drücken Sie den Ein/ ® Aus Schalter. Ein kurzer Piep-Ton ertönt. Entsperr-Knopf (an der rechten Seite des Duftgerätes) Drücken Sie für 5 Sekunden die SET Taste zum Entsperren Ihres AromaStreamers ®... -
Page 7: Inbetriebnahme/Duftstoffwechsel (As 650/As 750/As 850)
7.1. Inbetriebnahme/Duftstoffwechsel (AS 650/AS 750/AS 850) Bitte entnehmen Sie die Vernebelungseinheit, indem Sie diese senkrecht nach oben ziehen. Nutzen Sie bitte hierzu den Knauf (siehe rote Markierung) (1). Erstinbetriebnahme: Schrauben Sie die Duftstoffflasche fest und bündig in die Vernebelungseinheit (2). Duftstoffwechsel: Schrauben Sie die leere Duftkartusche heraus und drehen Sie die neue Duftstoff- flasche gerade in die Vernebelungseinheit ein (2). -
Page 8: Inbetriebnahme/Duftstoffwechsel (As 950)
7.2. Inbetriebnahme/ Duftstoffwechsel (AS 950) Für die Verbindung des Schlauches schrauben Sie zuerst den Schalldämpfer ab und danach den Adapter in den Zerstäuberkopf (4 & 5). Kleben Sie das Gewinde außen am Kanister mit etwas Teflonband ab (6). Setzen Sie den Zerstäuberkopf mit leichtem Druck auf das abgeklebte Gewinde (7). Der Zerstäuberkopf sollte nun einrasten. - Page 9 7.2. Inbetriebnahme/Duftstoffwechsel (AS 950) Duftstoffwechsel: Schrauben Sie lediglich den Zerstäuberkopf von Ihrem leeren Kanister ab und tauschen diesen gegen einen neuen, vollen Kanister aus. Eine Entfernung der Schläuche ist hierbei nicht notwendig. Erstinbetriebnahme (8 & 9) : Verbinden Sie die eine Seite des schmalen Schlauches mit dem Anschluss an der Rückseite des Duftgerätes und die andere Seite des Schlauches an der Seite des Zerstäuberkopfes.
-
Page 10: Installation - Wandhalterung (As 650, 750, 850)
8. Installation - Wandhalterung (AS 650, 750, 850) Entnehmen Sie die Wandhalterung sowie die Schrauben und Dübel der Verpackung. Befestigen Sie diese nun wie abgebildet (2) an Ihrer Wand. Hängen Sie jetzt nur noch Ihren AromaStreamer in die Halterung ein (3). ®... -
Page 11: Aufbau Des Bedienfeldes
9. Verbindung zur Klima- und/oder Lüftungsanlage FALSCHE ANWENDUNG 3. FALSCH WENN: Sie die rotmarkierte Fläche in Richtung des Luftstroms montieren. Hier wird der Duft nicht die gewünschte Wirkung erzielen und zurück in das Duftgerät gedrückt. WICHTIGER HINWEIS: Beachten Sie, dass Filter im Lüftungkanal zur Duftabsorbierung führen können. Je nach Raumtemperatur kann sich ein Duft verändern und zu Ablagerungen im Lüftungskanal führen. -
Page 12: Einstellung Der Uhrzeit
11. Einstellung der Uhrzeit Drücken Sie SET für 3 Sekunden bis ein Piep-Ton ertönt. Drücken Sie um die Stunden und Minuten einzustellen. Drücken Sie um zur nächsten Stelle der Uhr- zeit zu wechseln. Mit ENT speichern Sie die vorgenommenen Einstellungen. 12. -
Page 13: Aktivierung Des Beleuchteten Lux-Displays
13. Aktivierung des beleuchteten LUX-Displays Aktivierung: Drücken Sie 5 Sekunden auf um das LUX-Display in Betrieb zu nehmen, auf dem Display des Duftgeräts blinken nun 3 Balken. Schieben Sie dann das Display auf den AromaStreamer und verbinden Sie es mit dem Stecker am oberen An- ®... -
Page 14: Optionale Nutzung Mit Adapter
15. Optionale Nutzung mit Adapter Der AromaStreamer beinhaltet die Option zum Anschluss eines ® Schlauches. Somit ist es möglich, den AromaStreamer zum Beispiel hinter einer ® Theke, einem Werbedisplay oder im Nachbarraum zu verstecken. Hierfür schrau- ben Sie den im Lieferumfang enthaltenen Adapter in die Vernebelungseinheit. Danach klicken Sie den Schlauch in den Adapter und leiten den Schlauch in den zu beduftenden Raum, auf die zu beduftende Fläche oder in einen bestehenden Klima- oder Lüftungskanal. -
Page 15: Reinigung Ihres Aromastreamers
16. Reinigung Ihres AromaStreamers ® Wir empfehlen eine Reinigung des Gerätes in folgenden Fällen: 1. Generelle Reinigung bei Duftstoffwechsel. 2. Reinigung, wenn die Vernebelung schwächer wird. Reinigungsablauf: 1. Bestellen Sie bei Ihrem Duftstoffnachkauf einen Systemreiniger. 2. Füllen Sie eine kleine Menge des Reinigers in eine leere Duftstoffflasche und schrauben Sie diese in die Vernebelungseinheit ein. - Page 17 Manual AromaStreamer 650, 750, 850, 950 ® www.duftmarketing.de...
- Page 18 CONTENT Within the manual you will find QR-codes, leading you to product videos, which illustrate the following steps clearly. Technical Details Accessories Places of application Device models Device structure Power connection/blocking/unlocking 7.1. Initial start-up/Change of scent cartridge (AS 650/750/850) 7.2. Initial start-up/Change of scent cartridge (AS 950) Installation - Wall mounting...
-
Page 19: Technical Details
1. Technical Details Model Dimension (mm) Voltage Power Coverage AS650 260*210*65 12 V 10 W 100m²; 300m³ AS750 320*230*90 12 V 15 W 300m²; 900m³ AS850 370*260*110 12 V 20 W 600m²; 1800m³ AS950 180*220*190 12 V 25 W 2000m²; 5000m³ 2. -
Page 20: Places Of Application
3. Places of application Hotels, Meeting Rooms, Malls, Exhibition Halls, Brand retail stores, Bars, SPA‘s, Business places and wherever you want to enjoy a pleasant scent experience. 4. Device models AromaStreamer AromaStreamer ® ® AromaStreamer AromaStreamer ® ®... -
Page 21: Device Structure
5. Device structure Scent outlet, LED- Connection scent bottle Display Timer for Touch display operation mode for programming 6. Power connection/blocking/unlocking Power on: Connect the AromaStreamer with your AC 220V power supply and ® press the on/off switch. A short “beep“ sounds. Unlock: Press the SET button for 5 seconds to unlock your AromaStreamer ®... -
Page 22: Initial Start-Up/Change Of Scent Cartridge (As 650/750/850)
7.1. Initial start-up/Change of scent cartridge (AS 650/750/850) Please remove the atomization unit by pulling it straight up. Please use the handle (see red mark) (1). Initial startup: Screw the supplied scent bottle carefully into the atomization unit (2). Change of scent cartridge: Unscrew the empty scent cartridge and screw the new scent cartridge into the nebulization unit (2). -
Page 23: Initial Start-Up/Change Of Scent Cartridge (As 950)
7.2. Initial start-up/Change of scent cartridge (AS 950) For connecting the tube, first remove the silencer, then screw the adap- ter on the atomizer (4 & 5). Wrap the outside of the canister thread with a bit of teflontape (6). Place the atomizer head with light pressure on the taped thread (7). - Page 24 7.2. Initial start-up/Change of scent cartridge (AS 950) For scent change simply unscrew the atomizer from the empty scent canister and screw it on a new canister. A disconnection of the tubes is not necessary. First use (8 & 9): Connect the one side of the narrow tube to the port (on the backside of the Aro- maStreamer ) and the other side of the tube to the side of the atomizer.
-
Page 25: Installation - Wall Mounting
8. Installation - Wall mounting (AS 650, 750, 850) Take out the wall bracket as well as the screws and dowels from the box. Fix the bracket as shown (2) on the wall. Now, hang the AromaStreamer into the bra- ®... -
Page 26: Panel Setting
9. Connection to air conditioning and/or ventilation system Air flow WRONG APPLICATION 3. FALSE IF: You assemble the red marked surface to the direction of the air flow. Then, the scent will not have the desired effect and will be pressed back into the scent device. -
Page 27: Time Setting
11. Time setting Press SET for 3 seconds until a beep sounds. With you jump through the digits of minutes, hours and days. With you can change the minutes, hours and days. Press ENT to save your settings. 12. Operation setting You have the option to choose 3 working times per day on each day of the week (total of 21 operation times per week). -
Page 28: Activation Of The Illuminated Lux-Display
13. Activation of the illuminated LUX-Display Activation: Press for 5 seconds to turn on the LUX-Display, now 3 bars flash on the display of the scenting device. Then slide the frame with the LUX-Display onto the Aroma Streamer and connect it with the plug to the upper socket of the ®... -
Page 29: Optional Usage With Adapter
15. Optional usage with adapter The AromaStreamer 650/750/850/950 can also be connected to a flexible tube, ® so it will be possible to place it invisibly, for example behind a counter. Therefore, screw the supplied adapter into the nebulization unit on top of the device. Then click the tube into the adapter and guide the tube into the room or the area that should be fragranced or into your HVAC or ventilation channel. -
Page 30: Cleaning Of Your Aromastreamer
16. Cleaning of your AromaStreamer ® We recommend a cleaning of the device in the following cases: 1. General cleaning with every scent change. 2. Cleaning when the nebulization becomes weaker. Cleaning steps: 1. Order a system cleaner together with your scent order. 2. - Page 32 REIMA AirConcept GmbH ® Seiferitzer Allee 7 08393 Meerane/Germany Tel.: +49-3764-79560-0 Fax: +49-3764-79560-20 info@duftmarketing.de www.duftmarketing.de www.duftdisplay.de www.scent-display.com www.duftoase.de...
Need help?
Do you have a question about the AromaStreamer 650 and is the answer not in the manual?
Questions and answers