Table of Contents
Advertisement
Quick Links
Advertisement
Table of Contents

Related Manuals for Moog Claravox Centennial


Summary of Contents for Moog Claravox Centennial
- Page 2 C E L E B R AT I N G Y E A R S O F T H E T H E R E M I N...
- Page 4 “Before you do anything, you have to have music in your soul. You also have to have courage. Playing the theremin is like being a trapeze artist without a net. You don’t know if you’ll land correctly or not, but you take a risk and you jump.” Clara Rockmore...
- Page 5 CAUTION: Please note that any changes or mod- ifications made to this instrument not expressly There are no user serviceable parts inside. Refer all approved by Moog Music Inc. could void the us- servicing to qualified personnel only. er’s authority granted by the FCC to operate the...
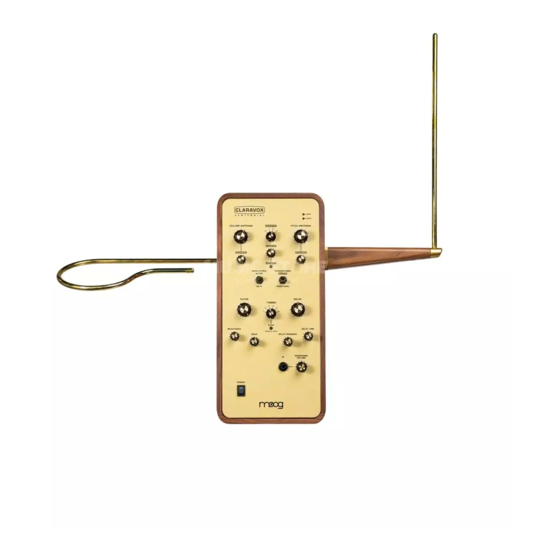
- Page 6 NOTE: Generally, the lowest setting on a stan- Pitch Antenna Arm dard mic stand is around 36 inches (~92 cm). Volume Antenna (Loop Tube) The Claravox Centennial antennas sit about a Microphone Stand Adapter foot higher than the top of the mic stand, or at Power Supply about 48 inches (122 cm) in this position.
-
Page 7: Table Of Contents
TABLE OF CONTENTS 1 - Introduction Select a Timbre Leon, Bob & Clara Store a Timbre Meet Claravox Centennial Headphones (Headphone Out) 2 - Getting Started Headphone Volume Setup and Connections Power Attaching a Stand MIDI Indicator Attaching the Antennas... - Page 8 Clara Rockmore PR photo with theremin, New York, 1932...
-
Page 9: Leon, Bob & Clara
For with the theremin, there is no string to In 1949, a teenager by the name of Bob Moog pluck, no key to press, no bow to scrape. Instead, first learned of the theremin in an issue of Elec-... - Page 10 Theremin, a gift from Leon Theremin, which virtuosa, Clara Rockmore. Through their mu- now resides in the Artist Gallery of the Musical tual love of this instrument, Bob Moog and Instrument Museum in Phoenix, Arizona. Clara Rockmore were fast friends; in 1977, Bob...
-
Page 11: Meet Claravox Centennial
Designed a deep, smooth analog delay has been added to commemorate the 100th anniversary of the to allow Claravox Centennial to create its own invention of the theremin, Claravox Centenni- sonic space. al distills decades of expertise into a once-in-a- lifetime instrument. - Page 12 Clara Rockmore Recital Poster, 1938...
- Page 13 Clara Rockmore taking a break during the rehearsal for her last public performance on the theremin, Merkin Concert Hall, New York, September 28, 1989...
- Page 14 TIMBRE slots accessible a root note, the octave range, and the amount of from the Claravox Centennial front panel, as pitch quantization. Changing the octave range al- well as Scales and Scale Sets loaded into four lows the artist to define an effective playing range.
-
Page 15: Setup And Connections
In the center of the mounting plate is a threaded hole. On either side are two smaller holes containing captive thumbscrews. NOTE: Claravox Centennial is not designed to These thumbscrews attach the mounting plate sit upright without a stand and should never be to the Claravox Centennial body. -
Page 16: Attaching A Stand
Step 3 Place Claravox Centennial on top of the stand and adapter assembly. While steadying Claravox Centennial with one hand, use the other hand to first tighten one of the captive thumbscrews. -
Page 17: Attaching The Antennas
The Pitch Antenna, which is the straight brass Before proceeding, now is a good time to men- tube, does not attach to Claravox Centennial tion that Claravox Centennial is available in directly, but to a fixture called the Pitch Anten- both right-handed and left-handed versions. - Page 18 Getting Started Line up the shoulder screws with the slots on fixture on the left side of Claravox Centennial. the receiving fixture so that the shaft is fully in- A retaining pin is fixed through the Volume serted, and rotate the entire Pitch Antenna Arm...
- Page 19 Figure 3 Phones Out Claravox Centennial includes a convenient 1/4” headphone jack on the front panel, complete with a dedicated HEADPHONE VOLUME knob. Keep the headphone cable secured so that it does not interfere with the Pitch Antenna.
-
Page 21: Tuning
Antenna so that no sound is heard. Move your your theremin experience. volume hand up and down at varied speeds and notice the way Claravox Centennial responds In order to tune up correctly, power up the in- to these changes in volume. Using your pitch... - Page 22 Getting Started Volume Antenna and adjust your sound system so that this note is playing at the loudest level you want to reach. Tuning the Pitch Antenna Refer to Figure 6 As with the Volume Antenna, begin with the PITCH ANTENNA knob in the midpoint (12 o'clock) position.
-
Page 23: Quickstart
ERN mode, the Response knobs adjust the lin- f. Analog Delay earity of the Antenna(s) to suit your style. The analog Moog BBD (Bucket Brigade De- b. Root Note & Scale vice) Delay adds depth, warmth, and motion. MODERN mode parameters allow you to se-... - Page 25 Claravox Centennial Moog Music Inc.
-
Page 26: About Claravox Centennial
BBD delay enhances the sound in either mode. CV, DIN MIDI, and USB Connections: MIDI (DIN and USB) and CV jacks are pro- Claravox Centennial can integrate with all your vided, and USB computer access allows for studio gear, and provide MIDI and USB control. -
Page 27: Learning How To Play
Claravox Centennial is traditionally played by tennial quieter. When your hand is very close, interacting with two electronic antennas using Claravox Centennial will be muted. You can use subtle hand gestures. The horizontal loop anten- changes in the volume to accentuate, to play, or na is used to control the volume, and the vertical to not play notes. - Page 28 Figure 7...
- Page 29 Learning How to Play Figure 9 Figure 8...
-
Page 30: Playing Exercises And Techniques
7. Slowly raise your volume hand to hear your taneously. While each gesture by itself is quite Claravox Centennial. Notice that it only takes simple, the two motions performed at the same incredibly small movements with your pitch time can feel a bit awkward. - Page 31 Learning How to Play Volume Hand Exercises 4. Now hum a third note that is slightly higher than the second. Play the first note, slide to the Refer to Figure 10 second, pause, and then glide to the third. Now that you’ve gotten your pitch hand in shape, let’s work on your volume hand.
- Page 32 Learning How to Play three-quarters of the way up. From here, just a casual raising of your hand or fingers makes the volume swell; dipping your fingers or wrist slightly makes the volume drop. This variation in volume adds articulation and depth to your playing, while also highlighting specific notes or passages of music.
- Page 33 Figure 13...
-
Page 34: Pitch And Volume Exercises
Learning How to Play Pitch and Volume Exercises the note up and down just slightly. Vibrato that is too wide, covering several steps, is a trill and Refer to Figure 13 generally doesn’t sound as pleasant. There is no “correct” way to perform vibrato, but generally Now it’s time to practice both hands working in you want to find a technique that is both precise concert. -
Page 35: Front Panel Controls & Functions
FRONT PANEL CONTROLS & FUNCTIONS Volume Antenna Controls The controls on the front panel of your Claravox Centennial are laid out by section, or function, Refer to Figure 14 in a way that is intuitive to both the experienced theremin player and the avid synthesist. The top In the theremin world, one hand is used to con- section is home to the Pitch Antenna and Volume trol the volume and articulation of each note. -
Page 36: Pitch Antenna Controls
Controls & Functions Response [Modern Mode Only] Lowering the value of this parameter by ro- tating the knob counterclockwise will give the Volume Antenna a wide and classical response. Raising the value of this parameter by rotating the knob clockwise will give the Volume Anten- na a tight and dynamic response. -
Page 37: Pitch Controls (Modern Mode)
These middle values allow a note Refer to Figure 16 to be found quickly, but still allow the freedom Switching Claravox Centennial to the MOD- to add expressive vibrato and pitch bending as ERN mode will unlock a host of pitch-related part of the performance. - Page 38 Controls & Functions Setting the Root Note (key) To access the Root Note parameter, press the SET ROOT button. The SET ROOT button will stay lit during this operation. As long as the SET ROOT button remains lit, rotating the QUANTIZE knob will play a chro- matic scale (C3 - C4).
-
Page 39: Main Output
Refer to Figure 18 NOTE: The four scales given are the default set- Claravox Centennial delivers the best of both tings; users can also use the Claravox Centen- worlds, as defined by the setting of the PER- nial software to assign other custom scales to FORMANCE switch. - Page 40 Figure 17 a rectifier circuit. Even in the TRADITIONAL mode, Claravox Centennial provides direct con- trol of the Filter, Brightness, and Wave Adjust parameters, as well as the analog BBD delay. NOTE: The performance of the Claravox Cen- tennial is intended to be transparent between TRADITIONAL and MODERN modes.
-
Page 41: Analog Waveshaper Parameters
Analog Waveshaper circuitry. Figure 19 Filter Refer to Figure 19 Claravox Centennial is equipped with a low-pass (2-pole/-12dB per octave) filter, based on the Etherwave Pro filter. This knob changes the val- ue of the cutoff frequency of the Filter. Rotating... -
Page 42: Wave
Refer to Figure 22 The DELAY knob sets the mix between the Wave original Claravox Centennial signal (dry) and the delayed signal (wet). By rotating the knob Refer to Figure 21 Although this is the last knob for adjusting the... -
Page 43: Delay Feedback
“dark” the delayed signal will sound. Timbres Refer to Figure 25 Claravox Centennial provides immediate access to six Timbres from the front panel. Each Tim- bre is the summation of all available parameters – both those accessible from the front panel, and those only accessible through software. -
Page 44: Select A Timbre
Controls & Functions eters in the MODERN mode can allow each Timbre to play a different scale in a different key, and using a different octave range. In addition, a new Timbre can be made from scratch – or by modifying an existing one –... -
Page 45: Headphones
Power A 1/4" jack for headphone use is conveniently Refer to Figure 28 located on the Claravox Centennial front panel, This switch turns your Claravox Centennial making it easily accessible during performance. on and off. The red LED indicates that it is The (HEADPHONE OUT) jack is equipped currently On. - Page 46 Controls & Functions Figure 26 Figure 27 Figure 28 Figure 29...
-
Page 47: Rear Panel Connections
MIDI, be played by other instruments via MIDI. CONTROL, and AUDIO. The connection port CV Control Jacks for the Claravox Centennial power supply is also located on this panel. Refer to Figure 31 Using these 1/4” CV (control voltage) jacks,... - Page 49 The default parameter is the Front Panel FILTER knob. This assignment can be changed via the Claravox Centennial software. In ad- dition, a +5 Volt signal is provided to the Ring component of the TRS connector allowing an expression pedal to affect the assigned parameter.
-
Page 50: Audio Outputs
Rear Panel Connections Audio Outputs Refer to Figure 32 Of the three audio outputs found on Claravox Centennial, two are found here on the Rear Pan- el (TUNER OUT, MAIN OUT). The third au- dio output, the (HEADPHONE OUT) output, is located on the Front Panel. -
Page 51: Power Connection
(earthed) amplifier, it is possible to introduce a ground loop. In this case, it may be necessary to use a ground-lifting device on either Claravox Centennial or the amplifier – but not both – to eliminate the ground loop. -
Page 52: Working With Other Gear
WORKING WITH OTHER GEAR Controlling Moog Synthesizers Claravox Centennial is a complete, standalone instrument. That said, Claravox Centennial is Claravox Centennial can connect to any modu- fully capable of interfacing and interacting lar or semi-modular analog synthesizer – or real- –... -
Page 53: Pitch Out Cv
Here are just a couple of examples of how you amazing levels of expression. Moog semi-modu- can use Claravox Centennial to enhance or lar instruments are excellent expanders for your modify other instruments. The Gestural Con- Claravox Centennial. -
Page 54: Playing External Instruments Via Midi Note Data
Cutoff Frequency. You can use Claravox by your Subharmonicon. Centennial strictly to control Grandmother, or Playing External Instruments you can play Claravox Centennial as you con- with MIDI Note Data trol Grandmother to create a spontaneous – and interactive – duet. - Page 55 Working With Other Gear Claravox Centennial software, select Fixed Settings in the Claravox Centennial software, Mode, and enable MIDI Pitch Out. Use the select Chromatic Mode, and enable MIDI Pitch Note Number parameter to select the base Out. Then, an initial Note On message must...
-
Page 56: Midi Parameters
MIDI PARAMETERS MIDI MIDI Parameter Range Notes NRPN## Bipolar (Center Value = 0) Volume Adjusts the linearity of 0 – 16383 Response the Volume Antenna response (concave to convex). Bipolar (Center Value = 0) Pitch Adjusts the linearity 0 – 16383 Response of the Pitch Antenna response (concave to... - Page 57 Header MIDI MIDI Parameter Range Notes NRPN## 0 = Chromatic 6 = Ionian 12 = Minor Pentatonic 17 = Fifth 23 = Dorian 29 = Phrygian 35 = Lydian 41 = Mixolydian 47 = Aeolian 52 = Locrian 58 = Major Blues Selects the scale Quantize 64 = Minor Blues...
- Page 58 Header MIDI MIDI Parameter Range Notes NRPN## Bipolar (Center Value = 0) This parameter Pitch controls the depth of Antenna 0 – 127 the PITCH CV signal Scan Freq used to modulate Mod Amount the frequency at which the oscillators’ wavetable is scanned.
- Page 59 Header MIDI MIDI Parameter Range Notes NRPN## Oscillator 1 Sets the width of the Scan Wavetable scanning 0 – 127 Amount window (0 to full (Width) frame). Bipolar (Center Value = 0) Oscillator 2 Linear offset (-10Hz Beat 0 – 127 to +10Hz) for the Frequency secondary oscillator...
- Page 60 Header MIDI MIDI Parameter Range Notes NRPN## Sets the width of the Oscillator 2 Wavetable scan- Scan Amount 0 – 127 ning window (0 to full (Width) frame). Sets the Cutoff Frequency of the two- Oscillator 2 0 – 16383 pole State-Variable Filter Offset Filter (SVF) affecting...
- Page 61 Header MIDI MIDI Parameter Range Notes NRPN## Bipolar (Center Value/ MSB 64 = 0) Oscillator 1 Determines how much Volume Filter 0 – 16383 the Volume Antenna Tracking value changes the Cut- Amount off Frequency of the Oscillator 1 Filter. Bipolar (Center Value/ MSB 64 = 0) Oscillator...
- Page 62 Header MIDI MIDI Parameter Range Notes NRPN## 0 = -5V to +5V Sets the voltage Pitch CV 43 = 0V to +5V range for the PITCH Output Range 86 = 0V to +10V OUT CV jack. Selects if the value of 0 = Pre- the PITCH OUT CV Pitch CV Out...
- Page 63 Header MIDI MIDI Parameter Range Notes NRPN## Determines the Volume Antenna CV level at which a Note On/Off message will MIDI Note be sent. Note will On Thresh- 0 – 16383 remain On as long as Volume Antenna CV is above threshold, and will remain Off as long as Volume Antenna...
-
Page 64: Calibration
CALIBRATION Pitch Null Calibration Procedure Claravox Centennial arrives calibrated and (Traditional Mode) ready to play. However, there are a handful of 1. Set the TIMBRE knob to the 1 position; set user-accessible calibration settings that can be the PERFORMANCE switch to the TRADI- useful for matching the performance of Clara- TIONAL mode. - Page 65 FAR (maximum volume) points to Pitch Null Calibration Procedure suit your playing. Claravox Centennial comes set (Modern Mode) up with a standard playing range, but you may 1. Set the TIMBRE knob to the 1 position; set want to change where the effective “off”...
- Page 66 Calibration 3. Stand in your playing position, and place nial will return to the normal playing mode, and you are free to move normally. your volume hand down where you would like to achieve the minimum volume (closer to the volume loop).
- Page 67 Clara Rockmore PR photo playing theremin, New York, mid to late 1930s...
-
Page 68: Specifications
SPECIFICATIONS Traditional Mode Pitch Circuit Pitch Adjust (PITCH ANTENNA knob) Pitch Oscillator LC (Inductance/Capacitance) Tank - 320kHz nominal Fixed Oscillator Heterodyne Circuit + Filter Volume Circuit Volume Adjust (VOLUME ANTENNA knob) Volume Oscillator LC (Inductance/Capacitance) Tank - 510kHz nominal Volume Rectifier and Filter VCA (Voltage Controlled Amplifier) Analog Waveshaper Circuit Filter Cutoff Frequency (FILTER knob) - Page 69 SPECIFICATIONS Modern Mode Additions Pitch Processing Circuit Pitch Response (PITCH RESPONSE knob): Pinched Lows (CCW); Linear (Center); Pinched Highs (CW) Wave Shape (Via Software): Sine, Triangle, Saw, and Wavetable Octave Range (REGISTER knob): -2, -1, 0, +1 Root Note (QUANTIZE knob; SET ROOT button): C3 to C4, Chromatic. Scale Select (REGISTER knob, SET ROOT button) Default: Chromatic, Ionian (Major), Pentatonic;...
-
Page 72: Service And Support Information
The Warranty Period is one year from the date of purchase. If, in Moog’s determination, it has been more than five years since the instrument shipped from our factory, it will be at Moog’s discretion whether or not to honor the warranty without regard to the date of the purchase. - Page 73 If the instrument was abused, damaged in transit, or is out of warranty, we will contact you with an estimate of the repair cost. Warranty work will be performed, and Moog will ship and insure your instrument to your United States address free of charge.
- Page 74 Robert Moog demonstrates his latest theremin to theremin virtuosa Clara Rockmore in Clara's home. New York, April 24, 1993.
-
Page 75: Photo Credits And Thank You
The Nadia Reisenberg / Clara Rockmore Foundation, and the family of these two great and inspirational women, are ever grateful to Moog Music and truly touched by this incredible honor to name this centennial theremin after Clara. Clara's lifelong devotion to furthering the true musical potential of the theremin mirrors Bob Moog’s innovative vision for the world of electronic music.
Need help?
Do you have a question about the Claravox Centennial and is the answer not in the manual?
Questions and answers