
Subscribe to Our Youtube Channel
Related Manuals for Shaw SDHmini


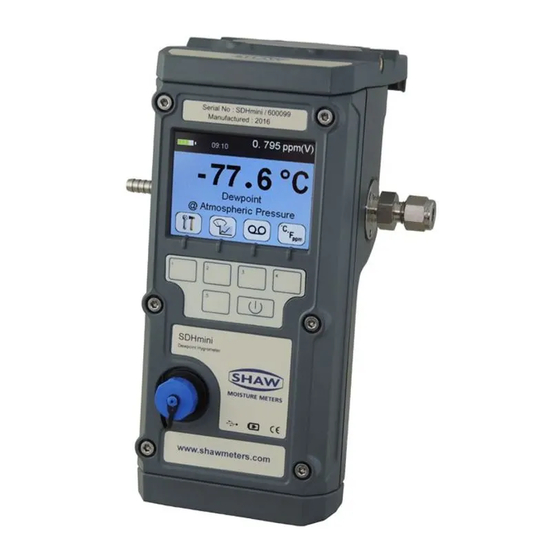
Summary of Contents for Shaw SDHmini
- Page 1 Model SDHmini Dewpoint Meter Instruction Manual 3006 - SDHmini User Manual - Iss 1.1...
-
Page 3: Table Of Contents
3.3 Piping Installation Schematic ..........8 3.4 Piping Schematic Component Index ........9 3.5 Purging the Sample Connection .......... 9 3.6 Using the SDHmini to Take a Moisture Reading ....10 3.7 Desiccant Dry-Down Technology ........11 3.8 Sample Connections ............11 3.9 Pressure and Flow Control .......... - Page 4 7.3 Changing International Settings ........19 7.4 Hotkeys ................20 Installing the SDHmini User Tool ..........21 8.1 Extracting the SDHmini User Tool Software from the USB Flash Drive (Memory Stick) ..........21 8.2 Extracting the SDHmini User Tool Software from the Instrument ................
-
Page 5: Introduction
1 Introduction 1.1 Unpacking Your Shaw Moisture Meters SDHmini Please examine the SDHmini package for any damage or mishandling. If any damage is evident please notify the carrier and the Shaw Moisture Meters representative from where this unit was purchased. -
Page 6: Important Information
2.1 Symbols Table 2.2 Lithium-ion Cell - Battery The SDHmini is powered by a single lithium-ion cell. The cell is not field replaceable by the user as it is completely enclosed within the instrument. However, the cell may be exchanged by an authorised agent who has received the necessary training, support systems and accreditation. -
Page 7: Pressure Exposure
The main principle when considering the presentation of the gas sample to the SDHmini dewpoint meter is to keep the sample system as simple as possible and of minimum swept volume, so that it has the least possible influence on the gas... -
Page 8: Piping Installation Schematic
The SDHmini should be placed on a stable surface prior to connecting to the sample pipework. Care should be taken to ensure that the sample presented to the SDHmini is not contaminated with any component that will damage, contaminate or affect in a way that will impair the unit’s accuracy. -
Page 9: Piping Schematic Component Index
4 is fitted to the system. Flow Control Valve. Sample Connection. SDHmini. Flow Indicator – The recommended sample flow is 2 to 5 L/min. Sample Exhaust – The exhaust is vented to atmosphere or returned to an atmospheric pressure line. -
Page 10: Using The Sdhmini To Take A Moisture Reading
10 litres/min. 3.6 Using the SDHmini to Take a Moisture Reading The first purpose of the SDHmini is to provide a rapid, easy and reliable means of carrying out moisture content measurement of gases. To ensure rapid response the sensor is kept dry by surrounding the sensor with desiccant in the head assembly when it is not in use. -
Page 11: Desiccant Dry-Down Technology
3.8 Sample Connections The SDHmini is supplied with two connections: a Fir Tree on one side and a Swagelok compression fitting for ¼”, ⅛”, 6 mm OD pipe or another Fir Tree fitting (as specified on your order) on the other. Either can be used as the inlet connection (6). -
Page 12: Pressure And Flow Control
3.9 Pressure and Flow Control In most cases the gas to be sampled will be at a positive pressure, which will need to be reduced to atmospheric pressure. At low pressures, up to around 8 barg, this can be done by including a simple needle valve (5) to control the flow and thereby the pressure dropping across it. -
Page 13: Normal Operations
4 Normal Operations 4.1 Powering On/Off To switch on (and off), press , the SDHmini briefly displays a splash screen showing instrument status, error information and firmware version number. 4.2 Graphical Viewing Options The start up screen is soon replaced by the normal measurement mode screen (see below) displaying the current moisture measurement in a variety of views. -
Page 14: Choice Of Units
5 Calibration Field calibrations of the SDHmini may be performed periodically, every two to three months, to ensure accuracy between laboratory calibrations by checking the span of the instrument and correcting for any deviation. These functions can be used to verify operation of the SDHmini if confirmation of an unexpected result is required. -
Page 15: Auto Calibration (Autocal)
For example a SDHmini with a full scale value of 0 °C dewpoint will read 0 °C dewpoint when exposed to a gas with this moisture concentration and will continue to read 0 °C dewpoint as the moisture concentration rises above 0 °C... -
Page 16: Calibration Setpoint (Calset)
The SDHmini will return the instrument to normal measurement mode. Note: Avoid carrying out the AutoCal procedure on a SDHmini with a full scale value of 0 °C dewpoint on days when the ambient may be below this value, for example a dry day when the ambient temperature is below approximately 12 °C. -
Page 17: Calibration Procedure Error Messages
Here you may view the type of sensor installed in the SDHmini and its range. 6.2 Selecting Gas Types The SDHmini default setting is for ideal gas behaviour, however, there is an option to change the setting to natural gas which uses the appropriate calculation. -
Page 18: Selecting Gas Molecular Weights
When this function is selected, the main and secondary display screens will display the pressure at which the dewpoint reading is calculated. The SDHmini requires that a numerical pressure value be entered in the selected units at the bottom of the units selection section, for example selecting pressure dewpoint of 2,000 psig on secondary display. -
Page 19: Non Measurement Related Configuration Functions
7 Non Measurement Related Configuration Functions 7.1 Changing the Date In order to change the present date press the arrow to select the Date function from the Configuration menu. Press to change the date. Here for example the date is changing from 06/03/15 to 06/04/15. Press to enter new date or to abort changes. -
Page 20: Hotkeys
Turns ON and OFF the inbuilt sounder Accesses the alternative moving coil graphical viewing screen Takes the user to the Information screen If the SDHmini is connected to a PC then the second hotkey is replaced by an SD card symbol... -
Page 21: Installing The Sdhmini User Tool
8 Installing the SDHmini User Tool The SDHmini User Tool software allows the instrument to be connected to a PC, enabling easy configuration of the SDHmini settings and functions. Please note: For the best visual appearance it is recommended that the PC display text and icons option is set to default rather than medium or larger. -
Page 22: Extracting The Sdhmini User Tool Software From The Instrument
• Open the folder for the SHAW SDHmini User Tool Setup software. • Double click the SHAW SDHmini User Tool Setup icon and install via the Windows wizard. • Select installation folder to save your software download in your chosen folder on the PC. - Page 23 • Open the folder for the SHAW SDHmini User Tool Setup software. • Double click the SHAW SDHmini User Tool Setup icon and install via the Windows wizard. • Select “Installation Folder” to save your software download in your chosen folder on the PC.
-
Page 24: Connecting The Sdhmini And Sdhmini User Tool
Always ensure the USB cable is connected to the instrument and PC when working in the SDHmini User Tool software. If you have not connected the unit to the PC and attempt to start using the SDHmini User Tool software it will show a “Not Connected” message. -
Page 25: Using The Sdhmini User Tool
10.1.2 Language The flag/language menu item shows the ten languages available which can be reset/amended on the SDHmini User Tool software screen. Note: This does not change the language on the instrument. To change the language on the instrument please follow the instructions Changing International Settings in section 7.3. -
Page 26: Help
10.1.3 Help The help menu item displays the manufacturer’s contact details and version number of the software. 10.2 Instrument Live Reading Displays information regarding: • Date and time • Live reading in main units • Live reading in secondary units •... -
Page 27: Utilities
10.4 Utilities Date/Time – Set Factory Reset – Reset The date and time can be set Warning: Performing a factory reset via the PC. will erase all saved settings and data. If continuing with the Factory Reset option, a dialogue box “Auto Calibration Required”... -
Page 28: Settings
Can be selected and setup of instruments deselected for the • Save – save settings to a PC file to instrument. enable uploading for future use SDHmini Click download to apply all/any changes to the instrument that are made in this screen. -
Page 29: Firmware Update
10.6 Firmware Update From time to time in the life cycle of the instrument, a number of product improvements or updates in the firmware will be made available. The facility exists for the user to update their instrument without having to return to the manufacturer. -
Page 30: Factory Reset
10.7 Factory Reset A factory reset can be performed using the Reset button within the Utilities panel in the SDHmini User Tool software. Click Reset and you will see the following messages. • “Formatting memory” • “Creating file system” • “AutoCal required”... -
Page 31: Additional Information
Unscrew the four handle retaining screws using a hex socket drive. • Unscrew the four posidrive countersunk screws which hold the retaining ring to the SDHmini. • The desiccant filled desiccant chamber can now be removed from the sample chamber by fully retracting the desiccant chamber. Gently pulling on the desiccant chamber a little more, will pull the retaining ring out of the sample chamber. -
Page 32: Temperature
This is the reason that the SDHmini is so successful. The sensor is kept in a dry condition when it is not in use and therefore results are obtained in the quickest possible time. -
Page 33: Problem Guide
Dewpoint Temperature The temperature to which the gas must be cooled in order that it should be saturated with water vapour (i.e. 100% relative humidity). For practical reasons it is referred to dewpoint above 0 °C and frostpoint below 0 °C. Parts Per Million by Volume ppm(v) is the ratio of the water vapour pressure to the total gas pressure. -
Page 34: Sdhmini Specifications
-80 °C to +20 °C dewpoint, 0 - 23000 ppm(v) Silver (S): -100 °C to -20 °C dewpoint, 0 - 1000 ppm(v) Gold (Gl): -110 °C to 0 °C dewpoint, 0 - 6000 ppm(v) Sensor: Operating Principle: SHAW Ultra High Capacitance Aluminium Oxide Sensor... -
Page 35: Sdhmini General Assembly Diagram
13.0 SDHmini General Assembly Diagram FRONT VIEW REAR VIEW SIDE VIEW TOP VIEW 97 mm... - Page 36 3006 SDHmini User Manual - Iss 1.1 © SHAW MOISTURE METERS UK (LTD) 2021 Shaw Moisture Meters (UK) Ltd. Len Shaw Building Bolton Lane Bradford BD2 1AF England t. +44 (0)1274 733582 f. +44 (0)1274 370151 e. mail@shawmeters.com www.shawmeters.com...
Need help?
Do you have a question about the SDHmini and is the answer not in the manual?
Questions and answers