Table of Contents
Advertisement
Quick Links
Advertisement
Table of Contents

Related Manuals for IMKO HD2

Summary of Contents for IMKO HD2
- Page 1 Handheld Device HD2 Manual More Information: www.imko.de Moisture Sensor Experts...
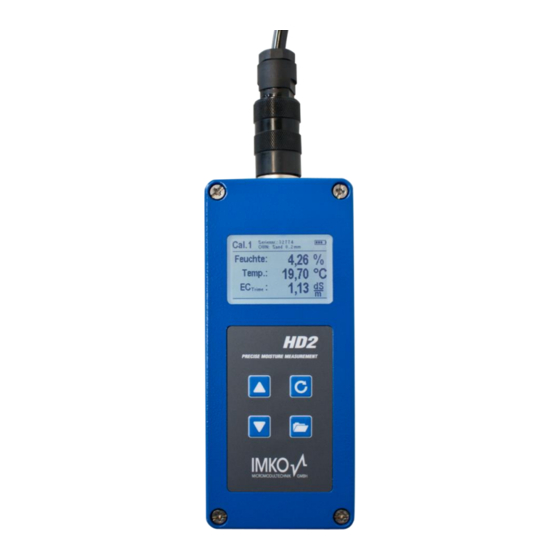
- Page 2 IMKO. Handheld Device HD2: The HD2 is a portable device which serves for the display of measurement values delivered by TRIME moisture measurement sensors and was designed for mobile field deployment. Connectable to following Moisture Probes: PICO64/32, TRIME-IPH, SONO-M1/M2...
-
Page 3: Table Of Contents
Checking the scope of delivery ........................ 6 Charging the Accumulator ........................6 Connecting a Sensor..........................6 Operation ............................7 Switching ON the HD2 Handheld device ....................8 Switching OFF the HD2 Handheld device ....................8 Settings ..............................8 4.3.1 HD2-Mode ............................9 Operating Mode „Normal“...................... -
Page 4: General Notices
The device is heating up during the charging process. Should the HD2 only function for a short period or not at all in spite of several attempts to charge it, the integrated accumulator is defective and must be exchanged. In this case, please contact our local distribution partner or us directly. -
Page 5: Control Elements
Control Elements Probe/Charger Connection Display „Measurement/Activate“ • Shutting ON/OFF- → press 1s • Perform Measurement „UP“ → press shortly • • Selection of a Menu Back to previous Menu Item or Item → press shortly Setting • • Direct link to “CHOOSE - Storing a setting →... -
Page 6: Initial Commissioning
HD2 due to the additional heat-up during the charging process. Connecting a Sensor The HD2 handheld device can be operated with the following IMKO-moisture probes: Connect the moisture probe to the HD2 by plugging in the 7-pole plug into the socket at the HD2 and fastening the coupling nut. -
Page 7: Operation
Operation Key/Button Designation: Key/Button Designation Measurement • Shutting ON/OFF- → press 1s • Perform Measurement → press shortly • Selection of a Menu Item → press shortly • Storing a setting → press shortly Settings • Conclude Settings • Leave Menu Item •... -
Page 8: Switching On The Hd2 Handheld Device
Switch OFF the HD2 by pressing the button „Measurement“ for approximately 1 second. NOTE: It is not possible to shut off the HD2 while it is in the „Settings“. Please, first leave the menu „Settings“ by pressing the button „Settings“ until the measurement display appears. -
Page 9: Hd2-Mode
Information regarding the HD2 handheld device 4.3.1 HD2-Mode In this menu item, the operating mode of the HD2 handheld device can be changed. With the selection „Normal“, an individual measurement of the three probe parameters Moisture, Temperature and the EC-TRIME is selected. -
Page 10: Operating Mode „Normal
During a measurement, no further actions are possible. It is necessary to wait until the measur- ement is concluded. Operating Mode „Normal“ 4.3.1.1 After switching on the HD2 handheld device, the following display will appear in the operating mode „Normal“ after the start screen: Number of selected Serial No. of the... -
Page 11: Operating Mode „Average Value
Depending on the set calibration, either the volumetric or the gravimetric moisture is presented. After switching on the HD2 handheld device, the following display will appear in the operating mode „Average value“ after the start screen: Individual Values of... -
Page 12: Operating Mode „Water Calculation
Operating Mode „Water Calculation“ 4.3.1.3 In this operating mode, only the variable Moisture is measured. There will be up to six single values stored and concluded to an average value. Out of this the water content per m³ is calculated. To get the correct water content it is necessary to set up the density of the measured material. -
Page 13: 1-Point Calibration
Menu item: “CHOOSE”: The 15 calibration options are displayed by name. This requires a short moment of time. A display in a similar form as follows will be presented: The list can be scrolled and the desired calibration be selected by actuating the buttons „Up“ and „Down“... - Page 14 Procedure: First you have to set the calibration curve to be changed (01 – 15) by pressing the buttons „Up“ and „Down“ Apply your setting by actuating the button „Measurement“ Next set the moisture of the material by pressing the buttons „Up“...
-
Page 15: 2-Point Calibration
4.3.2.2 2-Point Calibration During the 2-point material calibration, two material samples with different moisture values are measured. From these measurements, a linear equation (f(x) = mx + b) is calculated. This linear equation delivers very good measurement results especially in lower moisture values. NOTE: To perform a 2-point material calibration you need two material samples with different moisture values. -
Page 16: Detecting Sensor/Probe
4.3.3 Detecting Sensor/Probe In the event that that communication problems arise with the probe at the activation of the HD2 handheld device, or if no probe was connected, or it is intended to exchange the probe during operation, this menu item should be selected. -
Page 17: Language
4.3.4 Language In this menu item, the language of the HD2 handheld device can be selected. English and German can be set. You can select the desired language by actuating the buttons „Up“ and „Down“ activate the same via the button „Measurement“... -
Page 18: Display Contrast
• Probe Type • Hardware Version (HW) • Firmware Version (FW) 4.3.9 HD2-Info By selecting this menu “item”, the display presents information regarding the HD2 handheld device. These are: • Serial Number • Hardware Version (HW) • Firmware Version (FW) •... -
Page 19: Technical Data Hd2
Technical Data HD2 Height 36mm Width 64mm Length 150mm Weight approx. 35μA Power Down - Background Illum. OFF approx. 26mA Idle - Background Illum. Max approx. 56mA Power Consumption Probe turned ON approx. 100mA Measurement approx. 350 mA 20°C / Background Illum. Max Measurement per Charge approx. -
Page 20: How To Use The Hd2 Kit
How to use the HD2 kit Measurement in sand and gravel pile For measurements in sand and gravel pile, make sure that the probe rods are inserted in the material down to the gray probe bottom, so that the rods are in any case fully covered by the material. -
Page 21: Measurement Of Laboratory Samples In The Bucket
Measurement of laboratory samples in the bucket Following requirements are mandatory, to ensure the optimal accuracy of the system: • The probe rods must be covered completely by the material • The bucket must have a volume of 10 liters or more. Never use a metal bucket, the metal is disturbing the measurement field of the probe. - Page 22 The HD2 Kit is high precission measurement device. Carefully follow the above requirements to achieve repeatable, reliable and precise results from your measurements. 1. Dump the sand sample into the bucket 2. Compact the sand sample by lifting the bucket 5cm and letting it fall down vertically onto a solid...
- Page 23 4 Follow the measurement instructions in Chapter 4.3.1.2 Operating Mode „Average Value” 5 After the measurement pull the probe out of the material and loosen up the material again by shaking the bucket. 6 Follow the instructions point 2 to point 4 two more times to obtain in total three averaged measurement values.
-
Page 24: Measurment Volume/ Probe Dimensions
Measurment Volume/ Probe Dimensions Measurement Volume In theory the penetration depth of the electrical and magnetic flux lines reach indefinitely far into the measured material. However, the effective penetration depth of a SONO-M1 probe relevant for the measurement is approximately 2 cm in the vicinity of the probe rods. The illustration demonstrates the effective measurement volume (green waveform). - Page 26 Technical Data: Power supply: 7V..24V-DC Power consumption: 100mA @ 12V/DC during 2..3sec. of measuring Moisture measuring range: 0..100% volumetric water content Accuracy (in % volumetric water ±0.2% content): conductivity range: 0..5dS/m Repeating accuracy: ±0.3% Temperature caused drift of electronics ±0.3% (full range): Material temperature measuring -15°C...50°C...
-
Page 27: Probe Dimension Pico64 And Pico32
Probe Dimension PICO64 and PICO32... -
Page 28: Probe Dimension Sono-M2
Probe Dimension SONO-M2 Telescope extension... -
Page 29: Exchange Of The Probe Rods
Exchange of the Probe Rods If the probe rods are damaged, they can be easily exchanged. 1. Prepare the gaskets, the probe body, 2. Press the gaskets into the bore holes and the probe rods Press the gaskets until they reach the Screw the rods into the probe body interior thread... -
Page 30: Safety Notes
Intended Use Sensors and measuring systems of IMKO GmbH may only be used for the purpose described, taking into account the technical data. Misuse and use of the equipment other than for its intended purpose are not eligible. The function and operational safety of a sensor or measuring system can only be guaranteed if the general safety precautions, national regulations and the special safety instructions in this operating manual are observed during use. - Page 31 Danger by electricity The hand-held meter must not be immersed in water or other liquids. The sensor is insensitive to moisture contained in the typically measured products. Only connect the hand-held meter to a properly installed outlet with the supplied voltage supply cable, the voltage of which corresponds to the technical data.
- Page 32 IMKO Micromodultechnik GmbH Am Reutgraben 2 76275 Ettlingen Germany Phone: +49-7243-5921-0 Fax: +49-7243-5921-40 info@imko.de www.imko.de...
Need help?
Do you have a question about the HD2 and is the answer not in the manual?
Questions and answers