
Related Manuals for Cashkeeper CK-900

Summary of Contents for Cashkeeper CK-900
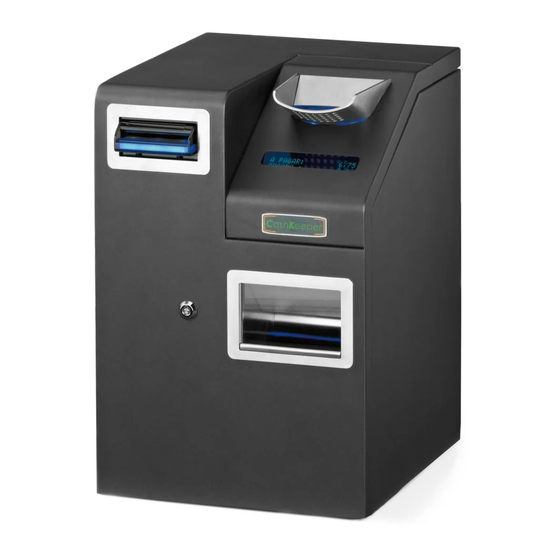
- Page 1 ENGLISH CK-900 CK-900E ® User Guide (v 3.8) Secure system for cash management 1 / 38...
-
Page 2: Table Of Contents
INDEX 1. Unpack the product..........2. -
Page 3: Unpack The Product
1. UNPACK THE PRODUCT a. Put the box upright and turn it 90º b. With the box in the horizontal position, open the bottom cover and remove the protection. c. With care, put the box back (with the device still inside) in vertical position. d. -
Page 4: Packing List And Dimensions
2. PACKING CONTENT Each CashKeeper® box shall contain: 1 CashKeeper device 3 access key sets 1 ALLEN key number 5 1 power cord (220V powerline) 1 identification labels set of in / out 1 shop window label 1 CD with installation drivers and manuals... -
Page 5: Bom
3. PACK LIST PAY IN LED COIN VALIDATOR COMUNICATION BOARD REF. R-03-BKV REF. R-01-PCB REF. R-17-LED DISPLAY BANKNOTE ASSEMBLY REF. R-02-VFD REF. R-10-BSC BANKNOTE RECYCLER REF. R-05-SPO NOTE VALIDATOR REF. R-04-BNV PAY OUT LED REF. R-18-LED NOTE CASHBOX REF. R-06-CBB POWER ASSEMBLY BOX REF. -
Page 6: Keys
4. KEYS With the aim of providing greater security for your money, each CashKeeper® device has 5 locks and 3 security levels: 1. Main door access (1 level) 2. Cashboxes access (2 level) 3. Notes cashbox opening (3 level) 4. Coins cashbox opening (3 level) 5. -
Page 7: Power Line Characteristics
Due to the system characteristics and its security, must be optimal condition grounding. Otherwise, do not use this device. ¡WARNING! GROUNDING ¡¡WARNING, TO MANIPULATE ANY CASHKEEPER COMPONENT, NEVER SHOULD HAVE POWER NEITHER USB SIGNAL!! (otherwise you could damage the device on irreversible way) 7 / 38... -
Page 8: Start Up
POS (depending of the type of POS, is possible that you’d need a cross ethernet cable). The device has the DHCP active. In case it was necessary, you may change the device ethernet configuration to make it visible on your LAN. DHCP: Active Host name: CashKeeper Default IP: 192.168.1.253 Network mask: 255.255.255.0 Gateway: 192.168.1.1... -
Page 9: Use Instructions
(G). At the payment moment, CashKeeper®, will pay the notes through the mouth (A) and the coins through the coins exit box (G). While CashKeeper® is dealing a payment, it is not possible to introduce cash to be validated. -
Page 10: Anchorage Surface Positioning And Assembly
8. POSITIONING AND ASSEMBLY OF THE ANCHORAGE SURFACE CashKeeper® is equipped with an anchoring surface to ensure that your device will never be raised without previously having the keys to access level 1 and level 2. To extract the interface of the device follow these steps: a. - Page 11 To place the interface and fix it in the desired surface, follow the attached schema: View on floor of the anchoring interface REAR AREA FRONT AREA 11 / 38...
-
Page 12: Cashbox Extraction And Replacement
9. CASHBOX EXTRACTION AND REPLACEMENT Below is the procedure of extraction, emptying and replacement of CashKeeper® cashboxes. a. COINS CASHBOX 1. Use the key to open the cashboxes closing access and remove it 2. Once removed, with a slight movement upwards (2a), pull the cashbox (2b). You... -
Page 13: Note Cashbox
b. BANKNOTE CASHBOX Use the key to open the cashboxes closing access and remove it Take the notes cashbox by the silver shooter and pull On the cashbox base you will find the locker that allows the opening. Open it with the corresponding key. -
Page 14: Incidences Management
4. If it is not seen with evidence the jam reason, it might be and internal validator jams. 5. Unplug the CashKeeper from the powerline (220V) and the USB connection 6. Disconnect the connection with the isolation screen and the side connector. - Page 15 14. Once the screws are removed, lift the disc lid carefully (there is a flexicable below the lid that could be damaged) roll the disc manually and remove the reason of the jam. 15. Replace the validator coverage, place the isolation screen over and reinsert the screws.
-
Page 16: In Coins Recycler
Coins jam in recycler 1. Unplug the CashKeeper from the powerline (220V) and the USB connection 2. Open the main door and leave aside 3. Use the key to open the cashboxes closing access and remove it 4. Pull the coins cashbox, the coins recycler is located behind the coins cashbox 5. - Page 17 15. Rearm the coins cashbox and replace it 16. Replace the cashboxes closing access and close it 17. Replace the main door and close it 18. Plug the CashKeeper to the powerline (220V) and the USB connection 17 / 38...
-
Page 18: Notes Jam I. In Note Validator
Notes jam in validator 1. Unplug the CashKeeper from the powerline (220V) and the USB connection 2. Open the main door and leave aside 3. Press the lower trigger of the validator head and with one hand holding the base, with the same hand that presses the trigger, pull the head firmly 4. -
Page 19: In Note Recycler (Manual)
d. Notes jam in recycler (manual method) 1. Remove the validator head as indicated in the previous point 2. Open the main door and leave aside 3. Disconnect the notes recycler (white top connector) 4. Use the key to open the cashboxes closing access and remove it 5. - Page 20 10. Remove the ALLEN wrench and put it into the drum shaft 11. Turn the ALLEN key clockwise until the jammed note appears on the exit mouth. 12. Replace the ALLEN wrench in the DIVERTER (cam output) shaft and turn it in a clockwise direction.
- Page 21 20. Remove the anti-falling locker and close the upper cover 21. Replace the validator head as indicated in the previous point 22. Replace the main door and close it 23. Plug the CashKeeper to the powerline (220V) and the USB connection 21 / 38...
-
Page 22: In Note Recycler (Automatic)
9. Slide the head back until it is securely fastened with the recycler (You should hear a 'clack' at the moment that is fastened) 10. Replace the main door and close it 11. Plug the CashKeeper to the powerline (220V) and the USB connection 22 / 38... -
Page 23: Cleaning And Maintenance
11. CLEANING AND MAINTENANCE ¡¡WARNING!! If unsure of how to perform any of the steps outlined below, abstain from initiating the procedure and contact the Service Centre a. Coins validator The coin validator is designed to run up to 500,000 cycles of reading without need to be cleaned. - Page 24 3. Carefully, remove the disc from the validator 4. Clean all exposed surfaces (including the back of the validator coverage): 5. Use an alcoholic solution 96º (agentless polishes, or abrasives or solvents which may damage plastic or metal) 6. Use a fibre tissue (do not use tissues with metallic components or that can leave fibre traces) 7.
-
Page 25: Coins Recycler
8. Replace the validator in its position as indicated at the end of the point 10 a. b. Coins recycler 1. Unplug the CashKeeper from the powerline (220V) and the USB connection 2. Open the main door and leave aside 3. - Page 26 16. Rearm the coins cashbox and replace it 17. Replace the cashboxes closing access and close it 18. Replace the main door and close it 19. Plug the CashKeeper to the powerline (220V) and the USB connection 26 / 38...
-
Page 27: Notes Validator
(minimum). 1. Unplug the CashKeeper from the powerline (220V) and the USB connection 2. Open the main door and leave aside 3. Press the lower trigger of the validator head and with one hand holding the base, with the same hand that presses the trigger, pull the head firmly 4. -
Page 28: Notes Recycler
'clack' at the moment that is fastened) 10. Replace the main door and close it 11. Plug the CashKeeper to the powerline (220V) and the USB connection d. Notes recycler Due to design characteristics, the notes recycler is a unit sealed and totally inaccessible, therefore, does not require maintenance cleaning because it is not possible. -
Page 29: Spare Parts And Options
Security lock Keys b. Bowlers control Now you can order serial bowlers to your CashKeeper ® if you don't want to have different keys to the access to the internal device and to the cashboxes, or access to different devices. -
Page 30: Warranty
Warranty confitions CashKeeper S.L. guarantees that the product you have purchased to CashKeeper S.L. or to an authorized distributor does not contain any defect in its components or its functioning under normal use circumstances, as specified in its technical manual. - Page 31 Regular cleaning services, which shall be done by the customer, and that are necessary to ensure the good operation of the product d) Damage caused by the use of parts not manufactured or sold by CashKeeper S.L. e) Damage or data lost caused by malfunction of the product, by the own customer computer (point of sale) or by the approved software to manage CashKeeper.
-
Page 32: Technical Service And Customer Attention Service
For assistance and technical support you must please contact your dealer or authorised technical service appointed by your dealer. CashKeeper S.L. does not provide direct customer service, unless there is a maintenance contract between CashKeeper S.L. and the client. 32 / 38... -
Page 33: Anex1. System And Device Error Codes
The value must be between 100.000 and 9.999.999 Enable devices error SSLCash not found. Unable to initiate communication with CashKeeper Exceeded time to find the necessary coins for the payment. Retry the payment Error when verifying the note value for payment. Retry the payment. - Page 34 Device type can not be detected Coin validator trashdoor can't be closed Firmware file corrupted. Firmware file doesn't much device type. Time of payment exceeded Communication with CashKeeper error (CSSI) Exceeded time limit for CashKeeper response (CSSI) 34 / 38...
- Page 35 System warning codes Code Message Possible jam on notes cashbox Unknown coin accepted The last fundraising operation is not completed successfully Error detected in coin validator. Possibility of non-counted coins Recoverable fraud attempt Note dispensed at power up Note refused due to system security: Change limit exceeded Note held in bezel Note refused due to system security: Total value not informed Note refused due to system security: Not enought change...
- Page 36 Banknote recycler error codes 36 / 38...
- Page 37 Banknote validator error codes 37 / 38...
- Page 38 Coin recycler error codes 38 / 38...
Need help?
Do you have a question about the CK-900 and is the answer not in the manual?
Questions and answers