
Related Manuals for Stratacache X2O Media Player-R

Summary of Contents for Stratacache X2O Media Player-R
- Page 1 X2O Media Player-R Setup Guide This document provides instructions for setting up the X2O Media Player-R. Copyright © 2020 X2O Media Inc. All rights reserved. All trademarks are the property of their respective owners.
-
Page 2: Table Of Contents
Setup Guide Table of Contents Introduction ..................................3 Notable Hardware Features ............................3 Aluminum Housing ..............................3 Fanless Design ................................3 Remote Access and Maintenance..........................4 X2O Remote Manager ............................... 4 Setting Up the X2O Media Player ..........................4 Configuring the X2O Media Player ..........................6 X2O Media Player Activation............................ -
Page 3: Introduction
X2O Media Player-R Introduction The X2O Media Players are dedicated digital signage player devices that combine carefully designed hardware, optimally configured system software, and X2O digital signage player software to deliver high-quality 24x7 playback in a robust and security-hardened environment. -
Page 4: Remote Access And Maintenance
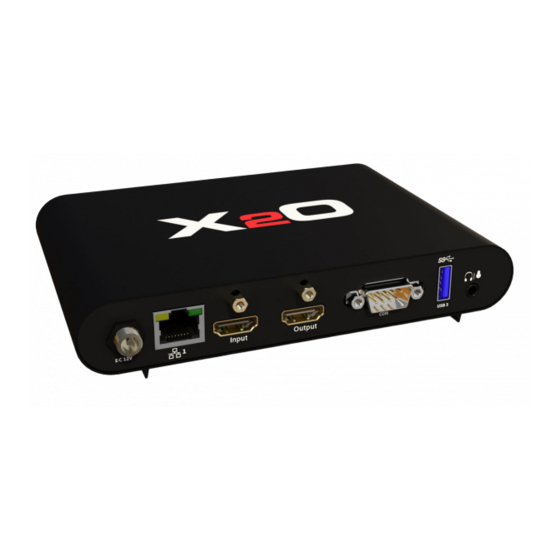
Setup Guide Remote Access and Maintenance X2O Remote Manager The X2O Remote Manager is a Windows desktop application that provides remote connectivity, monitoring, and maintenance for your X2O Media Players. It is the best diagnostic tool available to quickly identify, diagnose, and resolve player and network performance issues. Use the Remote Manager to view a thumbnail of what is currently playing, verify the content and available storage on the player, download files, access logs, reboot the device, or restart the player software. - Page 5 X2O Media Player-R c. If using wired networking, plug a network cable into the RJ-45 jack on the unit. d. If using wireless networking, screw the included antenna(s) into the antenna connectors on the unit. e. If the power is not provided by the network cable (not cabled or PoE not supported by the network connection or the device), plug the power cord into the power connector on the unit.
-
Page 6: Configuring The X2O Media Player
Setup Guide Configuring the X2O Media Player Note: Steps 1 to 5 are optional. If you prefer to leave the default Android settings (time zone, device name, etc.), you can go directly to the “X2O Media Player Activation” section. 1. Go to the Android Settings page to configure the player. To reach the Android Settings page, perform the following steps: a. - Page 7 X2O Media Player-R b. Click the Android Back button ( ) to reach the X2O landing page below. c. Click to open the Settings page. P 7 / 16...
- Page 8 Setup Guide 2. Connect to a Wi-Fi Network If using wireless networking, follow these steps to connect the Player to a secure Wi-Fi network: a. Click Network & Internet on the Settings page. b. Click Wi-Fi to open the Wi-Fi configuration page. c.
- Page 9 X2O Media Player-R 3. Set Device Name X2O Media Player-R devices are assigned a unique name like ANDROID-A9A9A9A9 where A9A9A9A9 consists of a random set of alphanumeric characters. Adjust the Bluetooth settings to assign a different device name to make it easier to identify specific players on your network: a.
- Page 10 Setup Guide Note: Android automatically sets the device name to POSPAD when Bluetooth is turned on, replacing the default ANDROID-A9A9A9A9A9. A field is provided so you can change the name. e. Enter a new device name and click Rename. Once the rename is done, you can turn off Bluetooth as it is no longer required. 4.
- Page 11 X2O Media Player-R Players automatically adjust to Daylight Saving Time according to the rules contained within the operating system. 5. When your changes to the settings are complete, perform the following steps to return to the Activation screen. a. Click the App Overview button ( ) to display the list of apps currently running. The result...
- Page 12 Setup Guide b. Click to close all the apps and return to the X2O landing page below. c. Click to start the X2O Signage app. The Activation screen appears, and you can proceed with the Player Activation. Note: If you do not start the X2O Signage app manually, the player self-healing process starts it automatically within a minute after detecting that the player is not running anymore.
-
Page 13: X2O Media Player Activation
X2O Media Player-R X2O Media Player Activation The Activation screen appears at first start up and upon subsequent reboots until the X2O Media Player is activated. To activate the X2O Media Player follow these steps: 1. Note the Player ID that is shown on the Activation screen. -
Page 14: Troubleshooting
Setup Guide Troubleshooting Follow these steps if you need to go back to the Android settings after the device was successfully activated: 1. Restart the X2O Signage app using X2O Remote Manager or the Player Manager in the X2O Portal. 2. -
Page 15: Contact Us
X2O Media Player-R Contact Us Contact X2O Media if you require standard product support for our applications. A team of experienced support engineers is at your service for any professional assistance. www.x2omedia.com/support P 15 / 16... - Page 16 REVISION HISTORY Revision Description 2020-05_v1.0 First publication P 16 / 16...
Need help?
Do you have a question about the X2O Media Player-R and is the answer not in the manual?
Questions and answers