Cosmo PDC 400 Owner's Manual
Pendular spreader
Hide thumbs
Also See for PDC 400:
- Owner's manual (43 pages) ,
- Owner's manual (41 pages) ,
- Owner's manual (36 pages)
Table of Contents
Advertisement
Available languages
Available languages
PENDULAR SPREADER
PDC 400 - PDV 500 - PDV 600
PDHV 800 - PDHV 1000 - PDHV 1250
OWNER'S MANUAL
Read the Operator's manual entirely before using the machine
ABONADORA PENDULAR
PDC 400 - PDV 500 - PDV 600
PDHV 800 - PDHV 1000 - PDHV 1250
MANUAL DE USO Y MANTENIMIENTO
Leer atentamente este Manual antes del empleo de la máquina
Advertisement
Table of Contents

Related Manuals for Cosmo PDC 400


Summary of Contents for Cosmo PDC 400
- Page 1 PENDULAR SPREADER PDC 400 - PDV 500 - PDV 600 PDHV 800 - PDHV 1000 - PDHV 1250 OWNER’S MANUAL Read the Operator’s manual entirely before using the machine ABONADORA PENDULAR PDC 400 - PDV 500 - PDV 600 PDHV 800 - PDHV 1000 - PDHV 1250 MANUAL DE USO Y MANTENIMIENTO Leer atentamente este Manual antes del empleo de la máquina...
- Page 3 PENDULAR SPREADER PDC 400 PDV 500 - PDV 600 PDHV 800 - PDHV 1000 PDHV 1250 OWNER’S MANUAL Read the Operator’s manual entirely before using the machine Pendular Spreader PDV - PDHV models ular Spreader PDV - PDHV models...
- Page 4 CLAIM OF CONFORMITY CLAIM OF CONFORMITY CLAIMS UNDER ITS OWN LIABILITY THAT THE MACHINE CLAIMS UNDER ITS OWN LIABILITY THAT THE MACHINE TYPE TYPE PENDULAR SPREADER MODEL MODEL PDV - PDHV SERIAL NUMBER SERIAL NUMBER YEAR OF MANUFACTURING YEAR OF MANUFACTURING is in conformity with the European Directive: 98/37/CE (abrogating and including the Directives 89/392/CEE, 91/368/CEE, 93/44/CEE and 93/68/CEE)
- Page 5 INDEX INDEX 1. INTRODUCTION 1. INTRODUCTION ............................................6 2. GENERAL INFORMATION 2. GENERAL INFORMATION ......................................6 2.1. USING THIS MANUAL 2.1. USING THIS MANUAL ..................................................6 2.2. INFORMATION ON THE MACHINE 2.2. INFORMATION ON THE MACHINE ..........................................7 2.2.1.
-
Page 6: General Information
1. INTRODUCTION 1. INTRODUCTION The pendular spreaders are machines used for the distribution of solid, granular fertilizers and seeds in the fi eld. They can be used whether with tractors of small/medium power. It is recommended to carefully read this operator’s manual of use and maintenance and follow the recommendations to help ensure safe and effi... -
Page 7: Information On The Machine
2.2. 2.2. INFORMATION ON THE MACHINE INFORMATION ON THE MACHINE The models introduced in this manual have been designed and made exclusively allowing the distribution of solid, granular fertilizers and of seeds in the fi eld. The machine is not indicated for being used in different sectors from the agricultural one. - Page 8 Beside the standard pendulum, several pendulum items are available for different applications, such as for the salt spreading in which the spreading width is limited from a minimum of 2 meters to a maximum of 4 meters, or for its use on the vineyards, the orchards or in the parks. Pendulum Pendulum Spreading width adjustment key...
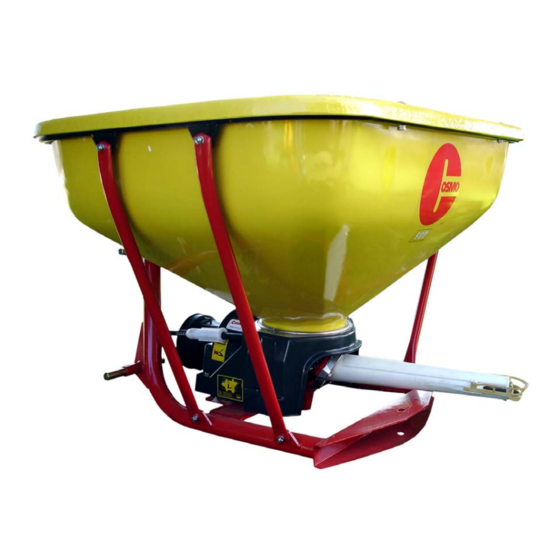
- Page 9 2.2.3. T 2.2.3. T ERMINOLOGY ERMINOLOGY PDV 500 PDV 500 PDC 400 PDC 400 PREADER PREADER PREADER PREADER Hopper E. E. Lower link pin B. B. Pendulum F. F. Protection cover Pto shaft C. C. Gear box G. G. Dosing rod D.
-
Page 10: Important Safety Information
3. IMPORTANT SAFETY INFORMATION 3. IMPORTANT SAFETY INFORMATION THE FOLLOWING SAFETY RECCOMENDATIONS ARE TO SAFEGUARD YOUR INCOLUMITY: THEREFORE IT THE FOLLOWING SAFETY RECCOMENDATIONS ARE TO SAFEGUARD YOUR INCOLUMITY: THEREFORE IT IS NECESSARY TO READ THEM CAREFULLY, MEMORIZING AND ALWAYS APPLYING THEM. IS NECESSARY TO READ THEM CAREFULLY, MEMORIZING AND ALWAYS APPLYING THEM. - Page 11 • The machine is designed for being used by a single operator who, during the use, must always stay in the stationing control on the tractor. • Never work with this machine if you are tired, sick or after having took drinks, drugs or medicines. DANGER! DANGER! It is forbidden to climb or to transport somebody when the machine is in motion.
- Page 12 Connection of the machine to the tractor Connection of the machine to the tractor • The third hitch point of the tractor and the fertilizer spreader must coincide or must be adapted. • Make sure that the pto shaft is engaged in right way after every linkage operation of the machine and that it does not come uncoupled when the machine is lowered in order to fi...
- Page 13 Transfer on the road Transfer on the road ATTENTION! ATTENTION! Please follow scrupulously the Highway code in force in the country of use. Please follow scrupulously the Highway code in force in the country of use. During moves on public roads, it is obligatory to empty the hopper During moves on public roads, it is obligatory to empty the hopper.
-
Page 14: Safety Decals
3.1. 3.1. SAFETY DECALS SAFETY DECALS ATTENTION! ATTENTION! Be s Be sure that the safety labels are readable. Clean them up using a cloth, water ure that the safety labels are readable. Clean them up using a cloth, water and soap. Replace the damaged labels placing them in the right position, as and soap. -
Page 15: Check The Raising Ability Of The Tractor
4. CONNECTIONS 4. CONNECTIONS The machine can be delivered all assembled or not (in this case follow the assembling instructions enclosed). In both cases, before using the spreader it is necessary to control that all the fi xing elements (screws, nuts, washers) are well locked and make sure that all the safety devices are located at their right position. - Page 16 4.2. 4.2. CONNECTION TO THE 3-POINT HITCH OF THE TRACTOR CONNECTION TO THE 3-POINT HITCH OF THE TRACTOR ATTENTION! ATTENTION! Every ti Every time that somebody comes down from the tractor, it is necessary to me that somebody comes down from the tractor, it is necessary to disconnect the pto shaft, stopping the engine and to put on the parking brake.
-
Page 17: Driveline Installation
4.3. 4.3. DRIVELINE INSTALLATION DRIVELINE INSTALLATION Before using the pto shaft, please consult the use and maintenance manual attached to the pto Before using the pto shaft, please consult the use and maintenance manual attached to the pto shaft. shaft. In case that the pto shaft, supplied with the machine, is not used, please check that the cowlings of the machines and of tractors are overlapped to the pto shaft’s shield of 5 cm., at least. -
Page 18: Fertilizer Spreader Use
5. FERTILIZER SPREADER USE 5. FERTILIZER SPREADER USE ATTENTION! ATTENTION! Before use, please check that gears are adequately greased (see paragraph 6.1) Before use, please check that gears are adequately greased (see paragraph 6.1). ATTENTION! ATTENTION! Durin During the use of the machine, please be sure that for a radius of 30 meters there g the use of the machine, please be sure that for a radius of 30 meters there are not any person or animals. - Page 19 The spreading width will be of 9 – 12 meters, by turning the key till the arrow will be downwards (till you hear the click). After recording the spreading width remove the key. In order to obtain lower or specifi c spreading widths, use the proper pendulum (when available) or reduce the revolutions of the pto shaft.
- Page 20 3. 3. Establish the feed motion speed feed motion speed to be kept during the working (from 4km/h to 15 km/h); EXAMPLE 3: feed motion speed = 6 km/h EXAMPLE 3: feed motion speed = 6 km/h 4. 4. Control on the slide ruler the product quantity in kg/min (or lbs/ min) that will be spread; EXAMPLE 4: Product quantity to be spread = 24 kg/min EXAMPLE 4: Product quantity to be spread = 24 kg/min 5.
- Page 21 5.1.3. S 5.1.3. S PREADING CHARTS PREADING CHARTS Metrical measures Metrical measures Pendular Spreader PDV - PDHV models...
- Page 22 Imperial measures Imperial measures Pendular Spreader PDV - PDHV models...
- Page 23 5.2. 5.2. HOPPER LOAD HOPPER LOAD It is advised not to carry out the hopper loading manually but using a lifter or suitable mechanical means. ATTENTION! ATTENTION! The hopper must be loaded only after having hitched the spreader to the tractor The hopper must be loaded only after having hitched the spreader to the tractor.
- Page 24 ATTENTION! ATTENTION! Before getting off from the spreader and before every operation of maintenance Before getting off from the spreader and before every operation of maintenance and regulation, set in action the parking brake, turn off the engine, remove the and regulation, set in action the parking brake, turn off the engine, remove the ignition key from the dashboard and await the stop of all the moving parts.
-
Page 25: General Maintenance
6. GENERAL MAINTENANCE 6. GENERAL MAINTENANCE The ordinary maintenance criteria we suggest, are based on the company experience and on the advices and suggestions from our customers. Such criteria are not exhaustive can be further integrated also with the collaboration of the customers that we thanks in advance. -
Page 26: Pendulum Replacement
6.1. 6.1. LUBRICATION LUBRICATION Before every use and after every 8 hours of effective work, carry out the Before every use and after every 8 hours of effective work, carry out the greasing of the gear box greasing of the gear box. It is a good use that the greasing nipples are well cleaned up from mud or other residuals before using them for inject lubricating grease. -
Page 27: Spare Parts
6.3. 6.3. STORAGE STORAGE It is a good use not to wait for using the machine to carry out repairing and maintenance. To repair and to replace the parts that are broken or damaged before the storage, in order to have always the machine ready for being used. -
Page 28: Warranty
7. WARRANTY 7. WARRANTY All the manufactured machines, shown in this manual, are sold with one warranty valid for a year from the All the manufactured machines, shown in this manual, are sold with one warranty valid for a year from the delivery date, subjected to the following clauses: delivery date, subjected to the following clauses: ♦... -
Page 29: Parts Breakdown
8. PARTS BREAKDOWN 8. PARTS BREAKDOWN Table 01 Table 01 MOD. PDV500/600 COMPLETE FRAME MOD. PDV500/600 COMPLETE FRAME CODE REF. DESCRIPTION 613.110 Complete frame PDV500/600 model 602.007 635.013 Rectangular tube for hopper support 300.045 Screw Hexagonal-Head 12x50 300.074 4bis Screw Hexagonal-Head 12x40 300.044 Screw Round-Head 10x30 303.026... - Page 30 Table 02 Table 02 MOD. PDHV 800/1000/1250 COMPLETE FRAME MOD. PDHV 800/1000/1250 COMPLETE FRAME CODE REF. DESCRIPTION 613.111 Complete frame PDV600 model 602.008 Long front rod 602.009 Short back rod 635.014 Rectangular tube for hopper support 637.001 Right hook up bar 637.002 Shaped hook up bar 300.045...
- Page 31 Table 03 Table 03 GEAR BOX PDV MODEL GEAR BOX PDV MODEL CODE REF. DESCRIPTION 610.018 Dosing plate fi xed 304.037 Cover unit 308.002 Decal horizontal 308.003 Grease decal 300.033 Hexagonal head screw 8.8-M14x65/DM 300.034 Hexagonal head screw M5x25/rvs 300.035 Hexagonal head screw M10x20/rvs 301.046 Nut m10/rvs...
- Page 32 Table 04 Table 04 GEAR BOX PDV MODEL GEAR BOX PDV MODEL CODE REF. DESCRIPTION 332.005 Yoke (assembly) 304.110 Flange spout (long or short) 03 600.003 Spreading basin 600.004 Centre axle 301.047 Special nut spout 300.061 Special bolt yoke bearings 300.060 Bolt 10,9-M12x65/DM 300.063...
- Page 33 Table 05 Table 05 GEAR BOX PDV MODEL GEAR BOX PDV MODEL CODE REF. DESCRIPTION 304.045 Housing 303.032 Ring 624.002 Bearing ring 304.042 Bearing cap 304.043 Lock cap width adjustment 300.064 Bolt pto 10.9-M10x48 599.002 Fly wheel 304.044 Width adjustment ring 306.009 Grease nipple M8x1,25 300.065...
- Page 34 Table 06 Table 06 GEAR BOX PDV MODEL GEAR BOX PDV MODEL CODE REF. DESCRIPTION 619.026 Complete agitator crown 617.001 Agitator spring 619.023 Agitator crown 304.100 Spout plastic long 03 308.267 Pendelum label 304.046 Band grey 03 long 305.007 Pin 3x40 304.047 Middle plate (long spout) 618.016...
- Page 35 Table 07 Table 07 1.50 - 2.00 1.50 - 2.00 The codes marked with the symbol ⊕ are available in stock. For the not available codes it needs to wait for the date confi rmation of the availability of goods. GEAR BOX PDV MODEL GEAR BOX PDV MODEL CODE...
- Page 36 Table 08 Table 08 MOD. PDV 500/600 HYDRAULIC CONTROL SYSTEM MOD. PDV 500/600 HYDRAULIC CONTROL SYSTEM CODE REF. DESCRIPTION 619.029 Hydraulic opening system for PDV500/600 623.005 Hydraulic cylinder 304.023 Hydraulic tube 300.055 Screw Hexagonal-Head 12x60 300.069 Screw Hexagonal-Head 8x30 301.008 Self locking nut M12 301.001 Self locking nut M8...
- Page 37 Table 09 Table 09 MOD. PDV 800/1000/1250 HYDRAULIC CONTROL SYSTEM MOD. PDV 800/1000/1250 HYDRAULIC CONTROL SYSTEM CODE REF. DESCRIPTION 619.030 Hydraulic opening system for PDV800/1000/1250 623.005 Hydraulic cylinder 304.023 Hydraulic tube 300.055 Screw Hexagonal-Head 12x60 300.050 Screw Hexagonal-Head 8x25 301.008 Self locking nut M12 301.001 Self locking nut M8...
- Page 39 ABONADORA PENDULAR PDC 400 PDV 500 - PDV 600 PDHV 800 - PDHV 1000 PDHV 1250 MANUAL DE USO Y MANTENIMIENTO Leer atentamente este Manual antes del empleo de la máquina Abonadora Pendular modélos PDV - PDHV onadora Pendular modélos PDV - PDHV...
-
Page 40: Declaración De Conformidad
DECLARACIÓN DE CONFORMIDAD DECLARACIÓN DE CONFORMIDAD DECLARA BAJO SU RESPONSABILIDAD QUE LA MÁQUINA DECLARA BAJO SU RESPONSABILIDAD QUE LA MÁQUINA TIPO TIPO ABONADORA PENDULAR MODÉLO MODÉLO PDV - PDHV MATRÍCULA N. MATRÍCULA N. AÑO DE FABRICACIÓN AÑO DE FABRICACIÓN Satisface la Directiva Europea: 98/37/CE (que abroga y comprende las Directivas 89/392/CEE, 91/368/CEE, 93/44/CEE y 93/68/CEE) Para la adaptación de la máquina se han utilizados las siguientes Normas Armonizadas:... - Page 41 ÍNDEX ÍNDEX 1. INTRODUCCIÓN 1. INTRODUCCIÓN ..........................................42 2. INFORMACIONES GENERALES 2. INFORMACIONES GENERALES................................42 2.1. INFORMACIONES SOBRE EL MANUAL .....................42 2.2. INFORMACIONES SOBRE LA MÁQUINA ...................43 2.2.1......................43 LACA DE IDENTIFICACIÓN 2.2.2....................43 ARACTERÍSTICAS DE LA MÁQUINA 2.2.3.
-
Page 42: Informaciones Generales
1. INTRODUCCIÓN 1. INTRODUCCIÓN Las abonadoras pendulares son máquinas utilizadas para la distribución sobre el terreno de abonos sólidos granulares y semillas, y pueden ser utilizadas tanto con tractores de pequeña como de mediana potencia. Se recomienda leer atentamente el presente manual de uso y mantenimiento y atenerse escrupulosamente a las indicaciones descritas antes de efectuar cualquier uso, control y operación que haya que realizar con y sobre la máquina. - Page 43 2.2. 2.2. INFORMACIONES SOBRE LA MÁQUINA INFORMACIONES SOBRE LA MÁQUINA Los modelos de máquina presentados en este manual han sido diseñados y fabricados exclusivamente para efectuar la distribución sobre el terreno de abonos sólidos granulares y de semillas. La máquina no está...
- Page 44 Además del pendulo estandar, hay otros pendulos para diferentes aplicaciones, por ejemplo el esparcimiento del sal, donde la anchura de esparimiento está limitada desde un minimo de 2 metros hasta un máximo de 4 metros, o para usarlas en las viñas, en los huertos y los parques. Tubo Pendular Tubo Pendular Clave para la regulación del ancho...
- Page 45 2.2.3. I 2.2.3. I DENTIFICACIÓN DE LOS COMPONENTES DENTIFICACIÓN DE LOS COMPONENTES PDV 500 PDV 500 PDC 400 PDC 400 PREADER PREADER PREADER PREADER Tolva E. E. Armazon inferior B. B. Tubo pendular F. F. Protección arbol cardan C. C.
-
Page 46: Informaciones Sobre La Seguridad
3. INFORMACIONES SOBRE LA SEGURIDAD 3. INFORMACIONES SOBRE LA SEGURIDAD LAS SIGUIENTES PRESCRIPCIONES DE SEGURIDAD SIRVEN PARA PROTEGER SU INCOLUMIDAD: ES LAS SIGUIENTES PRESCRIPCIONES DE SEGURIDAD SIRVEN PARA PROTEGER SU INCOLUMIDAD: ES NECESARIO ENTONCES LEERLAS ATENTAMENTE, MEMORIZARLAS Y APLICARLAS SIEMPRE. NECESARIO ENTONCES LEERLAS ATENTAMENTE, MEMORIZARLAS Y APLICARLAS SIEMPRE. - Page 47 • La máquina está diseñada para ser utilizada por un sólo operador que, durante el empleo, debe permanecer siempre en el puesto de mando a bordo del tractor. • No trabaje jamás con esta máquina si está cansado, enfermo o bajo la infl uencia de alcohol, drogas o medicinas.
- Page 48 Conexión de la máquina al tractor Conexión de la máquina al tractor • El embrague trifásico del tractor y de la abonadora deben coincidir o ser adaptados. • Asegurarse de que el árbol cardán esté conectado correctamente después de cada operación de conexión de la máquina y que no se desenganche cuando se baja la máquina para llenar la tolva.
- Page 49 Transferencia en carretera Transferencia en carretera ¡ATTENCIÓN! ¡ATTENCIÓN! Hay que atenerse escrupulosamente al código del tráfi co en vigencia en el país ay que atenerse escrupulosamente al código del tráfi co en vigencia en el país de empleo. de empleo. Durante las transferencias en carreteras públicas, es obligatorio vaciar el Durante las transferencias en carreteras públicas, es obligatorio vaciar el contenido de la tolva.
- Page 50 3.1. 3.1. CONJUNTO DE INDICACIONES DE SEGURIDAD CONJUNTO DE INDICACIONES DE SEGURIDAD ¡ATENCIÓN! ¡ATENCIÓN! As Asegurarse de que los pictogramas de seguridad sean legibles. Limpiarlos usando egurarse de que los pictogramas de seguridad sean legibles. Limpiarlos usando un paño, agua y jabón. Sustituir las etiquetas dañadas colocándolas en la posición un paño, agua y jabón.
-
Page 51: Montaje Y Conexiones
4. MONTAJE Y CONEXIONES 4. MONTAJE Y CONEXIONES La máquina puede entregarse montada o no montada ( en ese caso seguir las instrucciones adjuntas). En ambos los casos, antes de utilizar la abonadora controre que todos elementos sean fi jados correctamente (tornillos, tuercas, bujes) y que todos los dispositivos de seguridad sean bien colocados. - Page 52 4.2. 4.2. CONEXIÓN AL ENGANCHE DE TRES PUNTOS CONEXIÓN AL ENGANCHE DE TRES PUNTOS ¡ATENCIÓN! ¡ATENCIÓN! Cada vez que se desciende del tractor, es necesario desconectar la toma de ada vez que se desciende del tractor, es necesario desconectar la toma de fuerza, detener el motor y accionar el freno de estacionamiento.
- Page 53 4.3. 4.3. MONTAJE DEL ÁRBOL CARDÁN MONTAJE DEL ÁRBOL CARDÁN Antes de utilizar el árbol cardán hay que tomar visión del manual de uso y mantenimiento anexado Antes de utilizar el árbol cardán hay que tomar visión del manual de uso y mantenimiento anexado al mismo.
- Page 54 5. EMPLEO DE LA ABONADORA 5. EMPLEO DE LA ABONADORA ¡ATENCIÓN! ¡ATENCIÓN! Antes del empleo, hay que comprobar que el grupo de transmisión esté es del empleo, hay que comprobar que el grupo de transmisión esté adecuadamente engrasado (véase el párrafo 6.1). adecuadamente engrasado (véase el párrafo 6.1).
- Page 55 El ancho de distribución será entre 9 y 12 metros, girando la llave hasta que la fl echa estará hacia abajo (hasta a oír el clic). Después del aduste del ancho de esparcimiento, quite la llave. Para obtenir un ancho de distribución más bajo o específi co, utilize el pendulo apropriado ( si está disponible) o reduzca las revoluciones del árbol cardan.
- Page 56 3. 3. Establece la velocidad de avance del tractor velocidad de avance del tractor que se quiere mantenir durante del trabajo (desde 4km/h hasta 15 km/h); EJEMPLO 3: velocidad elegida = 6 km/h EJEMPLO 3: velocidad elegida = 6 km/h 4.
- Page 57 5.1.3. T 5.1.3. T ABLAS DE DISTRIBUCIÓN ABLAS DE DISTRIBUCIÓN Medidas metricas Medidas metricas Abonadora Pendular modélos PDV - PDHV...
- Page 58 Medidas imperiales Medidas imperiales Abonadora Pendular modélos PDV - PDHV...
- Page 59 5.2. 5.2. CARGA DE LA TOLVA CARGA DE LA TOLVA Se aconseja no cargar la tolva manualmente sino utilizando un elevador o adecuados medios mecánicos. ¡ATENCIÓN! ¡ATENCIÓN! La t La tolva debe ser cargada solamente después de haber conectado la abonadora olva debe ser cargada solamente después de haber conectado la abonadora al tractor.
- Page 60 ¡ATENCIÓN! ¡ATENCIÓN! Antes de descender del tractor y antes de efectuar cualquier operación de Antes de descender del tractor y antes de efectuar cualquier operación de mantenimiento y regulación, hay que accionar el freno de stacionamiento, apagar mantenimiento y regulación, hay que accionar el freno de stacionamiento, apagar el motor y quitar la llave de encendido del salpicadero y aguardar a que se el motor y quitar la llave de encendido del salpicadero y aguardar a que se detengan todos los elementos móviles.
-
Page 61: Mantenimiento
6. MANTENIMIENTO 6. MANTENIMIENTO Se ilustran ahora los criterios aconsejados de mantenimiento ordinario de la máquina, basados en la experiencia de la empresa y en los consejos y sugerencias dados por nuestros clientes. Dichos criterios no son exhaustivos sino que pueden ser ulteriormente integrados también con la colaboración de los mismos clientes, a los cuales agradecemos anticipadamente. - Page 62 6.1. 6.1. ENGRASE ENGRASE Antes de cada empleo y después de cada 8 horas de trabajo efectivo, hay que Antes de cada empleo y después de cada 8 horas de trabajo efectivo, hay que engrasar el grupo de transmisión engrasar el grupo de transmisión. Antes de usar las cabezas de los engrasadores para inyectar grasa lubricante, es una buena norma limpiarlas antes correctamente del fango o de otros residuos.
-
Page 63: Piezas De Repuesto
6.3. 6.3. ALMACENAMIENTO ALMACENAMIENTO Es conveniente no esperar a usar la máquina para efectuar intervenciones de reparación y mantenimiento. Hay que reparar y sustituir las piezas que están rotas o dañadas antes de guardar la máquina, para poder tenerla siempre lista para ser utilizada. Almacenar la máquina en un lugar reparado de agentes atmosféricos y protegerla, para evitar que se deteriore. - Page 64 7. GARANTÍA 7. GARANTÍA Todas las máquinas producidas, presentadas en este Manual, se venden con una garantía de un año a Todas las máquinas producidas, presentadas en este Manual, se venden con una garantía de un año a partir de la fecha de entrega, y está sujeta a las siguientes cláusulas: partir de la fecha de entrega, y está...
- Page 65 8. TABLAS DESPIECES 8. TABLAS DESPIECES Tabla 01 Tabla 01 MOD. PDV500/600 CHASIS MOD. PDV500/600 CHASIS Código REF. DESCRIPCIÓN 613.110 Chasis completo mod.PDV500/600 602.007 Vara 635.013 Tubo rectangular para sostener la tolva 300.045 Tornillo cabeza hexagonal 12x50 300.074 4bis Tornillo cabeza hexagonal 12x40 300.044 Tornillo TTQST 10x30 303.026...
- Page 66 Tabla 02 Tabla 02 MOD. PDHV 800/1000/1250 CHASIS MOD. PDHV 800/1000/1250 CHASIS Código REF. DESCRIPCIÓN 613.111 Chasis completo mod.PDV600 602.008 Vara anterior larga 602.009 Vara posterior corta 635.014 Tubo rectangular para sostener la tolva 637.001 Vara elevación recta 637.002 Vara elevación - opcional 300.045 Tornillo cabeza hexagonal 12x50 300.074...
- Page 67 Tabla 03 Tabla 03 GRUPO REDUCTOR MOD. PDV GRUPO REDUCTOR MOD. PDV Código REF. DESCRIPCIÓN 610.018 Chapa fi ja para dosifi car 304.037 Caja protección reductor 308.002 Etiqueta horizontal 308.003 Etiqueta engrase 300.033 Tornillo cabeza hexagonal 8.8-M14x65/DM 300.034 Tornillo cabeza hexagonal M5x25/rvs 300.035 Tornillo cabeza hexagonal M10x20/rvs 301.046...
- Page 68 Tabla 04 Tabla 04 GRUPO REDUCTOR MOD. PDV GRUPO REDUCTOR MOD. PDV Código REF. DESCRIPCIÓN 332.005 Horquilla (montada) 304.110 Brida pendulo (corto o largo) 03 600.003 Cuenca superior 600.004 Eje central 301.047 Tuerca especial brida 300.061 Tornillo especial para cojinete 300.060 Tornillo 10,9-M12x65/DM 300.063...
- Page 69 Tabla 05 Tabla 05 GRUPO REDUCTOR MOD. PDV GRUPO REDUCTOR MOD. PDV Código REF. DESCRIPCIÓN 304.045 Protección cojinete 303.032 Arandela 624.002 Arandela (aro) cojinete 304.042 Tapa cojinete 304.043 Tapa para regular - anchura 300.064 Buje cardan 10.9-M10x48 599.002 Volante 304.044 Equipo llave para regular la anchura 306.009 Engrasador M8x1,25...
- Page 70 Tabla 06 Tabla 06 GRUPO REDUCTOR MOD. PDV GRUPO REDUCTOR MOD. PDV Código REF. DESCRIPCIÓN 619.026 Grupo agitador extra 617.001 Resorte para fi jar agitador extra 619.023 Agitador corona extra 304.100 Pendulo plástica largo l=558 308.267 Etiqueta pendulo 304.046 Faja pendulo grisa 03 305.007 Pasador faja 3x40 304.047...
- Page 71 Tabla 07 Tabla 07 1.50 - 2.00 1.50 - 2.00 Los códigos ⊕ están disponibles sono disponibili en existencias. Para los códigos que no están disponibles se necesita esperar la confi rmación de la fecha de disponibilidad de la mercancía. PENDULO MOD.
- Page 72 Tabla 08 Tabla 08 MOD. PDV 500/600 APERTURA HIDRÁULICA MOD. PDV 500/600 APERTURA HIDRÁULICA Código REF. DESCRIPCIÓN 619.029 Apertura hidráulica PDV500/600 623.005 Cilindro hidráulico 304.023 Goma hidráulica 300.055 Tornillo cabeza hexagonal 12x60 300.069 Tornillo cabeza hexagonal 8x30 301.008 Tuerca aut.alto M12 301.001 Tuerca aut.alto M8 303.007...
- Page 73 Tabla 09 Tabla 09 MOD. PDV 800/1000/1250 APERTURA HIDRÁULICA MOD. PDV 800/1000/1250 APERTURA HIDRÁULICA Código REF. DESCRIPCIÓN 619.030 Apertura hidráulica PDV800/1000/1250 623.005 Cilindro hidráulico 304.023 Goma hidráulica 300.055 Tornillo cabeza hexagonal 12x60 300.050 Tornillo cabeza hexagonal 8x25 301.008 Tuerca aut.alto M12 301.001 Tuerca aut.alto M8 303.007...
- Page 74 ....................................................................................................................................................................................................................................................................................................................................................................................................................................................................................................................................................................................................................................................................................................................................................................................................................................................................................................................Pendular Spreader PDV - PDHV models - Abonadora Pendular modélos PDV - PDHV...
Need help?
Do you have a question about the PDC 400 and is the answer not in the manual?
Questions and answers