
Summary of Contents for Martin TRACKPOD
- Page 1 ARTIN RACK ARTIN RACK BETA BETA Getting Started Fifth Edition: November 2001 Martin TrackPod 2.0 Page 1 www.audiovias.com...
- Page 2 Martin TrackPod, by Acoustic Positioning Research Incorporated, Edmonton, Canada. Protected by international patents pending PCT/ CA98/00684. Lighting control portions of the TrackPod software are licensed exclu- sively world-wide to Martin Professional A/S, Denmark by APR inc. Virtual positioning control technology is licensed non-exclusively to Martin Professional A/S by APR.
-
Page 3: Table Of Contents
Contents General warnings Laser information Laser safety Welcome What’s included in the TrackPod package What’s NOT included in the package Software installation TrackPod card installation TrackPod assembly TrackPod connections TrackPod placement TrackPod controller Before you begin TrackPod calibration Automatic calibration... -
Page 4: General Warnings
Set the appropriate access priviledges in the preferences screen of the TrackPod software. 6. The laser aperture is not blocked by a lid or cap. 7. The F3 button in the TrackPod controller is pressed. Releasing the F3 button stops laser emission. Page 4 Getting Started www.audiovias.com... -
Page 5: Laser Safety
4. Only qualified and trained employees approved by a laser safety officer should be assigned to install, adjust and calibrate the TrackPod. 5. When not in use, the TrackPod should be stored safely out of reach of unauthorized personnel. 6. Do not remove the warning label on the TrackPod’s general purpose attachment plate. -
Page 6: Welcome
This booklet contains introductory information on how to set up and use your system. To get the most out of the TrackPod, like with any other sophisticated controller, the lighting designer or technician will need to familiarise him or herself with the system. -
Page 7: Trackpod Card Installation
GeForce 2 or 3 recommended TrackPod card installation The TrackPod card is an 8-bit ISA card that needs to be inserted into your PC. Make sure the PC is turned off and its power cord is unplugged from the wall. Remove the PC chassis cover as discussed in your PC owner’s manual. -
Page 8: Trackpod Assembly
Please note that in the great majority of cases the default address is fine. If you are aware that other hardware in the PC is using the TrackPod default address, or if you are experiencing unexpected system crashes, then perform this procedure. -
Page 9: Trackpod Connections
The male XLR “IN” connector is used to hook the TrackPod up to the TrackPod card in the PC. This is done with the supplied serial cable (which is the same as DMX cables, using pins 1 and 2). - Page 10 It is likewise possible (and desirable!) to have a TrackPod aim frontally but controlling several side and back followspots on the performer. In short, the TrackPod does not need to be placed colinear with the fixtures that it is controlling. This...
-
Page 11: Trackpod Controller
(or VIP box!). On the other hand, if you are tracking a small stage you may place the TrackPod on a short platform or riser on the stage. One important rule: always place the TrackPod higher than your performers. -
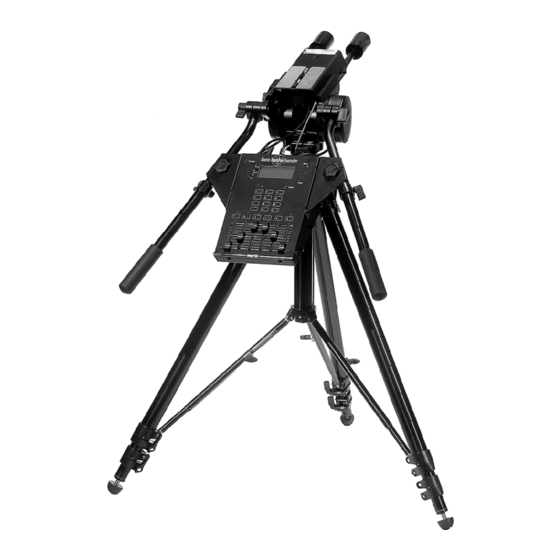
Page 12: Before You Begin
FIGURE 4 - The TrackPod controller Before you begin The TrackPod can be powered by either 115 or 230V. Please ensure that the switch on the back of the controller is set to the appropriate voltage before connecting it to the mains. Also, make sure that the power is properly grounded. -
Page 13: Trackpod Calibration
TrackPod calibration The software must know the precise 3D location and orientation of each TrackPod with respect to the centre of the stage: this is called “calibrat- ing the TrackPod”. There are two ways of performing the calibration: automatic and manual. - Page 14 Make sure to read the “warnings” section of this manual (pages 4-5) before attempting this step. The first screen that appears on the TrackPod display when it is con- nected to a PC that runs the software, shows the TrackPod number and options for playback or calibration.
-
Page 15: Manual Calibration
To use this method you must measure the exact position in metres (or ft-inches) of each TrackPod relative to the origin. Upstage Height over... -
Page 16: After Trackpod Calibration
Measure the XY and Z distance from the centre of the TrackPod head to the central stagemark following the convention shown in Figure 6: • At the central stagemark the X, Y and Z are zero. • X is the stage width, with positive values towards stage left and negative values towards stage right. - Page 17 Tip: if you want your lighting board to control fixtures by sending them DMX through the TrackPod, you will need to define those fixtures in your console in the same way that if you did not have the TrackPod in between.
-
Page 18: Basic Light Definition
Basic light definition The TrackPod supports up to 1000 DMX fixtures or devices, using up to 3584 DMX channels (with three optional DMX cards, 512 is the standard). The system needs to know specific information about the lights that you will be controlling. To enter this information choose “Fixtures”... -
Page 19: Followspot Calibration
PC software. One advantage of calibrating fixtures from the TrackPod controller is that usually it is located close to the stage so it is easier to see if the beams are directed at the stagemarks. On the other hand, if you would like to calibrate many fixtures at once doing it from the PC might be preferable. - Page 20 • Once you have chosen your followspot calibration points you can select which fixture to calibrate. Press the up or down arrow selection keys to the right of the TrackPod controller’s display. This will let you Page 20 Getting Started...
- Page 21 Use the five stagemarks previously measured for an automatic TrackPod calibration in the stage set-up (see Figure 5). This is the fastest and most accurate option. ii) Define new followspot calibration points. This option should only be...
- Page 22 Use your DMX board and capture its data. If you have a DMX console connected to the TrackPod you may find it easier to point the light at the calibration points by using the console’s trackball, touchpad, tablet, joystick or sliders rather than using the TrackPod software.
-
Page 23: Manual Calibration
Start using the system! Once TrackPod and fixture calibrations have been completed you can start using the system right away. Press 1 in the TrackPod controller to start playback. Now press 1 and OK to load all the calibrated followspots. Finally, move the first fader to bring up the dimmer. To load different fixtures press the up and down arrow to browse through the fixture list and press OK to load a selected group or fixture. - Page 24 • Set fixture specific parameters for tweaking performance. For in- stance, control P/T Speed (or M Speed) to make movement smoother or faster. For Martin fixtures, ensure that the pan and tilt offsets in the adjustment > calibration internal menu are set to 127.
-
Page 25: A Tour Of The Trackpod Software
A tour of the TrackPod software The TrackPod software runs on Windows operating systems. When you first run the program you specify whether you want a simple or an advanced interface. You may change this option at any time by selecting the “Interface”... - Page 26 Wall tool - Creates a wall (multiple clicks to set start and end points and right click to set a height). When a TrackPod points at a wall it will automatically direct the followspots to go up the wall.
- Page 27 Most inspectors are self-explanatory but here is a discussion on some important inspectors: TrackPod inspector - View and edit the name of the TrackPod, its colour, visibility and Head ID number (which can also be entered during TrackPod calibration). Shows the XYZ coordinates of the TrackPod target and the name of the loaded map, if any.
- Page 28 The location button opens a window where the position and orientation of the TrackPod can be viewed or entered. Tip: normally, the TrackPod’s location is determined by an automatic calibration.
- Page 29 TrackPod inspector. Here you can view or enter the distances between the five stagemarks used to calibrate the TrackPod. Tip: the distances can be entered as well directly in the TrackPod controller when performing a TrackPod calibration.
-
Page 30: Fader Patch
All of these actions will be called simultaneously when the console loads the map. You can define up to 255 maps for each TrackPod and these can be loaded at the same time that individual fixtures or groups are loaded directly. -
Page 31: Height Control
1.5 metres, which is an average height to light performers’ faces. This target height can be changed during playback by moving the sixth fader in the TrackPod controller. If you bring the sixth fader all the way down the target height will be zero and all the followspots will be directed at the stage floor. -
Page 32: Megapod
Target height = 0.3m Stage FIGURE 11 - Target height explained. The TrackPod is pointing at both the actor and the dog but the followspot is directed at the actor if the target height is set to 1.5 m and at the dog if the target height is set to 0.3 m. -
Page 33: Using The New Console Driver
(the driver uses 15 chan- nels). By default the TrackPod is set to listen to channels 498 to 512 on the link but this can be changed in the preferences. This process is similar to how you would assign an address to a fixture. -
Page 34: Real Time - Playback
The F1 key toggles the display to show the exact XYZ coordinates where the TrackPod is pointing to. Also, the DMX values of the faders are displayed. The F2 key shows the page notes for the current fader page and if pressed again any map notes. -
Page 35: Example
Example Here are the necessary steps to have a TrackPod control pan and tilt for a number of lights to follow a performer, with a few DMX channels controlled by the faders and the rest by the main lighting board: 1. -
Page 36: For Further Reference
It is strongly recommended that users attach a viewing device, particu- larly if a) the lights are not shining from the same location as the TrackPod, b) the stage area or throw area is large, and c) there is a large number of automated followspots. - Page 37 Martin TrackPod 2.0 Page 37 www.audiovias.com...
- Page 38 Martin Professional A/S APR inc. Olof Palme Allé 18 Suite 200, 8526-109 St. 8200 Aarhus, Denmark Edmonton, Alberta www.martin.dk T6G 1E5 Canada Page 38 Getting Started www.audiovias.com...
Need help?
Do you have a question about the TRACKPOD and is the answer not in the manual?
Questions and answers