Advertisement
Table of Contents
Advertisement
Table of Contents

Subscribe to Our Youtube Channel
Related Manuals for Bushnell CORE DS-4K


Summary of Contents for Bushnell CORE DS-4K
- Page 1 CORE DS-4K / S-4K INSTRUCTION MANUAL DS-4K MODEL #119987C / S-4K MODEL #119949C...
- Page 2 WELCOME Thank you for purchasing a Bushnell Trail Camera! This manual has all the instructions you need to set up your camera and your account, plus quick answers to your questions. If your camera does not seem to be functioning properly or if you are having image quality issues, please check the Troubleshooting Tips section.
-
Page 3: Table Of Contents
TABLE OF CONTENTS Camera Overview Viewscreen Indicators Quick Start Guide Helpful Setup Tips Buttons & Functions Overview Settings Menu Reviewing & Deleting Photos & Videos Troubleshooting Tips Technical Specifications Two Year Limited Warranty... -
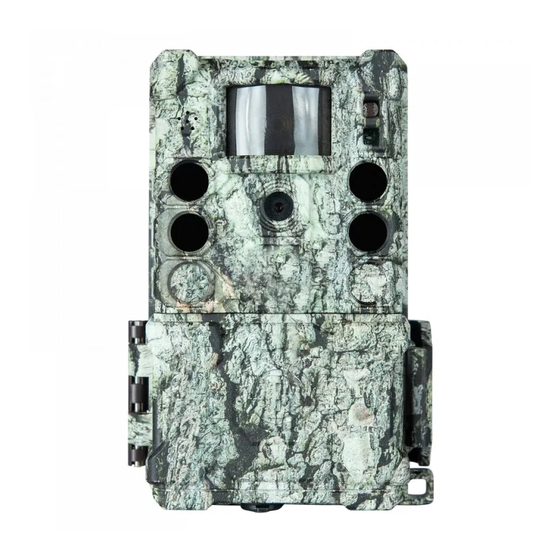
Page 4: Camera Overview
CAMERA OVERVIEW CORE DS-4K / CORE S-4K PIR Sensor Light Sensor Video Mic Motion Indicator Daytime Lens LED IR Flash Nighttime Lens (only on Core DS-4K) Control Panel Latch Cover Lock Hole DC In (For optional solar panel accessory) USB Port... -
Page 5: Viewscreen Indicators
View Screen Selector Switches SD Card Slot Menu Battery Tray Power On/Off Release Battery Tray VIEWSCREEN INDICATORS Current Mode Current Image Resolution Current Images (Megapixels) Captured Time Stamp Image Capacity Left Field Scan On SD Card Inserted Battery Life Countdown Timer... -
Page 6: Quick Start Guide
QUICK START GUIDE 1. Make sure camera power switch is in the OFF position. 2. Install 6 AA batteries (lithium or alkaline, lithium batteries are recommended). 3. Make sure the write-protect switch on the side of the SD card is “OFF” (not in the “Lock” position.) Insert card (up to 512GB max). - Page 7 4. Switch the power ON. 5. Set the date and time. 6. Mount the camera using the tree strap. Your camera is now ready to use at its default settings: photo mode, 10 sec intervals between photos, medium resolution, “Long Range” illumination mode. If you would like to customize your settings, see the Settings Menu section.
-
Page 8: Helpful Setup Tips
HELPFUL SETUP TIPS LEARN YOUR CAMERA AT HOME FIRST We highly recommend that you first spend some time indoors with this manual and your camera to familiarize yourself with the Settings Menu and various functions like Video capture, as well as read the tips to help you mount it properly on a tree (see Mounting &... - Page 9 Inserting Insert the SD card into the card slot with its label side facing the front of the camera. A “click” sound indicates that the card is installed successfully. If the wrong side of the card is facing up, you will not be able to insert it. Formatting To assure the card is formatted to save images and video correctly, format the SD card by using the “Format”...
- Page 10 MOUNTING & POSITIONING After you’ve set up the camera’s settings to your preferences, you’re ready start capturing images. We recommend mounting the camera on a sturdy tree or post with a diameter of about 6 in. To get the optimal picture quality, the camera should be about 16-17 ft.
- Page 11 USING A SOLAR PANEL ACCESSORY You can connect an optional Solar Panel accessory (model# 119986C) – please visit www.bushnell.com for more information) to the “DC In” jack on the bottom of your camera. Other external power supplies should not be used, as the camera and/or display may not function correctly.
-
Page 12: Buttons & Functions Overview
BUTTONS & FUNCTIONS OVERVIEW Power Off Function • “Safe” mode when replacing the SD card or batteries. • When transporting the camera. • When connecting camera to a computer’s USB port to download your photos/ videos. • When storing the camera. NOTE: Remove batteries before storing for a long time. -
Page 13: Settings Menu
Right & Left Arrow Function • Press right button to go forward in the menu setting options, press left arrow to go backward. Up & Down Arrow Function • Press to go up or down to choose a specific setting in the menu option you are currently viewing. - Page 14 Trail: Medium Image Size, 1 Picture Capture, 0.5s Interval Food Plot: High Image Size, 1 Picture Capture, 2S Interval, Field Scan ON 5:30-9:00/15:30-19:30 with 5M Interval Advanced: To customize all settings. Mode Selects the format your camera will record in. Camera: For photos only.
- Page 15 Capture Number Selects how many photos are taken in sequence per trigger. This setting affects photos taken in Camera, Hybrid, and Field Scan mode. Image Format Selects the aspect ratio of your photos. 16:9 Illumination Mode Selects the shutter speed. Note: These settings only affect the quality of your nighttime images.
- Page 16 Camera Name Allows you to enter a name for your camera that will appear on the image time stamp. Press the OK button to choose “Input” and go to the name input screen. If necessary, select the arrow in the upper right of the keyboard to erase the current camera name, then enter the new name using the arrow buttons and keyboard.
- Page 17 Delay Selects the length of time that the camera will “wait” until it responds to any additional triggers from the PIR. Settings begin with 10 second default when parameter is first selected. To choose other intervals, press OK, and select by using the arrow buttons. The shorter your delay, the more images you’ll get.
- Page 18 Format Deletes all files stored on a card to prepare it for reuse. Always format a card that has been previously used in other devices. Caution! Make sure you have downloaded and backed up any files you want to save first! Time Stamp Selects on or off for time stamps, current temperature, moon phase,...
-
Page 19: Reviewing & Deleting Photos & Videos
Firmware Version If you choose to update firmware, this is the screen you’ll use. See firmware update instructions at https://www. bushnell.com/bu-product-software- updates.html or call Customer Service at (800) 423-3537 for details. REVIEWING & DELETING PHOTOS & VIDEOS After you have setup, mounted and activated your camera, you will return later and review the images it has captured. -
Page 20: Troubleshooting Tips
Possible Cause Batteries not fully installed, or not installed correctly. Recommended Solution(s) • Install new AA alkaline or Bushnell recommended Energizer® Lithium AA batteries. • Make sure the positive (+) and negative (–) poles are lined up properly in each compartment, with (–) pole making contact with the spring. - Page 21 0.5 second will decrease battery life. Typically, you will be able to capture several thousand images before the batteries die. Recommended Solution(s) • Make sure you install all new alkaline or Bushnell recommended Energizer® Lithium AA batteries. • Use Bushnell recommended SanDisk® brand SD Cards.
- Page 22 6) Night images or videos look too dark. Possible Cause Batteries are low or Settings are not set for good night quality. Recommended Solution(s) • Check battery power. If low, replace. • Check distance of subject from camera. If beyond 80’, subject may not be in flash range.
- Page 23 • Make sure Light Sensor on camera is not in shade while camera is aimed into a bright area during day. 9) Daytime images or videos look too bright. Possible Cause Camera is aimed at a dark area during the day. Recommended Solution(s) •...
- Page 24 Possible Cause “TIMESTAMP” setting is off. Recommended Solution(s) • Go to the Settings Menu, select “TIMESTAMP”, select “ON”. 13) Viewscreen powers on, but no text appears. Possible Cause Batteries are low or dead. Recommended Solution(s) • Replace with new AA Alkaline or Lithium batteries. 14) Viewscreen comes on but then powers off.
-
Page 25: Technical Specifications
B do not overlap. (Ex: If start time of A is 10am, stop time of B cannot be 8am). TECHNICAL SPECIFICATIONS CORE DS-4K #119987 Lens - FOV=50° Horizontal Display Screen - 1.5” Color Image Size (pixel count in 16:9 format) •... - Page 26 Operation - User selectable: 24 Hour, Day only, or Night only (based on ambient light level) Response Time - 0.15 second (Photo), 0.5 second (Video). 0.5 second interval Delay - 0.5s - 60s and 1m-60m programmable Images per Trigger - 1—6 programmable Illumination Mode - Low, Fast Motion, Long Range (120’...
- Page 27 TECHNICAL SPECIFICATIONS CORE S-4K #119949 Lens - FOV=50° Horizontal Display Screen - 1.5” Color Image Size (pixel count in 16:9 format) • Low- 2MP = 2048x1152 • Medium 4MP = 2592x1464 • High- 23MP = 6400x3600 Image Size (pixel count in 4:3 format) •...
- Page 28 Illumination Mode - Low, Fast Motion, Long Range (110’ maximum range) Power Supply - 6x AA batteries, lithium (recommended) or alkaline Stand-by Current - > 0.8mW Average Battery Life* approx. 12 mos. at 30 images per day average (15 day, 15 night w/LEDs) Operating Temperature -20 - 60°C (Storage temperature: -30 - 70°C)
-
Page 29: Two Year Limited Warranty
TWO-YEAR LIMITED WARRANTY Your Bushnell® product is warranted to be free of defects in materials and workmanship for two years after the date of purchase. In the event of a defect under this warranty, we will, at our option, repair or replace the product, provided that you return the product postage prepaid. - Page 30 For products purchased outside the United States or Canada please contact your local dealer for applicable warranty information. In Europe you may also contact Bushnell at: Bushnell Germany GmbH European Service Centre Mathias-Brüggen-Str. 80 D-50827 Köln GERMANY Tel: +49 221 995568-0 Fax: +49 221 995568-20 This warranty gives you specific legal rights.
- Page 31 used in accordance with the instructions, may cause harmful interference to radio communications. However, there is no guarantee that interference will not occur in a particular installation. If this equipment does cause harmful interference to radio or television reception, which can be determined by turning the equipment off and on, the user is encouraged to try to correct the interference by one or more of the following measures: •...
- Page 32 For further questions or additional information please contact: Bushnell Outdoor Products 9200 Cody, Overland Park, Kansas 66214 (800) 423-3537 | www.bushnell.com ©2021 Bushnell Outdoor Products...
Need help?
Do you have a question about the CORE DS-4K and is the answer not in the manual?
Questions and answers